FHB Logo Facebook LinkedIn Email Pinterest Twitter X Instagram Tiktok YouTube Plus Icon Close Icon Navigation Search Icon Navigation Search Icon Arrow Down Icon Video Guide Icon Article Guide Icon Modal Close Icon Guide Search Icon Skip to content
Subscribe
Log In
  • How-To
  • Design
  • Tools & Materials
  • Restoration
  • Videos
  • Blogs
  • Forum
  • Magazine
  • Members
  • FHB House
  • Podcast
Log In

Fine Homebuilding Project Guides

Wiring

Guide Home
  • Working with Electricity
  • Tools and Materials
  • Receptacles and Switches
  • Lights and Fans
  • Rough-In
  • Outdoor Wiring
  • Panels and Subpanels
How-To

Cutting Boxes into Existing Walls and Ceilings

Retrofit a cut-in box (or a pancake box) into plaster or drywall.

By Mike Litchfield, Michael McAlister
  • X
  • facebook
  • linkedin
  • pinterest
  • email
  • add to favorites Log in or Sign up to save your favorite articles

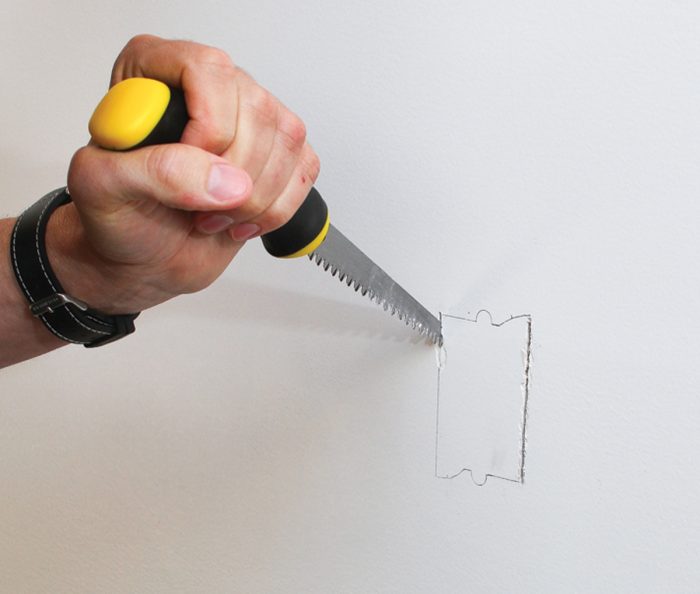
Cutting a Wall Box into Plaster

If existing house wiring is in good condition and an existing circuit has the capacity for an additional outlet, turn off the power, cut a hole in the wall, fish cable to the location, and secure a remodel box (cut-in box) to the finish surface. This process is called cutting-in or retrofitting a box, and, of course, it requires boxes with special mounting mechanisms.

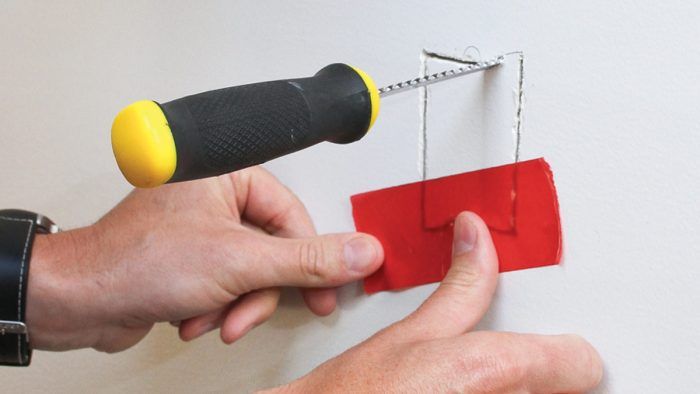
Hold the new box at the same height as other outlet or switch boxes and trace its outline onto the wall. Use a stud finder or drill a small exploratory hole to locate studs or wood lath behind. Look for water pipes or other wires. If you hit a stud, move the box. If you hit lath, keep drilling small holes within the opening to find the edges of the lath. If you position the box correctly, you’ll need to remove only one or two lath sections 1.

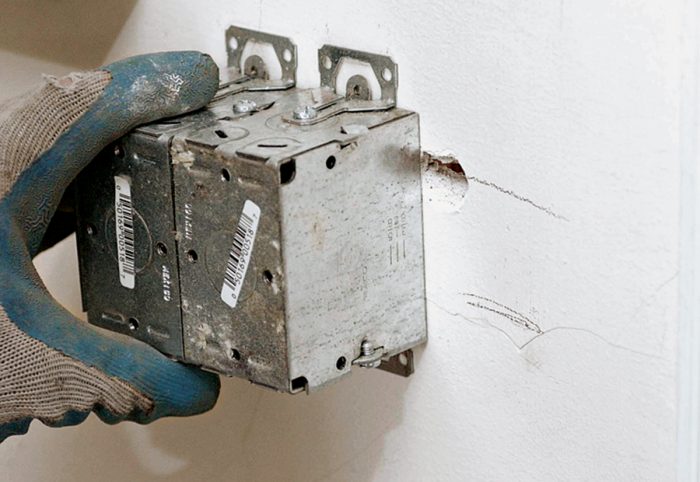
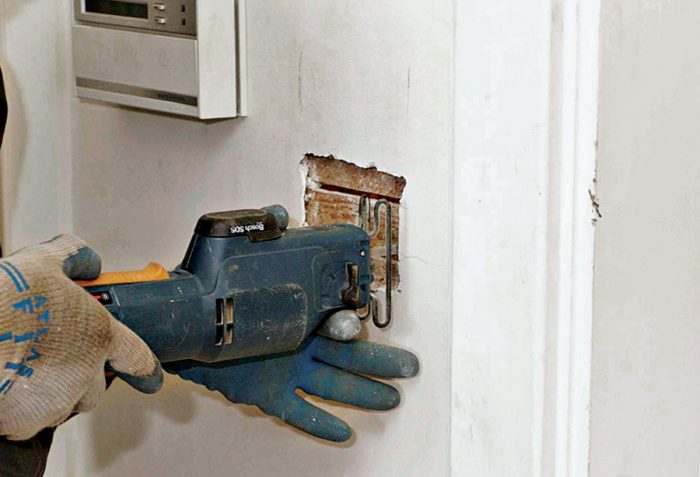
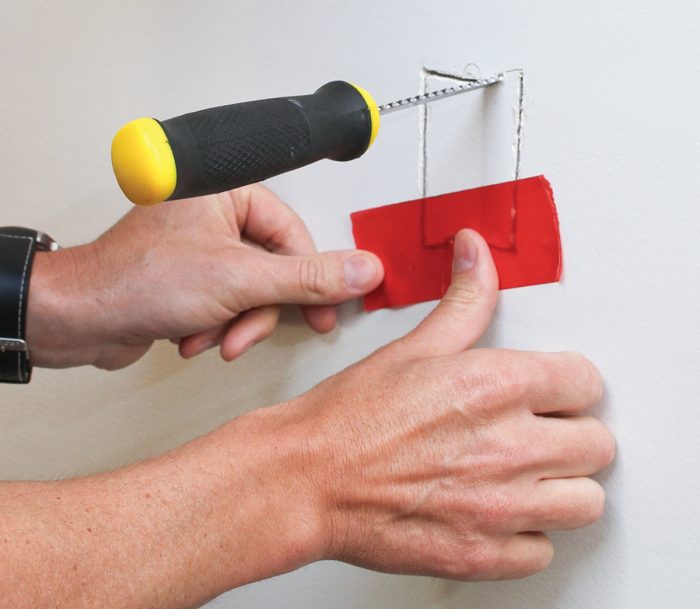
Use a utility knife to score along the outline to minimize plaster fractures. Remove the plaster within the outline using a chisel. Then cut out the lath, using a cordless jigsaw, sabersaw, or, even better, an oscillating multi-tool with a Universal E-Cut blade 2. As you cut through the lath strip, alternate partial cuts from one side to the other to avoid cracking the plaster. Then carefully remove the plaster beneath the box ears, so they can rest on lath. Before inserting cut-in boxes, remove box knockouts, insert cable clamps, strip sheathing off the ends of incoming cable, and feed cable into the cable clamps. If more than one cable enters the box, write the destination of each on the sheathing. Secure the box by screwing its ears to the lath 3.

Position the box and then trace the box outline onto the wall.
1 Position the box and then trace the box outline onto the wall.
Use a sabersaw to cut lath.
2 After you chisel out the plaster within the outline, use a sabersaw to cut lath.
After fishing and pulling cable, secure the box to the wall.
3 After fishing and pulling cable, secure the box to the wall.

Cutting a Wall Box into Drywall

Adding a cut-in box to drywall is essentially the same as adding one to plaster. Start by drilling a small exploratory hole near the proposed box location to make sure there’s no stud in the way.

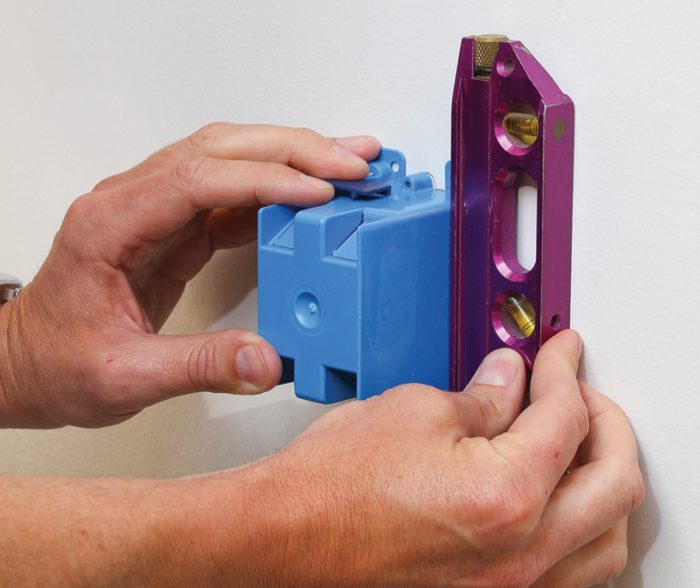
There are a number of cut-in boxes to choose from. The most common have side-mounted ears that swing out or expand as you turn their screws. Hold the box against the drywall, plumb it 1, then trace the outline of the box onto the wall 2. Align the blade of a jab saw (drywall saw) to the line you want to cut and hit the handle of the saw with the heel of your hand 3.

There is no one right way to cut out a box opening; just take it slow. If the box outline is intricate or the jab saw produces a ragged line, switch to a utility knife. If you secure the cutout with a piece of painter’s tape 4 as you finish the cut, the drywall’s paper face will be less likely to tear and the cutout won’t fall into the wall cavity—useful, should you need to patch the hole.

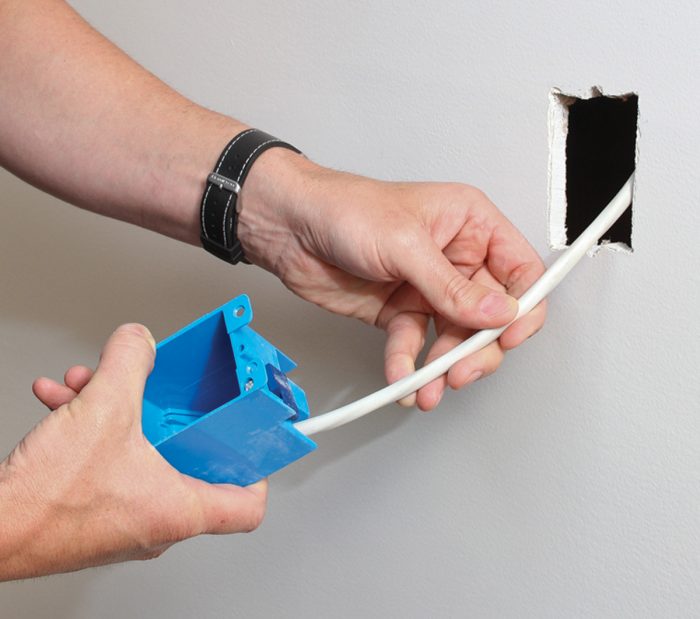
Run cable(s) to the new outlet, remove knockout(s) in the box, and slide the box onto the cable and into the opening 5. Code does not require that you add cable clamps for a single-gang plastic box—integral plastic clamps in the box will secure the cable.

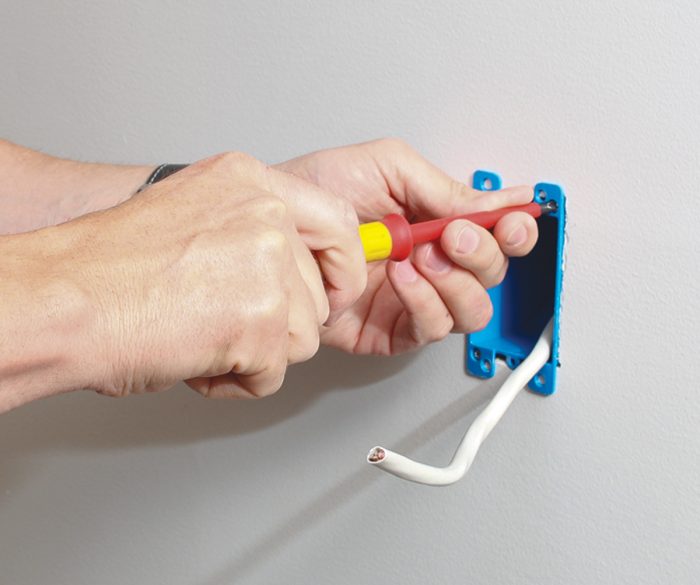
Tighten the box mounting screws 6, which will expand side-mounted ears to extend and draw the box tight to the drywall 7.

Locate the new outlet between studs, then plumb it.
1 Locate the new outlet between studs, then plumb it.
Trace the box outline onto the drywall.
2 Carefully trace the box outline onto the drywall.
Use a jab saw to cut the opening in drywall.
3 Use a jab saw to cut the opening in drywall.
Attach a piece of painter’s tape to the cutout.
4 Attach a piece of painter’s tape to the cutout.
Feed cable into the box
5 Feed cable into the box, and insert the box into the hole.
Tightening electrical box screws
6 Tighten the mounting screws.
Extending side-mounted ears on the cut-in box.
7 This will extend side-mounted ears on the cut-in box.
Pro Tip: If you need to splice two or more cables, use a 4-in. octagonal or round box instead of a pancake box.


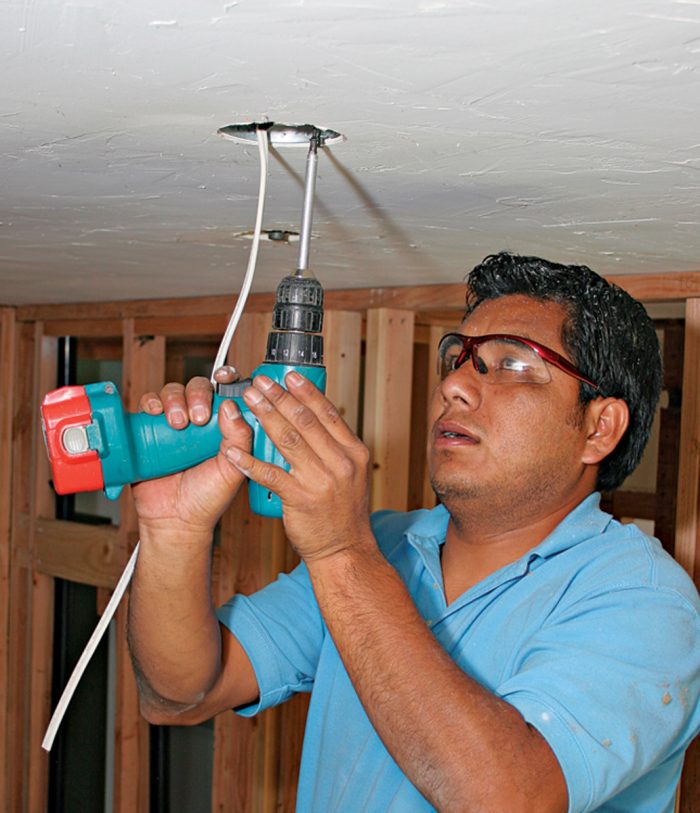
Retrofitting a Ceiling Box

As with all retrofits, turn off power to the area and explore first. Follow the mounting recommendations for your fixture. Attach the fixture box to framing.

If there’s insulation in an attic above, remove it from the affected area. Be sure to wear eye protection and a dust mask when drilling through any ceiling—it’s a dusty job.

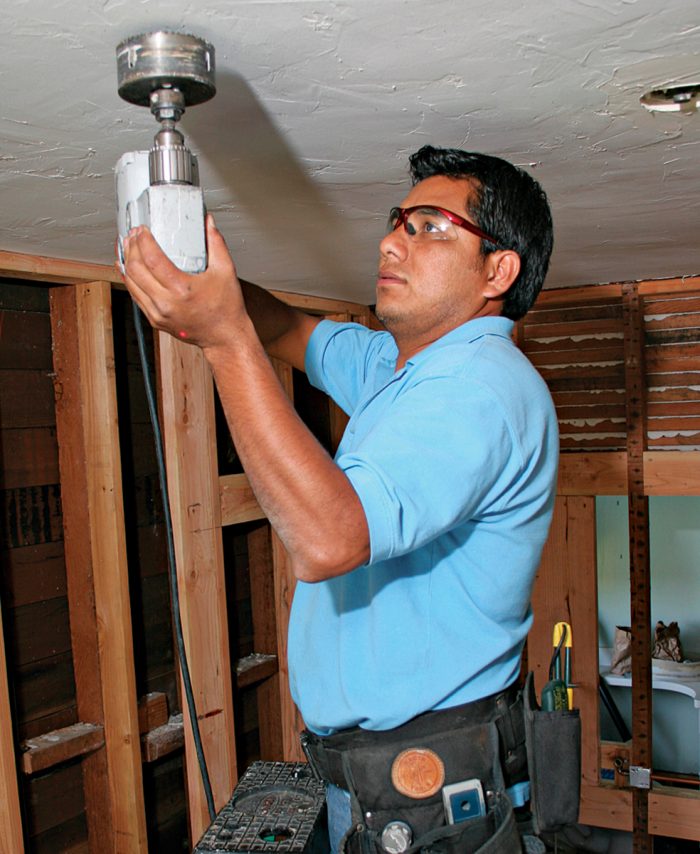
Mark the box location and use a fine-tooth hole saw to cut through plaster or drywall 1. Place the centering bit of the hole saw on the exact center of the box opening. Drill slowly so you don’t damage adjoining surfaces—or fall off the ladder.

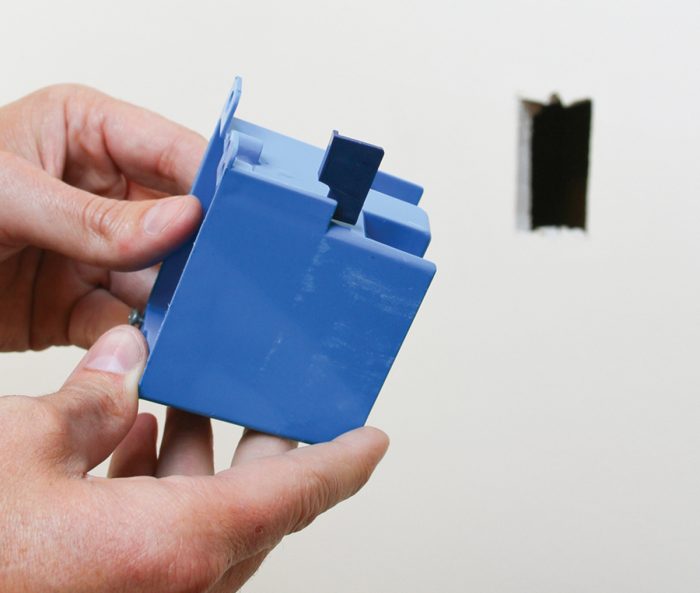
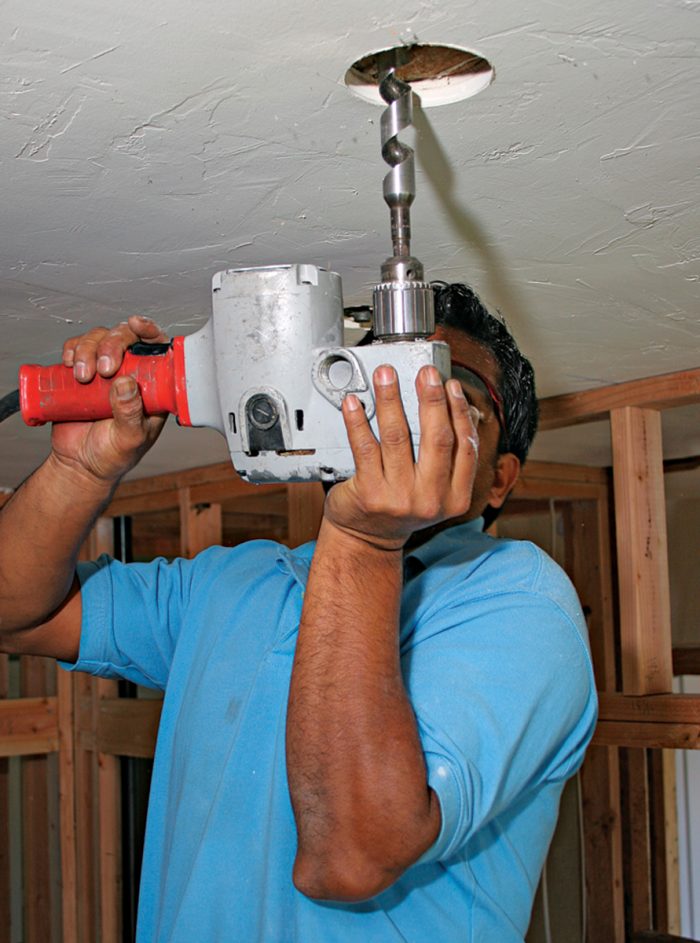
If the ceiling is drywall, you’re ready to run cable through the hole in the ceiling. If the ceiling is plaster, cut through the lath or leave the lath intact and screw a pancake box through the lath and into the framing. Before attaching a pancake box, remove a knockout, test-fit the box in the hole, and trace the knockout hole onto the lath. Set the box aside and drill through the lath, creating a hole through which you can run cable 2.

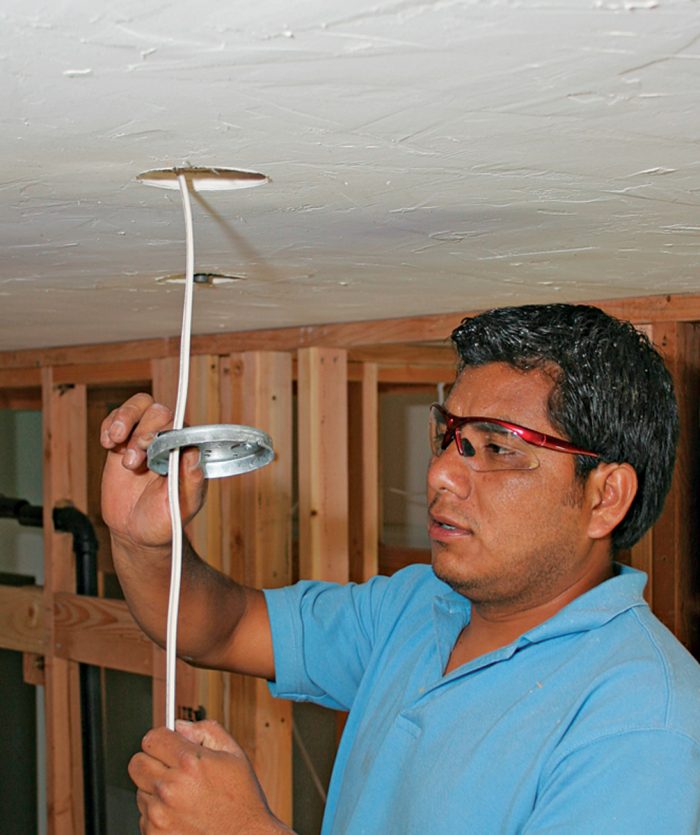
Feed cable to the location and fit a cable connector into the box. Insert the cable into the connector, slide the box up to the ceiling 3, and secure it 4. Strip the cable sheathing and attach the ground wire to a ground screw in the box. Strip insulation from the wire ends and you’re ready to connect the light fixture.

Use a fine-tooth hole saw to cut the box hole.
1 Use a fine-tooth hole saw to cut the box hole.
Drill through the lath
2 Drill through the lath
Fish cable through the lath and feed it through the box.
3 Fish cable through the lath and feed it through the box.
Screw the pancake box to framing or blocking.
4 Screw the pancake box to framing or blocking.


Wiring Complete, 3rd Edition

Excerpted from Wiring Complete, 3rd Edition (The Taunton Press, 2017) by Michael Litchfield and Michael McAlister

Available in the Taunton Store and at Amazon.com.

Previous: Electrical Retrofit — Working with Old Wires Next: How to Install an “Old-Work” Electrical Box

Guide

Wiring

Chapter

Rough-In

Sign up for eletters today and get the latest how-to from Fine Homebuilding, plus special offers.

Signing you up...

This site is protected by reCAPTCHA and the Google Privacy Policy and Terms of Service apply.
See all newsletters
See all newsletters

Log in or create an account to post a comment.

Sign up Log in

Become a member and get full access to FineHomebuilding.com

Wiring

Wiring

Trusted, code-compliant guidance from the pros for working safely on any wiring project

View Project Guide

View All Project Guides »

Become a member and get unlimited site access, including the Wiring Project Guide.

Start Free Trial

Working with Electricity
  • Basics
  • Safety
  • Troubleshooting and Upgrades
Tools and Materials
  • Electrical Tools
  • Electrical Boxes
  • Cables and Wires
Receptacles and Switches
  • Materials
  • Wiring Receptacles
  • Wiring Switches
Lights and Fans
  • Lighting Design
  • Installing Lights
  • Fans
Rough-In
  • Planning
  • Installing Electrical Boxes
  • Running Cable
  • Retrofit Work
  • Making Connections in Boxes
  • Electrical Conduit
Outdoor Wiring
  • Basics
  • Outlets
  • Installing Lighting
Panels and Subpanels
  • Understanding Panels
  • Circuits
  • Installing a Subpanel

Fine Home Building

Newsletter Sign-up

  • Fine Homebuilding

    Home building tips, offers, and expert advice in your inbox.

  • Green Building Advisor

    Building science and energy efficiency advice, plus special offers, in your inbox.

  • Old House Journal

    Repair, renovation, and restoration tips, plus special offers, in your inbox.

Signing you up...

This site is protected by reCAPTCHA and the Google Privacy Policy and Terms of Service apply.
See all newsletters

Follow

  • Fine Homebuilding

    Dig into cutting-edge approaches and decades of proven solutions with total access to our experts and tradespeople.

    Start Free Trial Now
    • Facebook
    • Instagram
    • X
    • LinkedIn
  • GBA Prime

    Get instant access to the latest developments in green building, research, and reports from the field.

    Start Free Trial Now
    • Facebook
    • YouTube
  • Old House Journal

    Learn how to restore, repair, update, and decorate your home.

    Subscribe Now
    • Facebook
    • Instagram
    • X

Membership & Magazine

  • Online Archive
  • Start Free Trial
  • Magazine Subscription
  • Magazine Renewal
  • Gift a Subscription
  • Customer Support
  • Privacy Preferences
  • About
  • Contact
  • Advertise
  • Careers
  • Terms of Use
  • Site Map
  • Do not sell or share my information
  • Privacy Policy
  • Accessibility
  • California Privacy Rights

© 2025 Active Interest Media. All rights reserved.

Fine Homebuilding receives a commission for items purchased through links on this site, including Amazon Associates and other affiliate advertising programs.

  • Home Group
  • Antique Trader
  • Arts & Crafts Homes
  • Bank Note Reporter
  • Cabin Life
  • Cuisine at Home
  • Fine Gardening
  • Fine Woodworking
  • Green Building Advisor
  • Garden Gate
  • Horticulture
  • Keep Craft Alive
  • Log Home Living
  • Military Trader/Vehicles
  • Numismatic News
  • Numismaster
  • Old Cars Weekly
  • Old House Journal
  • Period Homes
  • Popular Woodworking
  • Script
  • ShopNotes
  • Sports Collectors Digest
  • Threads
  • Timber Home Living
  • Traditional Building
  • Woodsmith
  • World Coin News
  • Writer's Digest
Active Interest Media logo
X
X
This is a dialog window which overlays the main content of the page. The modal window is a 'site map' of the most critical areas of the site. Pressing the Escape (ESC) button will close the modal and bring you back to where you were on the page.

Main Menu

  • How-To
  • Design
  • Tools & Materials
  • Video
  • Blogs
  • Forum
  • Project Guides
  • Reader Projects
  • Magazine
  • Members
  • FHB House

Podcasts

  • FHB Podcast
  • ProTalk

Webinars

  • Upcoming and On-Demand

Podcasts

  • FHB Podcast
  • ProTalk

Webinars

  • Upcoming and On-Demand

Popular Topics

  • Kitchens
  • Business
  • Bedrooms
  • Roofs
  • Architecture and Design
  • Green Building
  • Decks
  • Framing
  • Safety
  • Remodeling
  • Bathrooms
  • Windows
  • Tilework
  • Ceilings
  • HVAC

Magazine

  • Current Issue
  • Past Issues
  • Magazine Index
  • Subscribe
  • Online Archive
  • Author Guidelines

All Access

  • Member Home
  • Start Free Trial
  • Gift Membership

Online Learning

  • Courses
  • Project Guides
  • Reader Projects
  • Podcast

More

  • FHB Ambassadors
  • FHB House
  • Customer Support

Account

  • Log In
  • Join

Newsletter

Get home building tips, offers, and expert advice in your inbox

Signing you up...

This site is protected by reCAPTCHA and the Google Privacy Policy and Terms of Service apply.
See all newsletters
See all newsletters

Follow

  • X
  • YouTube
  • instagram
  • facebook
  • pinterest
  • Tiktok

Join All Access

Become a member and get instant access to thousands of videos, how-tos, tool reviews, and design features.

Start Your Free Trial

Subscribe

FHB Magazine

Start your subscription today and save up to 70%

Subscribe

We hope you’ve enjoyed your free articles. To keep reading, become a member today.

Get complete site access to expert advice, how-to videos, Code Check, and more, plus the print magazine.

Start your FREE trial

Already a member? Log in

Privacy Policy Update

We use cookies, pixels, script and other tracking technologies to analyze and improve our service, to improve and personalize content, and for advertising to you. We also share information about your use of our site with third-party social media, advertising and analytics partners. You can view our Privacy Policy here and our Terms of Use here.

Cookies

Analytics

These cookies help us track site metrics to improve our sites and provide a better user experience.

Advertising/Social Media

These cookies are used to serve advertisements aligned with your interests.

Essential

These cookies are required to provide basic functions like page navigation and access to secure areas of the website.

Delete My Data

Delete all cookies and associated data