
Exploring the Benefits of Engineered Floor Joists
Choosing I-joists or floor trusses appropriately will increase the design potential and structural integrity of the homes you build.
Synopsis: Architects and engineers used to have one choice for framing a floor: dimensional lumber. But engineered floor-framing options such as I-joists or floor trusses are giving the traditional choice some serious competition. I-joists alone now comprise 50% of the floor-joist market. Associate editor Chris Ermides explains how I-joists and floor trusses are designed and constructed, how they support and distribute the load above them, and how they should be installed. He also explores the benefits and drawbacks of each. Although generally more expensive than joists made from dimensional lumber, engineered joists can increase the structural integrity of a home while also expanding its design potential.
It used to be that architects and designers were limited by floor framing choices; dimensional lumber was the only thing available. Depending on species and age, a 2×8, 2×10, or 2×12 might require supporting beams or bearing walls, both of which could limit design possibilities. Large, uninterrupted spaces were complicated to design and build.
Engineered floor-framing options such as wood I-joists and floor trusses, however, can span greater lengths with fewer caveats, yielding open spaces easily accessible to designers and framers. Both I-joists and floor trusses minimize or eliminate potential engineering problems and in the end—despite the added upfront cost—might even save money. Engineered wood joists and trusses are easier to specify, are more stable than dimensional lumber, and are easier to install.
Load affects the top and bottom of floor joists
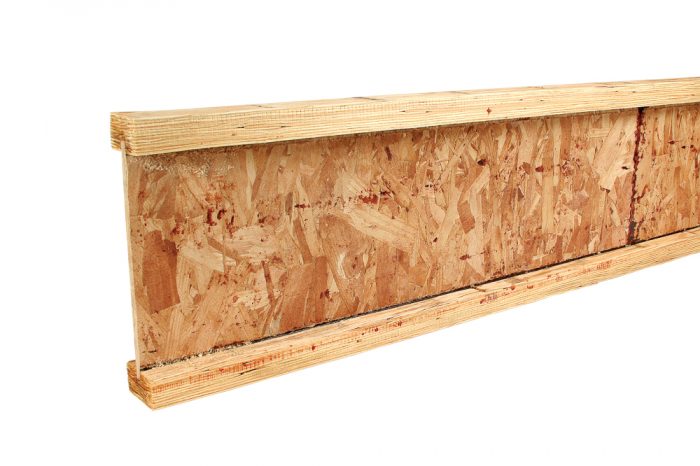
I-joists were developed to meet the demands of open floor plans. Architects needed a material that could clear-span areas larger than dimensional lumber without complicated engineering. When they arrived on the market in 1969, I-joists were made of a plywood web capped with top and bottom flanges. Those flanges were either laminated-veneer lumber (LVL), solid lumber, or strand lumber. Today, those webs are made of oriented strand board (OSB), while the flange options are limited to LVLs and sawn lumber.
One advantage I-joists have over dimensional lumber is consistency and stability. Dimensional lumber can vary in width from board to board, and even end to end. It shrinks over time, and framers have to be mindful of splits, checks, twists, and crowns in every board. Setting a single joist becomes a multistep process. Also, the possibility of shrinkage means potential drywall cracks and uneven, wavy ceilings.
The most exploitable advantage I-joists have over dimensional lumber, though, is strength. At first glance, it’s tough to imagine that a 3/8-in.-thick web of OSB capped with 2×2 blocks of wood could be as strong as a solid piece of lumber. To accept that fact, you need to understand how load stresses are distributed within an I-joist.
As a load bears down on an I-joist, the load stresses mainly the top and the bottom flanges. The wood fibers on the top flange are compressed, while the fibers on the bottom flange are stretched. The fibers near mid-depth, however, are virtually unaffected.
This is why it’s OK to drill holes along the center and also why you can’t notch the top and bottom of any joists. Notches remove wood fiber from the joist areas that need it most.
Builders such as Michael Chandler in Raleigh, N.C., like I-joists for their strength and value, but also for their sustainable qualities. “My goal is to build houses that will last more than 100 years,” Chandler says, “and I want to do so with minimal impact on the environment.” The fact that I-joists use far less wood than dimensional lumber is a big benefit for many builders.
I-joists offer builder flexibility
I-joist manufacturers have figured out a way to optimize the physics involved in the way bending stresses are distributed within a joist, and they have designed a product that puts wood where it’s needed most and removes it where it’s needed least. The result is a stronger, straighter, and lighter joist than dimensional lumber.
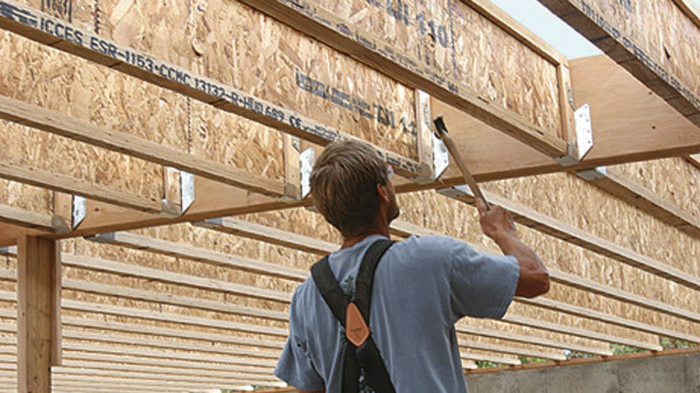
Save for a few necessary stiffeners, I-joists install similarly to dimensional lumber, and they offer builders similar flexibility to dimensional joists. Because allowable spans are set by I-joist manufacturers, a framer can move a layout as necessary if changes need to be made after the joists are delivered. I-joists can be doubled for added strength or moved to make room for plumbing and other mechanicals. I-joists also offer more options for drilling holes.
Manufacturers such as iLevel offer free software to help designers and builders customize performance. To help builders achieve desired floor performance, most manufacturers offer a selection of I-joists with variations in flange size, web thickness, and depth.
Floor trusses are custom joists
Given their strength, their efficient use of materials, and their open-web design, wood floor trusses are sustainably built and offer benefits to builders, subs, and even homeowners. Truss manufacturers can take a set of plans and customize the truss designs down to details of concentrated load placement and utility chases.
Aside from their design characteristics, trusses are easy to install—as long as framers follow the truss manufacturer’s placement diagrams. Lisa Biggin, construction manager for Habitat for Humanity in Newburgh, N.Y., likes trusses for several reasons. “I need to clear-span distances that would require structural supports for I-joists or dimensional lumber,” she says. “The added cost for those supports and columns would make the floor system more expensive than just the cost of floor trusses.” Biggin also likes how easily floor trusses install. Everything is precut and ready to go, so even Habitat volunteers who don’t have framing experience can handle the installation without a glitch.
Biggin points out that proper planning and site management are the keys to capitalizing on the cost/time benefit of using trusses. Training installers and subs about the dos and don’ts goes a long way toward avoiding costly mistakes. An entire set of trusses can be installed and sheathed before anyone realizes that they’ve all been placed upside down; it has happened before. Paying attention to the manufacturer’s instructions is important.
Open webs benefit everyone
For shallower depths and shorter spans, floor trusses are more expensive than I-joists, but as Biggin points out, comparing the cost of
I-joists to trusses without considering the big picture can be misleading. Builders who swear by trusses like them most for their open webs, which make mechanical contractors’ work a lot easier.
“My subs are able to run plumbing, wiring, and any other utility without drilling holes,” says Arkansas builder Gary Striegler. “They’re through the job site faster, which moves the whole project along more quickly.” For Striegler and other builders, saving time for subcontractors translates into saving money for the whole project.
Michael Chandler uses floor trusses for the second floors of the houses he builds. Chandler’s truss designer allocates a section of the truss for a utility chase. Using this design allows Chandler’s subs to keep their work clean and neat. The greatest benefit for Chandler, though, is from an energy-efficiency standpoint. “It’s important to have all HVAC ductwork within the building envelope. Trusses provide a place for ductwork in a conditioned environment, not an attic,” Chandler says.
Dialing in performance is a tricky equation
It used to be that builders didn’t have many options or resources available for customizing floor performance. Sawn-lumber floor joists were typically the same grade, size, and spacing required for the longest span within the system. With I-joists and trusses, builders can design and install floors that maximize performance based on each part of the house and the way it will be used.
Living spaces such as hallways don’t require the same deflection rating as sleeping spaces, for example. No matter how spaces feel underfoot, builders want to ensure that floors don’t make a sound, that tile doesn’t crack, and that drywall doesn’t pop. Joist sizing and strength can vary in different parts of a house.
Open-web floor trusses play a large role here. A builder can hand plans to the truss manufacturer with specs such as desired deflection, floor-material selections, and location of utility chases. In about a week, the builder gets a floor-framing plan that’s fully customized and guaranteed to perform.
Custom-home builders such as Mike Guertin in Rhode Island like this level of customization and peace of mind. “I want to hand my plans over to someone and get back my layout and design options,” Guertin says. “I don’t want to spend my time looking at span tables and punching numbers into a calculator in order to figure this out.”
This level of customization is why it’s difficult to say how much a floor truss will cost per lineal foot. Taft Ketchum from PDJ Components Inc. in Chester, N.Y., points out that truss sourcing varies by region, too, which makes it hard to gauge pricing. “In our area, lumberyards act as the middleman, but in other parts of the country, builders deal directly with the truss plant,” he says.
It’s interesting to note that unlike with dimensional lumber and I-joists, deeper doesn’t necessarily mean more expensive. Ketchum explains that depending on the design, a 12-in.-deep truss might be more expensive than a 16-in.-deep truss simply because of the amount of material used. A shallower truss may call for more webs, which means more wood, more labor, and ultimately, higher cost.
The bottom line is that you’ll pay more for trusses and I-joists than for dimensional lumber. You’ll also get a more stable, sometimes fully customized product that’s faster to install and easier on the subs.
I-joists

I-joists now make up more than 50% of the floor-joist market. They’re strong, lightweight, stable, and more versatile than dimensional lumber. Longer spans, varying depths, and a range of flange widths provide builders with options for dialing in price and performance. They’re available from national and regional manufacturers through local lumberyards. Price varies by location. Here in Connecticut, an 117⁄8-in. I-joist costs $2 per lin. ft.
OSB has replaced plywood, the original web material used by most manufacturers, each of which makes its own OSB webs to ensure the strength and quality of the joist. Proprietary OSB webbing is often designed to resist moisture, which can pose a serious threat to the integrity of the flange-to-web bond.
The flanges are made of either solid dimensional lumber or LVL material. LVL flanges are made up of thin wood veneers, which manufacturers claim means that they’re more stable. Wooden flanges are as strong as most LVL flanges, but they are more susceptible to movement from expansion and contraction. It’s important to note, however, that expansion and contraction are minimal because these flanges are attached to stable OSB webbing. Manufacturers of solid-wood flange types maintain that those flanges are as stable and resource-efficient as LVL flanges, and more economical as well.
Pros
- Available in many sizes and configurations so that performance can be somewhat customized.
- Lightweight so that they’re easy to maneuver around the job site.
- Install like dimensional lumber, which most framers are familiar with.
- Span and load ratings are predetermined, so layout can be reconfigured on site as needed.
- Dimensionally consistent and stable.
Cons
- OSB-to-flange connection is susceptible to damage if exposed to excessive moisture.
- Not structurally stable until bracing and/or floor sheathing is installed.
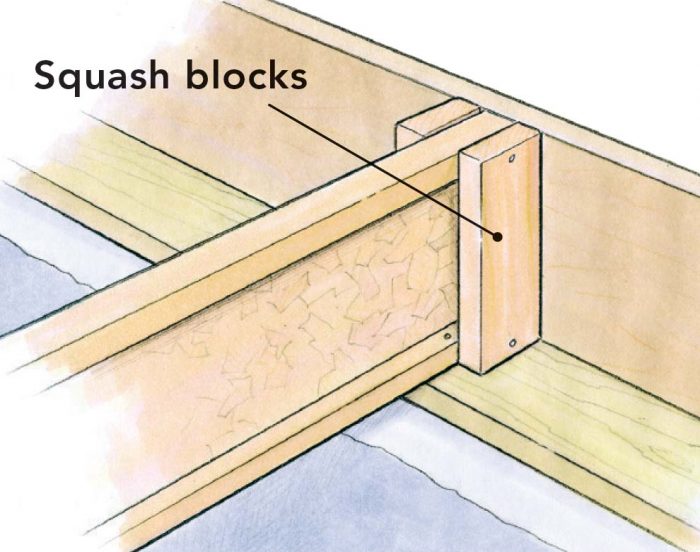
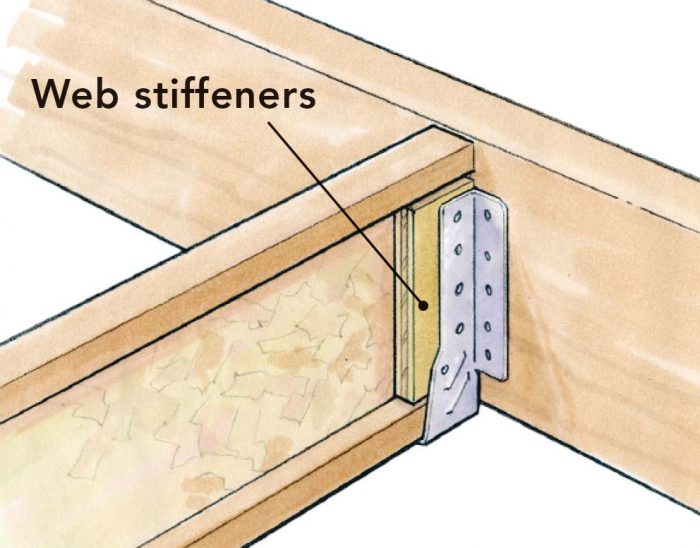
- Web stiffeners are required at point loads and when hangers are used, which means more time to install.
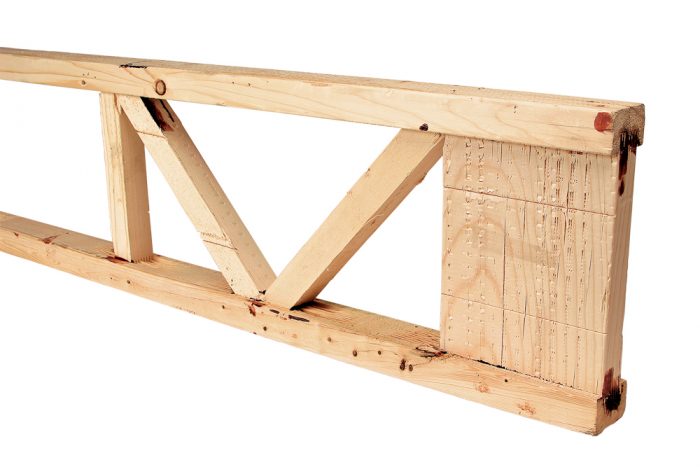
Floor trusses
Open-web floor trusses are gaining popularity, especially in custom homes. They’re lightweight, strong, and capable of making long spans. Builders like them because they can be fully customized. For example, multiple live and dead loads can be designed along a set of trusses, eliminating the need for bearing walls or beams. It’s also possible to create utility chases up to 24 in. wide at any desired location. Open webs make running wire and pipe easier, but having a dedicated chase makes work easier for subs. A truss designer can spec a set of trusses to desired spans, deflection, point loads, and bearing capacity while taking into account the materials that will be added later. The bottom line: Performance is highly customizable.
Trusses are available mostly through regional manufacturers and local lumberyards. Prices depend on design and location.
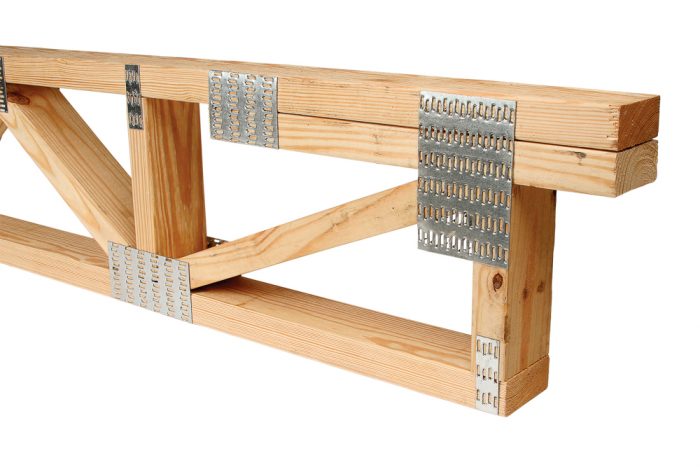
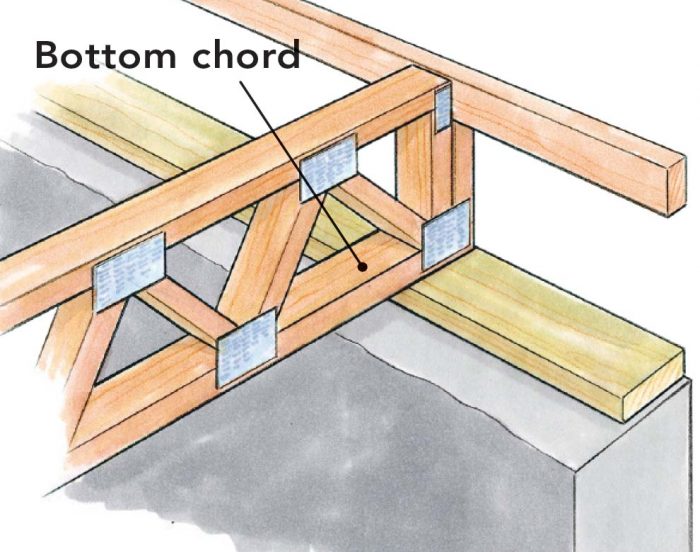
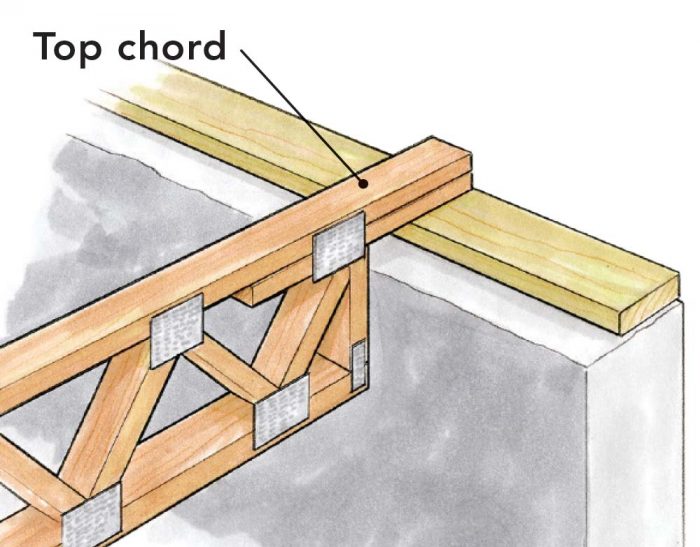
Stress-rated 2x pine is used for both top and bottom chords, as well as for webbing. The chords tend to run a higher grade, usually No. 2 or better. Web lumber is stress-rated as well, although it isn’t usually as high grade. This is where manufacturers keep costs under control; higher-rated wood is used where it’s needed according to the load design for a particular truss.
Web members join to top and bottom chords by heavy-gauge steel nailing plates. These plates come in various sizes and gauges that are pressed into the wood at each joint by a large roller or hydraulic press.
Pros
- Customized layout and truss design with an engineer’s stamp means less time and worry for the builder.
- Customized performance means guaranteed results.
- Utilities are easy to run and are accessible later, saving time and money.
- Easy and fast to install.
- No additional bearing blocking is needed.
- Wide bearing surface makes for faster, more accurate subfloor installation.
Cons
- Customization means that layout changes can’t be made in the field.
- All layout/structural changes have to be approved by an engineer and might require new trusses.
- Framers unfamiliar with them can install them improperly: upside down, front to back, or in the wrong order.
Hybrids are trimmable. Georgia-Pacific, Trim Fit, and Universal Forest Products offer joists that are neither traditional I-joists nor customized floor trusses. They’re actually both.
Georgia-Pacific’s XJ 85 is an I-joist with large holes already cut in the web. The holes vary in size and shape, but are large enough for utility chases. These joists install like typical I-joists, though additional drilling through the web is not allowed. They’re available 16 in. deep and in lengths from 6 ft. up to 26 ft.
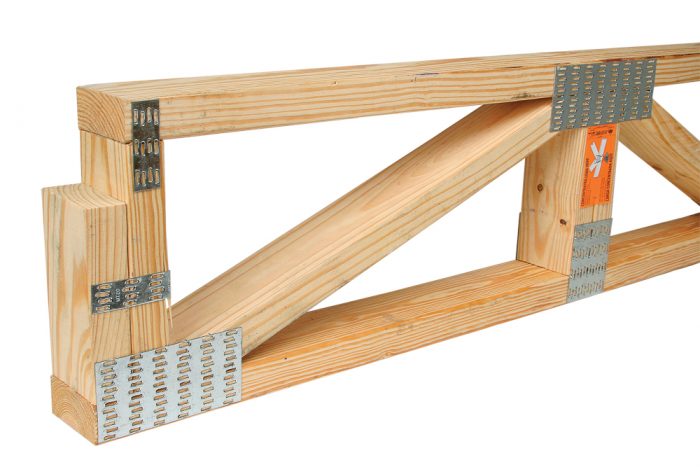
United Forest Products’s Open Joist 2000 (right) and Trim Fit’s SpaceJoist come in varying depths and lengths. Chase openings are fixed, spans are prescriptive, and the ends are trimmable up to 51⁄2 in. Although they look like typical floor trusses, they’re built differently. The webs in Open Joist 2000 run on the flat and tie to the chords via finger joints instead of steel nailing plates. SpaceJoist’s metal webs connect to wood chords.
How engineered joists work
Joist spans depend on the strength and stiffness of the member and the amount of load it is required to carry. Deflection, or the degree to which a joist flexes under the design load, is commonly taken to be the main factor in the way a floor performs. Live loads (such as the weight of furniture and people) and dead loads (the weight of actual materials) are both used in calculating deflection.
The International Residential Code (IRC) limits floor-joist deflection to span/360 (where span is measured in inches) for live loads in living spaces (40 psf) and in sleeping areas (30 psf). The higher the denominator, the lower the deflection and, generally, the better the performance. Although this might generally be true, deflection isn’t the only variable to consider in a floor’s performance. While deflection is important, a number of other factors can affect floor performance.
According to Tim Debelius, a spokesman for joist manufacturer iLevel, a floor can have a deflection rating as high as span/720 and still feel bouncy, or a low span/280 and feel firm. Joist depth plays an obvious role in performance. The deeper the joist, the stiffer the floor will likely be. Ceilings installed on the bottom of a floor system and other materials also affect performance. Ceilings, for example, help to brace the bottoms of joists, tying them all together and limiting their ability to shift left to right. Strongbacks, blocking, and flooring material matter, too. Factors including the floor system’s weight (dead load) and the elasticity of these materials all contribute to a floor’s performance.
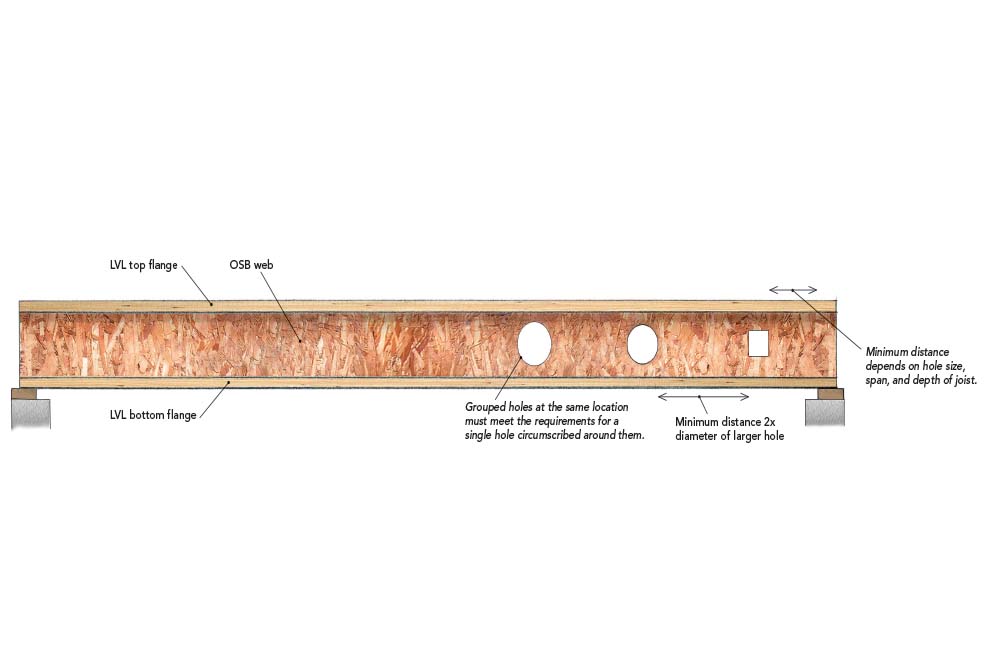
Drill holes with caution. I-joist flanges and webbing each play a crucial role in the way load is distributed within the member. Modifying flanges in any way could result in structural failure. Drilling holes in the webbing outside of the manufacturer’s recommendations could result in structural failure as well. See the manufacturer’s installation information for specific guidance on hole sizing and spacing requirements. Below are examples of some requirements.
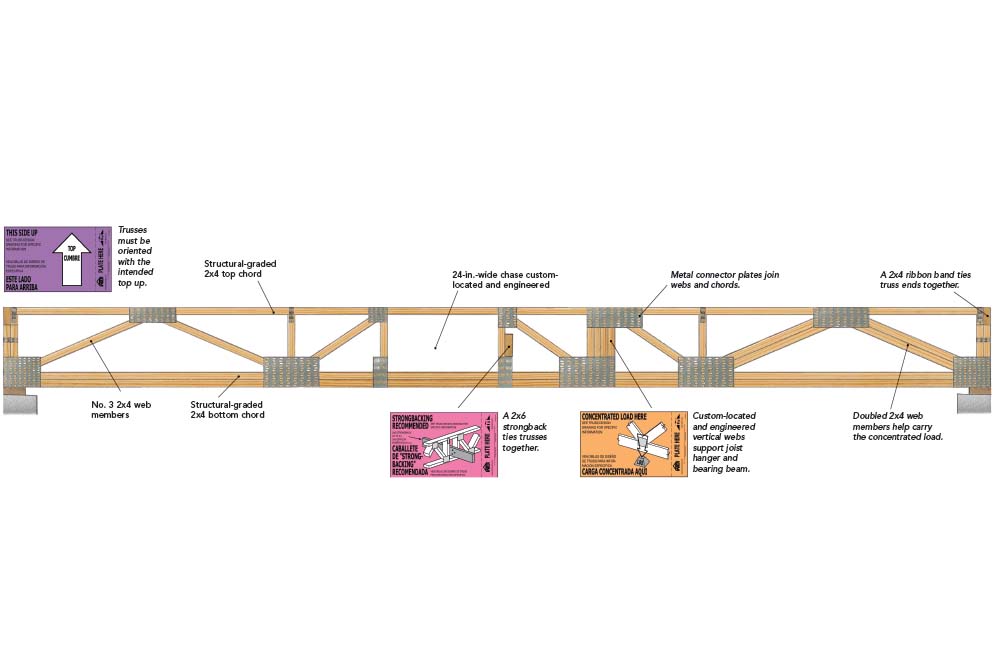
Don’t change a thing. Because of the way trusses are engineered, every piece has a predetermined role in how it performs. Therefore, any modifications, however slight, affect the entire truss and could result in structural failure. Don’t trim the ends, add point loads without an engineer’s approval, or cut, notch, and drill through webs, plates, or chords. Also, look for installation guidance from tags like the ones shown here.
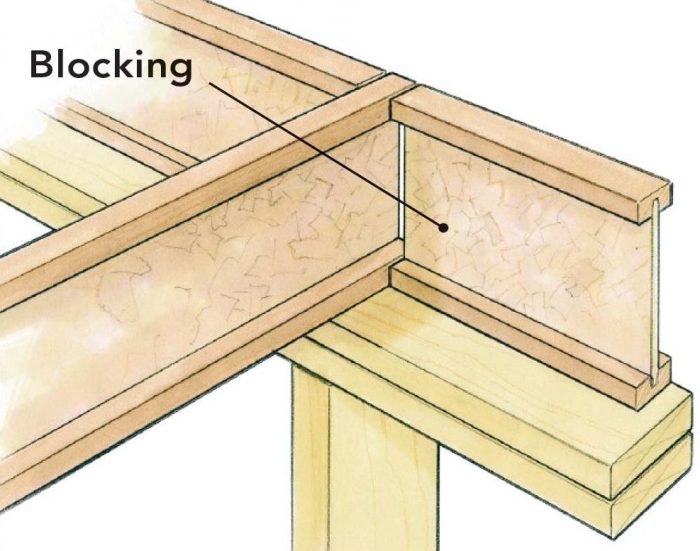
Key installation details
I-joists
Floor trusses
Photos by Justin Fink, Dan Thornton, and Steve Culpepper. Drawings by Bill Godfrey and Dan Thornton.
Related stories:
- Frame a Strong, Stable Floor With I-Joists
- Floor-Framing Design
- LVLs: A Strong Backbone for Floor Framing
From Fine Homebuilding #209
For more photos and information on key installation details for I-Joists, click the View PDF button below.

