Framing Big Gable Walls Safely and Efficiently
Build them on the floor, lift them with specialized jacks, and eliminate extra footsteps wherever possible.

Synopsis: Framing big gable walls on the floor deck and then lifting them is much faster, safer, and produces a better finished product than framing the roof first and then filling in the wall under it. Lynn Hayward’s method of notching the studs to accept the rafter, rather than using a double top plate, is much stronger and uses less wood. To stand the walls, he uses wall jacks which allow two people to lift very heavy walls safely.
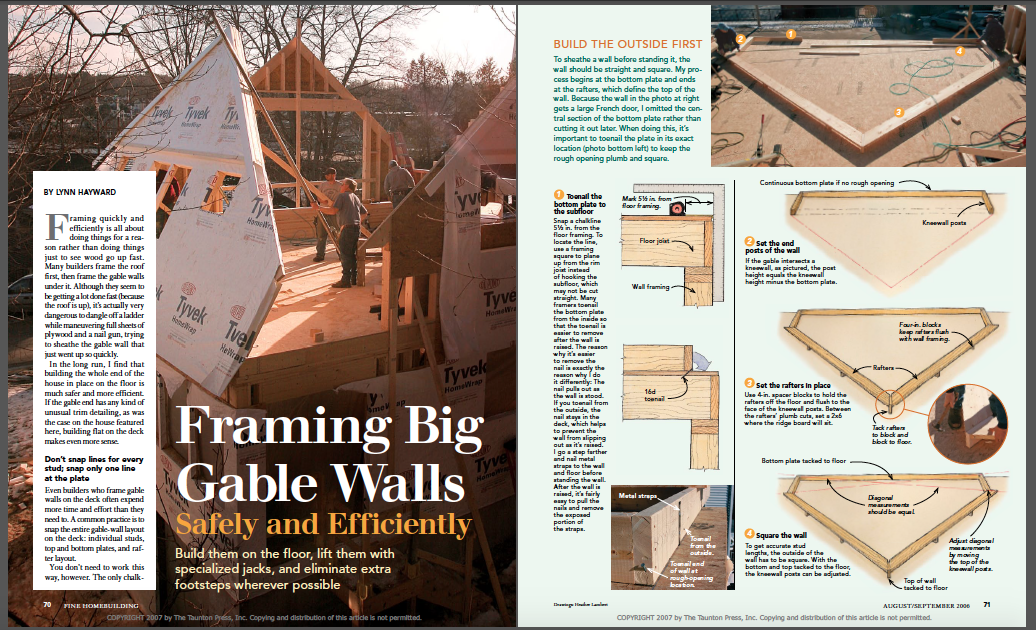
Framing quickly and efficiently is all about doing things for a reason rather than doing things just to see wood go up fast. Many builders frame the roof first, then frame the gable walls under it. Although they seem to be getting a lot done fast (because the roof is up), it’s actually very dangerous to dangle off a ladder while maneuvering full sheets of plywood and a nail gun, trying to sheathe the gable wall that just went up so quickly.
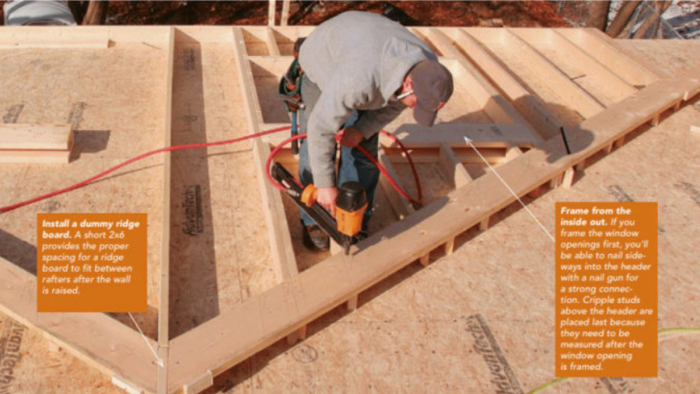
In the long run, I find that building the whole end of the house in place on the floor is much safer and more efficient. If the gable end has any kind of unusual trim detailing, as was the case on the house featured here, building flat on the deck makes even more sense.
Don’t snap lines for every stud; snap only one line at the plate
Even builders who frame gable walls on the deck often expend more time and effort than they need to. A common practice is to snap the entire gable-wall layout on the deck: individual studs, top and bottom plates, and rafter layout.
You don’t need to work this way, however. The only chalk line I snap on the deck is the line representing the inside edge of the bottom plate. Because I use the rafters to define the top of the wall, any additional lines are superfluous.
My single chalkline is snapped 5-1 ⁄2 in. in from the outside of the framing (for 2×6 walls). Rather than hooking the subfloor and then measuring in, I use a straight edge, such as a framing square, to plane up from the framing. Following this procedure keeps the outside walls consistently straight from one floor to the next.
I cut the bottom plate to length and toenail it to the deck through the outer face of the plate. The nail acts as a hinge when my crew and I are lifting the wall. If you toenail through the inside face, the nail will pull out of the deck and let the wall slide bottom first as you raise it. I also use short lengths of metal strapping nailed to the floor and to the bottom plate to prevent the bottom of the wall from kicking out during lifting. After the wall is in place, we pull these hinge nails and the nails in the straps with a cat’s paw, then cut off the metal straps.

From Fine Homebuilding #181
Fine Homebuilding Recommended Products
Fine Homebuilding receives a commission for items purchased through links on this site, including Amazon Associates and other affiliate advertising programs.

Magoog Tall Stair Gauges

Plate Level

Original Speed Square


