
Rolling Roof Trusses
Factory-made trusses save time and give you a roof engineered for strength and stability.
Synopsis: A veteran frame carpenter walks you through the process of installing simple gable trusses by hand (no crane involved). He offers tips for getting the job done quickly and accurately, along with guidelines for bracing the roof trusses.
Roof trusses offer many advantages. They are lightweight (generally made from kiln-dried 2x4s), so they are fairly easy to handle. Because trusses are engineered, they can span longer distances without having to rest on interior bearing walls, allowing for more flexibility in room size and layout. Finally, installing trusses on most houses is pretty simple. If you want to get a house weatherized quickly, roof trusses are the way to go. Ceiling joists and rafters are installed in one shot, and no tricky cuts or calculations are required.

Lay out braces as well as plates
Laying out the top plates for trusses is the same as for roof rafters. Whenever possible, I mark truss locations on the top plates before the framed walls are raised, which keeps me from having to do the layout from a ladder or scaffolding. For most roofs, the trusses are spaced 2 ft. on center (o.c.). I simply hook a measuring tape on one end of the plate and mark the truss positions every 2 ft., putting an “X” on the far side of each mark. I also mark the layout on several 16-ft. 1x4s, which serve as top-chord braces during installation.
A straight fascia is just a snap away
Remember to order trusses well in advance of when you’ll need them. In Oregon, where I work, a three-week lead time is common. Before I ask for truss delivery, I make sure all the exterior and interior walls are upright, nailed off, and braced properly. Interior walls help to keep the exterior walls straight and plumb. In addition, with all walls in position, I have more support for the bundles of trusses when they’re delivered.
Even when the walls are straight, it’s worth taking some trouble to ensure that when the trusses are installed, the rafter ends line up perfectly. There’s an easy way to do this.
I measure in 1 in. from the outside edge at each end of the top plate. Then I snap a chalkline the full length of the wall as a straight reference line. As I set each truss, I measure from the tail of the rafter chord the distance of the eave overhang plus 1 in. I mark this point on the bottom chord of each truss and align the mark to the snapped reference line, keeping the ends of the trusses straight.
I also snap a chalkline along the gable endwall plates to locate and align the gable truss. Unless it’s required by code, I usually don’t sheathe gable trusses. The gable truss is set flush with the outside face of the wall sheathing below. I snap the chalkline along the gable end-wall plates 1 in. from the outside. When the gable truss is set on this line, it overhangs the right amount.
Cutting blocks to nail between trusses is another important step to complete before you start setting trusses. In seismic and highwind areas, code requires blocking between trusses at the plates and often at the ridge as well. I cut 22-1/2-in. blocks to maintain the 24-in.-o.c. truss spacing and to help keep the trusses stable as they go up.
Lifting trusses onto the plates
To help with setting the trusses, I build a catwalk scaffold down the center of the house. Framed with 2x lumber, the catwalk gives the crew a safe, temporary platform to work from as we raise trusses into position and nail them to the wall plates.
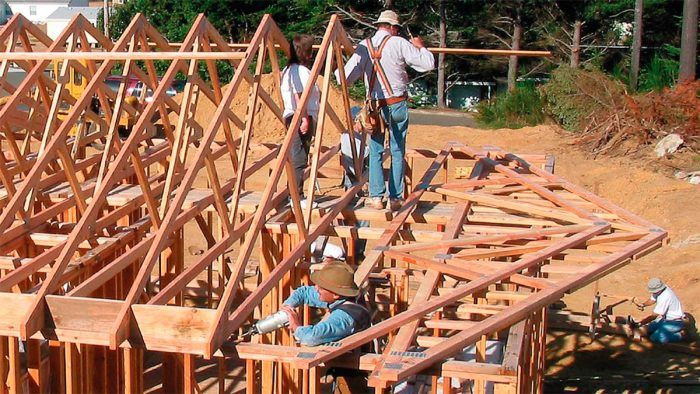
The next step is getting the trusses onto the plates. Around here, trusses are delivered in bundles held together with steel strapping. The number of trusses per bundle depends on the size of the roof and usually the types of trusses. For this project, there were three bundles: the porch trusses, the scissor trusses, and the trusses for the rest of the roof. With the help of a job-site forklift or the boom attached to the delivery truck, the bundles are positioned on top of the framed walls. If the house is too tall for the forklift or boom, or if the trusses are heavy or wide, a crane is the best way to lift the trusses into place.
To be safe, I lay the bundles of trusses flat across the walls at the opposite end of the house from where I’ll begin installation. Avoid the temptation to set the bundle of trusses upright on the plates. If the trusses are standing up when you cut the bands holding the bundle, they can fall and hurt someone. Lay the bundles down with the peaks pointing in the direction you’ll be spreading the trusses.
Start at one end with a gable truss
When the bundles are resting safely on the wall plates, I use tin snips to cut the metal bands holding the bundles together, taking care to avoid getting sliced. The first truss is for the gable end of the building and usually has vertical studs instead of angled webbing. Most trusses are lightweight, so one person walking on the catwalk should be able to grab a truss by the peak and pull it into position.
The gable truss is dragged to the end of the house first. Then, before any trusses are raised, the rest of the trusses are dragged over to their approximate locations, with each truss overlapping the one below, like fallen dominoes (photo facing page). With the trusses spread out in this and efficiently. On this house, the front gable was the first to go up. While the truss is held upright, I line it up with the exterior wall sheathing and toenail it every 16 in. with 16d nails. I also brace the truss temporarily until it can be tied to the rest of the roof.
Roll the trusses into place
When the gable truss is set, I roll the next truss into place, which in this case was a scissor truss. The truss company sent an extra scissor truss, so I nailed it to the gable truss to provide nailing for the end of the vaulted-ceiling drywall. A 2×4 nailed to the gable truss could have done the trick as well.
With the first gable resolved, I turn to raising the rest of the trusses. A team of three framers is ideal for “rolling” trusses. You need to have one framer who is located in the middle and one who is placed at each exterior wall. Each truss is nailed to the top plate with one 16d toenail on one side and two on the other side. After the truss is set, I install the blocking. As shown in the center photo at left, these 2x members maintain a uniform distance (221⁄2 in.) between the trusses and help the roof assembly to resist lateral loads.
When the first couple of trusses have been put in place, I nail one of the 16-ft. 1x4s that I had laid out earlier to the rafter chords near the ridge. An 8d nail in each chord holds the truss at the proper spacing to keep the trusses stable until the roof has been sheathed.
Once four or five of the trusses have been put in place, I put in a permanent sway brace, which adds lateral stability in the event of an earthquake or high wind. A sway brace has 45° angle cuts at both ends and extends from the top plate of an exterior wall up to the top chord of an inboard truss. Building code requires the use of sway braces at each end of the building and every 25 ft. between. But I like to install sway braces more often for added insurance.
Now the rest of the trusses can be brought into position and nailed into place on the layout. For this project, we used scissor trusses over the kitchen, dining room, and living room to create a large open area with a vaulted ceiling. The scissor trusses have a 5-in-12 roof pitch with a 3-in-12 ceiling pitch for the interior. Scissor trusses are set just like regular ones, but because they tend to be top heavy, they should be handled carefully until they’re secured.
Tying up loose ends
When all the trusses are in place, I nail 16-ft. 2x4s to the tops of the joist chords in the attic space, near the center of the span. Overlapping each other and running the full length of the house, these permanent braces stabilize the joist chords and hold them at the correct spacing.
If diagonal web braces are called for in the engineered specs, I nail them on at this point, along with any other braces. Metal hurricane clips keep the roof attached to the house frame in a heavy wind. The metal clips nail to each joist chord and then to the top plates of the exterior walls (Simpson Strong-Tie Co.; 800-925-5099; www.strongtie.com). They can be nailed on the inside or outside of a wall. Be
sure to use the “hanger” nails made specifically for nailing these clips.
It’s easy to keep a straight fascia

Unloading and spreading trusses set the stage

Brace the gable truss plumb and in plane with the outside wall

A team of three can make quick work of rolling trusses

Hardware and bracing get the roof ready for sheathing
The trusses are up, but the framing job isn’t done until the final bracing is installed. A combination of steel framing connectors and wood braces strengthens the roof assembly and ties it to the walls of the building.
Truss terms
Trusses gain their strength from lightweight components assembled in triangular shapes. In most cases, they can span
the width of a house with no support from interior walls. Here are three common trusses:

Photos by Donald Blum
Related stories:
From Fine Homebuilding #168
To view the entire article, please click the View PDF button below.
Fine Homebuilding Recommended Products
Fine Homebuilding receives a commission for items purchased through links on this site, including Amazon Associates and other affiliate advertising programs.
Short Blade Chisel

QuikDrive PRO300s

Bluetooth Earmuffs
