FHB Logo Facebook LinkedIn Email Pinterest Twitter Instagram Plus Icon Close Icon Navigation Search Icon Arrow Down Icon Video Guide Icon Article Guide Icon Modal Close Icon Guide Search Icon Skip to content
Main Menu
Subscribe

In every issue you'll find...

  • Expert insights on techniques and principles
  • Unbiased tool reviews
  • Step-by-step details to master the job
  • Field-tested advice and know-how
Subscribe Now!
Subscribe
  • How-To
  • Design
  • Tools & Materials
  • Videos
  • Blogs
  • Forum
  • Magazine
  • Members
  • FHB House
  • Podcast
  • Join
  • Log In
Main Menu Subscribe

Fine Homebuilding Project Guides

Framing

Guide Home
Chapter
  • Introduction to Framing
  • Framing Tools, Techniques, and Materials
  • Framing Floors
  • Framing Walls
  • Framing Stairs
  • Framing Roofs
  • Efficient Framing Methods
  • Timber Framing
How-To

The Loads Carried by a Roof

Understand the difference between dead loads and live loads, and design and detail the roof structure to meet local weather conditions.

By John Carroll
Article Image

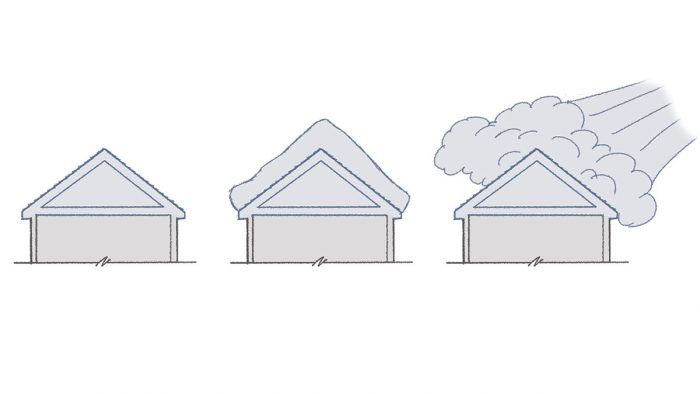
The dead loads on most roofs are pretty small; because the roof is the highest part of the frame, it merely has to carry its own weight and the weight of the shingles (or other roofing material) installed over it. The live loads are a different matter. The roof takes the brunt of the weather and, in some areas, the live loads imposed by Mother Nature can be very large. If you’re building in an area where heavy snow, high winds, or seismic events occur, the roof structure has to be designed and detailed to meet those conditions. As always, the best sources of this information are local building officials and local design professionals.

Two structural approaches

When architects and engineers design raftered roofs, they use one of two basic approaches. If they use a structural ridge, the ridge serves the same function as any of the other structural beams in the house. It has to be strong enough to carry the loads imposed on it, and it needs to be properly supported at each end. The posts that support the ends of structural ridges create point loads, and these loads have to be transferred via a well-conceived load path to the footing. Both the beam and the load path should be designed by an engineer or architect.

two structural approaches


Overlapping pieces


Structural ridges are heavy and expensive, and the main reason designers specify them is to open up the space below the roof. With a structural ridge, there is no need to restrain the bottom ends of rafters from spreading and, hence, no need to specify joists or collar ties. Designers often specify structural ridges, therefore, when they want to create cathedral ceilings.

The second approach to raftered roof structure uses nonstructural ridges, which are lighter and less expensive than structural ridges. Nonstructural ridges serve mainly as convenient surfaces to attach opposing pairs of rafters. The rafters lean against one another, with the ridge sandwiched between them. In essence, the load on one side is offset by the load on the other. The ridge, which can be as thin as 3⁄4 in., doesn’t hold this weight up; instead, it simply serves as a surface to press against. With the ridge doing little to hold up the rafters, there is a strong tendency for the ridge to sink and the bottom ends of the rafters to push out. Here is where the ceiling joists or, in some cases, exposed beams or cables come into play. They run across the span of the building and tie the bottoms of opposing rafters together. If the bottoms can’t thrust out, the top can’t sink.

Because restraining the outward thrust of the rafter bottoms is an essential part of the structural scheme, it is extremely important to know and follow the fastening schedule at the rafter/joist intersection. On many houses and additions, there is an equally important connection toward the center of the structure. Where single joists or beams cannot span the entire width of the structure, carpenters need to overlap two pieces—usually over a central wall. These overlapping pieces must be properly connected; otherwise, the bottoms of the opposing rafters will not be tied together. Be sure, then, to follow the fastening schedule specified for this connection, too.

Sign up for eletters today and get the latest how-to from Fine Homebuilding, plus special offers.

Sign Up
X
X
Previous: Guide to Roof Sheathing Next: Rafters vs. Trusses

Guide

Framing

Chapter

Framing Roofs

Log in or create an account to post a comment.

Sign up Log in

Become a member and get full access to FineHomebuilding.com

Framing

Framing

Trusted, in-depth guidance from the pros for framing a durable, code-compliant house

View Project Guide

View All Project Guides »

Become a member and get unlimited site access, including the Framing Project Guide.

Start Free Trial

Introduction to Framing
  • House Framing Concepts, Tips, and More
Framing Tools, Techniques, and Materials
  • Tools
  • Techniques
  • Framing Lumber
  • Steel
Framing Floors
  • Floor Framing
  • Engineered Floors
  • Floor Sheathing
Framing Walls
  • Wall Framing Basics
  • Layout
  • Wall Assembly
  • Raising and Straightening Walls
  • Framing Rough Openings
  • Blocking
Framing Stairs
  • Stair Layout
  • Building Stairs
Framing Roofs
  • Roof-Framing Basics
  • Roof Design
  • Laying Out and Cutting Rafters
  • Framing Valleys
  • Working with Trusses
  • Dormers
  • Special Situations
Efficient Framing Methods
  • Advanced Framing
  • Double-Stud Walls
Timber Framing
  • Timber-Frame Construction
  • Timber-Frame Design

Fine Homebuilding

Follow

Newsletter

Get home building tips, offers, and expert advice in your inbox

Sign Up See all newsletters

Membership & Magazine

  • Online Archive
  • Start Free Trial
  • Magazine Subscription
  • Magazine Renewal
  • Gift a Subscription
  • Customer Support
  • Manage Preferences

Taunton Network

  • Green Building Advisor
  • Fine Woodworking
  • Fine Gardening
  • Threads
  • About
  • Contact
  • Advertise
  • Privacy Policy
  • Careers
  • Copyright
  • Terms of Use
  • Accessibility
  • CA Privacy Rights

© 2021 The Taunton Press, Inc. All rights reserved.

    Main Menu

  • How-To
  • Design
  • Tools & Materials
  • Video
  • Blogs
  • Forum
  • Reader Projects
  • Magazine
  • Members
  • FHB House
  • Podcasts

  • FHB Podcast
  • ProTalk
  • Account

  • Log In
  • Join

    Podcasts

  • FHB Podcast
  • ProTalk
  • Popular Topics

  • Kitchens
  • Business
  • Bedrooms
  • Roofs
  • Architecture and Design
  • Green Building
  • Decks
  • Framing
  • Safety
  • Remodeling
  • Bathrooms
  • Windows
  • Tilework
  • Ceilings
  • HVAC

    Magazine

  • Current Issue
  • Past Issues
  • Magazine Index
  • Subscribe
  • Online Archive
  • Author Guidelines

    All Access

  • Member Home
  • Start Free Trial
  • Gift Membership

    Shop the Store

  • Books
  • DVDs
  • Taunton Workshops

    More

  • FHB Ambassadors
  • Reader Projects
  • Podcast
  • Customer Support

    Account

  • Log In
  • Join

Newsletter

Get home building tips, offers, and expert advice in your inbox

Sign Up See all newsletters

Follow

Join All Access

Become a member and get instant access to thousands of videos, how-tos, tool reviews, and design features.

Start Your Free Trial

Subscribe

FHB Magazine

Start your subscription today and save up to 52%

Subscribe

We hope you’ve enjoyed your free articles. To keep reading, become a member today.

Get complete site access to expert advice, how-to videos, Code Check, and more, plus the print magazine.

Start your FREE trial

Already a member? Log in