
9 Upgrades to Windproof Your Roof
Master these roof-installation details to keep asphalt shingles on and rain out of your house.
Synopsis: You have one chance to protect a roof against the elements: during installation. This article details nine methods for making an asphalt-shingle roof more weather-resistant—improving the drip edge, using adhesive at the edges, maximizing nail placement, eliminating the overhang, selecting the right shingles, using better nails, securing the hip and ridge, getting the right ridge vent, and using roof cement as a cold-weather backup. You can watch the related webinar for additional information.
Asphalt shingles are getting better all the time, but the elements can still get the best of them. Nor’easters, hurricanes, and even heavy winds can blow shingles off a roof, leaving a house vulnerable to leaks. Roofs in high-wind regions—areas that experience wind gusts greater than 90 mph according to FEMA— are the most susceptible to this type of damage. We can’t control the weather, but we can take measures to make a new asphalt-shingle roof more wind resistant.
Today’s asphalt shingles are likely to last twice as long as the ones I installed when I started building in the late 1970s, but that longevity raises the chances that the roof will experience severe weather in its lifetime. You only get one shot at taking the extra steps needed to ensure that it can weather the storm—and that’s during installation.
To improve my roof jobs, I’ve adopted and adapted some of the methods promoted by the Institute for Business and Home Safety’s (IBHS) Fortified Home program, whose goal is to improve the disaster resistance of homes from top to bottom. I also take additional measures—although nothing that will break the bank—that I think make a more wind-resistant roof.
Windproofing starts with the sheathing. Roof-shingle manufacturers generally accept a minimum of 3/8in. thick plywood, 7/16in. OSB, or nominal 1in. thick wood planks. The Fortified Home program’s “Gold” standard calls for 7/16in. sheathing at a minimum. When it comes to resisting nail withdrawal, thicker is better.
1. Improved Drip Edge
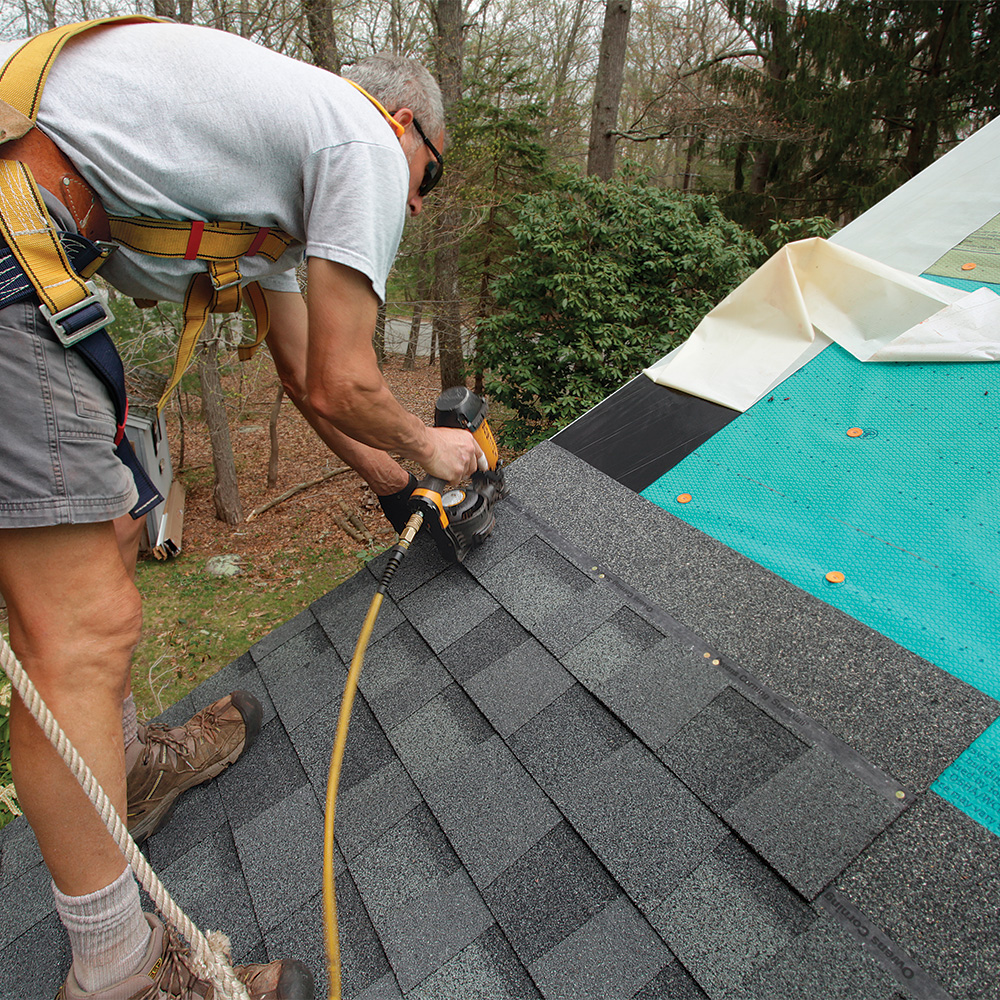
Metal drip edges can be critical to helping roof shingles resist wind uplift along the perimeter of the roof. To do this, they have to be fastened securely to the roof sheathing and framing. The IRC, which since 2012 has required metal drip edges along rake and eave edges, calls for fastening them with roofing nails spaced no more than 12 in. o.c., with an overlap of 2 in. between sections. I go a step above code and follow the Fortified Home recommendations for hurricane-force winds, fastening drip edges with roofing nails spaced 4 in. o.c. in a staggered W-pattern and overlapping drip-edge joints by 3 in. I nail into framing rather than just the roof sheathing whenever possible. If there isn’t solid blocking or subfascia, some of the nails can be driven into the rafters or trusses.

Code requires that the roof leg of drip edges extend at least 2 in. onto the roof deck, but drip edges with narrow roof legs won’t reach far enough onto the deck when the fascia leg bottoms out against the fascia. To ensure that this isn’t a problem, I generally use drip edge with a 5-in. to 6-in. roof leg. The cost difference between narrow and wide drip edge is minimal, and I think the performance boost is worth it.
2. Adhesive at the edges
Starter strips along the eave edge not only back up joints in the first course of shingles but also help bond the first course down to the roof deck. If the starter isn’t fastened well to the roof deck, the first course of shingles is vulnerable to wind. For that reason, it’s important to secure it with a belt-and-suspenders approach: seal bonding and nails.
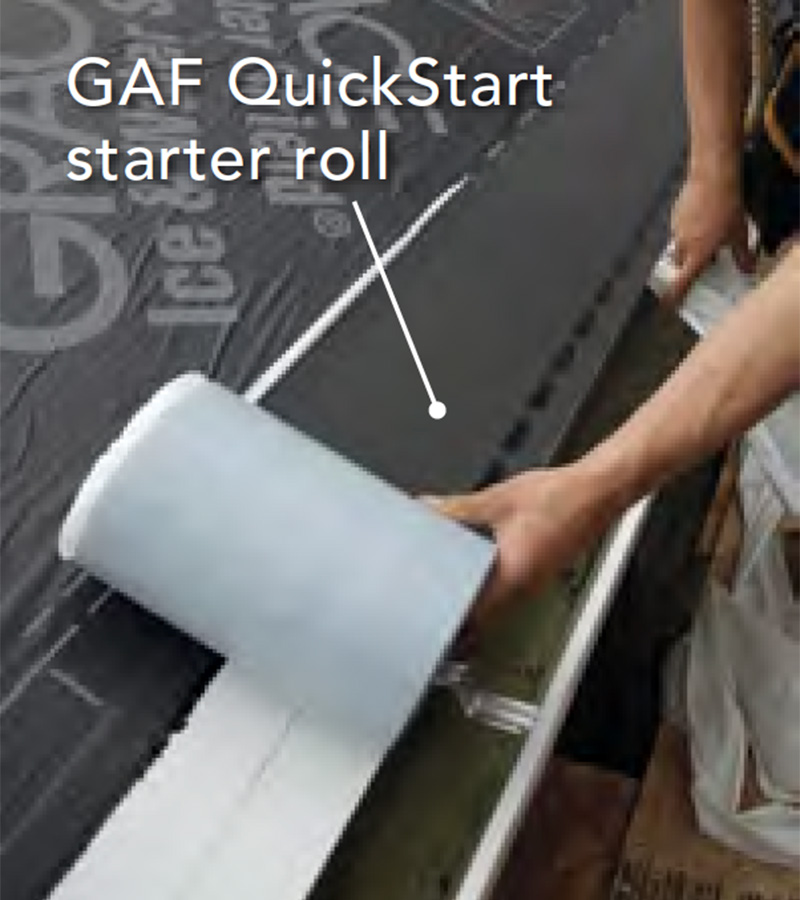
The Fortified Home program recommends bedding the starter course in an 8-in.-wide band of roof cement that covers the drip edge and underlayment—an approach that can be used with any nail-down starter. As an alternative, Fortified Home also approves the use of self-adhering starter strips rather than roof cement. I prefer this faster and less messy option. The adhesive backing on self-adhering starter strips sticks them down, but they need to be nailed as close to the bottom edge as possible while still catching the roof deck.

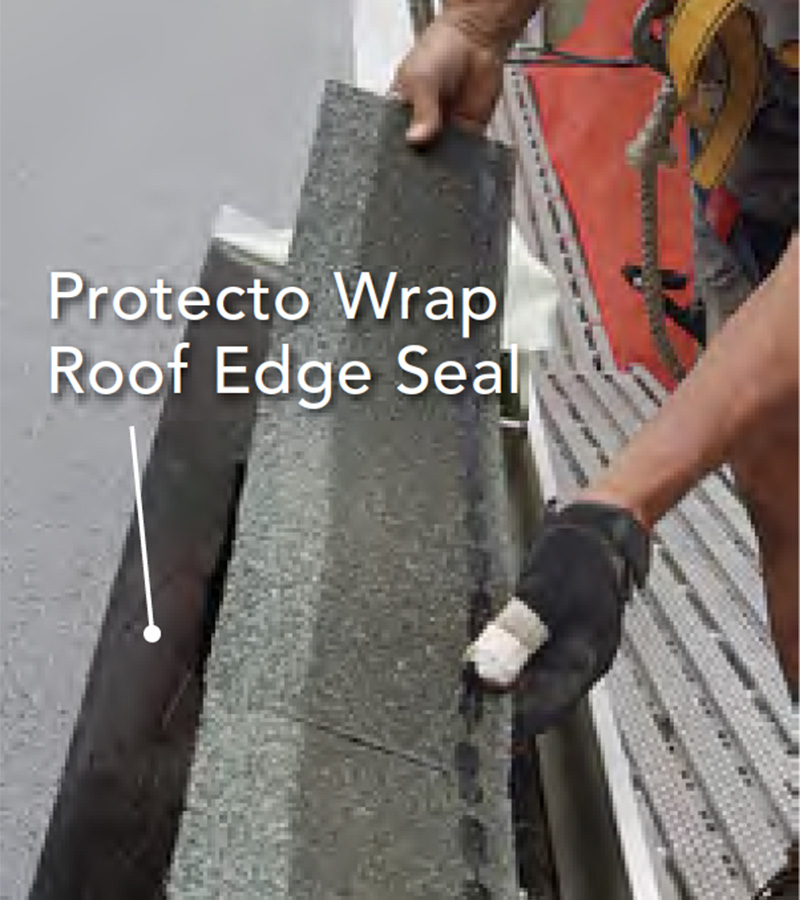
Rake edges are similarly vulnerable to wind uplift, and some roofers like to run starter strips along the rake to help bond the shingles down. This helps, but the self-sealing strip on most starter shingles isn’t very wide. As at the eaves, Fortified Home recommends bedding rake shingles in an 8-in.-wide band of roof cement to bond the top lap of each shingle to the roof’s edge. In keeping with the spirit of the provision, I use a doublesided peel-and-stick sealing strip—Protecto Wrap’s Roof Edge Seal. It installs like flashing tape but also has a release sheet covering the adhesive on the up-facing surface. You can bond the strip to the drip edge and underlayment, then remove the release sheet while installing the shingles.
Starter optionsOnly a few shingle manufacturers make their own self-adhering starters, such as GAF’s Quick Start starter roll (photo above left). Alternatively, Protecto Wrap’s roof edge Seal can be used underneath standard starter strips to improve their wind resistance (photo above right). Finally, there are also peel-and-stick starter strips from companies that aren’t in the shingle business. Options include:
|
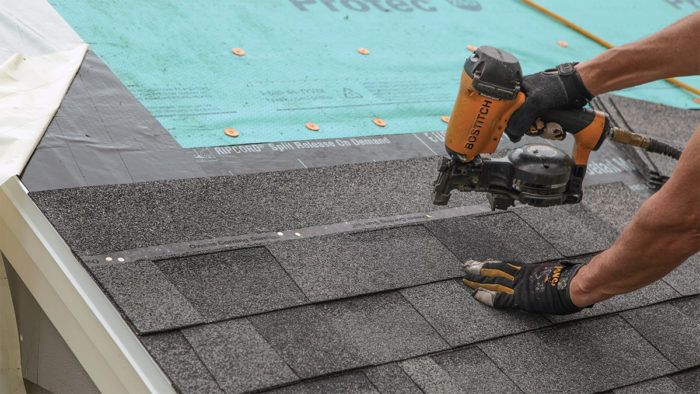
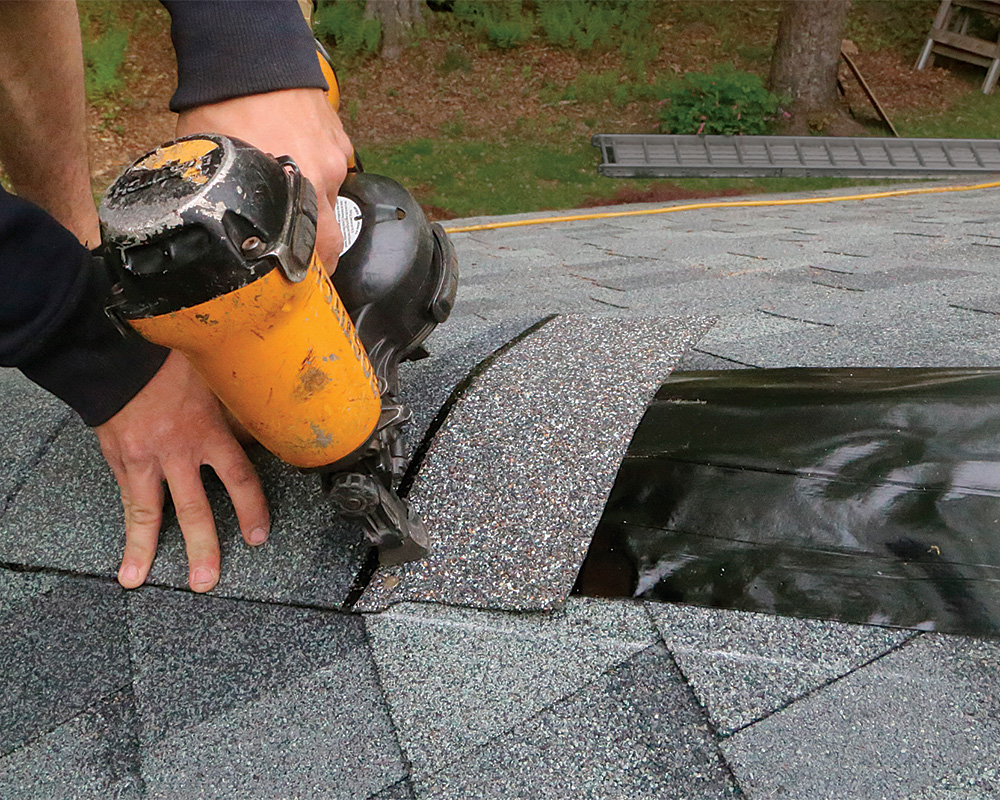
3. Nail better, nail more
How and where you nail shingles is extremely important to wind resistance. Overdriven and offangle nails will fracture the base mat that the shingle is built around, significantly reducing the shingle’s wind resistance. Whenever a nail is misdriven, a second nail
should be installed about 1 in. away and flush with the surface. There’s no need to pull out the offending nail.
Underdriven nails also cause problems. They hold up the shingles lying over them, so the self-seal strip doesn’t bond. Over time,
a raised nail head can break through the surface of the overlying shingle.
Many shingles require more nails to perform as advertised in high-wind zones. While some shingle manufacturers achieve their wind rating with the standard four-nail pattern, others require a six-nail pattern. Six-nail patterns differ between manufacturers; some want
the nails evenly spaced, while others recommend two pairs of nails spaced about an inch apart onethird of the distance from each end of the shingle, along with single nails an inch in from each end. I use a six-nail pattern even when installing shingles that only require four, and I double-nail shingle ends along the rakes.
Wind classifications for shinglesThe IRC calls for asphalt shingles to be tested and labeled in accordance with ASTM D7158 or ASTM D3161. The standards |
| Basic wind speed from local building code | Required shingle wind-resistance class rating |
| 110 mph | ASTM 3161 Class F ASTM 7158 Class G or H |
| 120 mph | ASTM 7158 Class G or H |
| 130 to 150 mph | ASTM 7158 Class H |
4. Eliminate overhang
Uplift forces can be extreme at a roof’s perimeter, and minimizing how much the starter strip and shingles overhang the drip edge limits the wind’s leverage on them. Fortified Home recommends a maximum 1 ⁄ 4-in. overhang, but it’s better to install both flush with the drip edge along the eaves and rake edges.

5. Select the right shingles
Selecting shingles that meet or exceed the wind speed in your area is the simplest way to improve roof performance. Lots of manufacturers produce shingles classified at the highest wind rating (H), so you shouldn’t have any trouble finding them. Generally, laminated shingles perform better in high wind than three-tab shingles, and some shingles have additional reinforcing strips in the
nailing zone to improve tear-through resistance.

When selecting shingles, pay attention to the nail zone’s relation to the common bond—the area where two shingles overlap. Ideally, shingles should be nailed through the common bond so that both layers are secured under the heads of the nails, but the nail zones and common-bond areas of some shingles either don’t match up or do so only partly. On shingles with wide nail zones but narrower common-bond areas, installers have to be careful not to nail immediately above the common bond. There is a small void under the overlying shingle just above the common bond, and nailing in the void can fracture the shingle, reducing its wind resistance.
6. Better nails
The type, length, and corrosion resistance of the fasteners can make a difference in how well and how long the shingles stay where they
belong. The IRC requires that a minimum of four 12-ga. nails with 3 ⁄ 8-in.-dia. heads be used for installing asphalt shingles and that the
nails penetrate completely through roof sheathing that is less than 3 ⁄ 4 in. thick and penetrate at least 3 ⁄ 4 in. into thicker sheathing. While 1-in. nails can sometimes meet the penetration requirement, longer nails may be needed when installing thicker shingles. The cost difference between 1-in. nails and 1-1 ⁄ 4-in. nails, or between 1-1 ⁄ 4-in. nails and 1-1 ⁄ 2-in. nails, is about $1 per square (100 sq. ft.)—an insignificant amount. I use 1-1 ⁄ 4-in. nails at a minimum.

In coastal regions and areas prone to acid rain, the corrosion resistance of nails is a big issue. Even though overlying shingles cover them, wind-driven rain and capillary action cause nails to get wet on a regular basis. Electrogalvanized (EG) nails are the most common type used in roofing nailers, but the quality of galvanization varies, and some low-quality products start corroding in just a few years. For longevity, better-quality EG nails, hot-dipped galvanized (HDG) nails, and stainless-steel coil-collated nails are better options. While HDG roofing nails cost about twice as much as EG nails, they only add about $2.25 per square. Within 1 km (about 3000 ft.) of salt water, FEMA recommends using stainless-steel roofing nails, which cost about $16 more than EG nails per square of shingles.
The chances of smooth-shank nails pulling out of the roof sheathing are low even during a high-wind event; the nails are more likely to pull through a shingle than they are to pull out of the sheathing. That noted, ring-shank roofing nails are available, and almost all stainless-steel roofing coil nails are ring-shank.
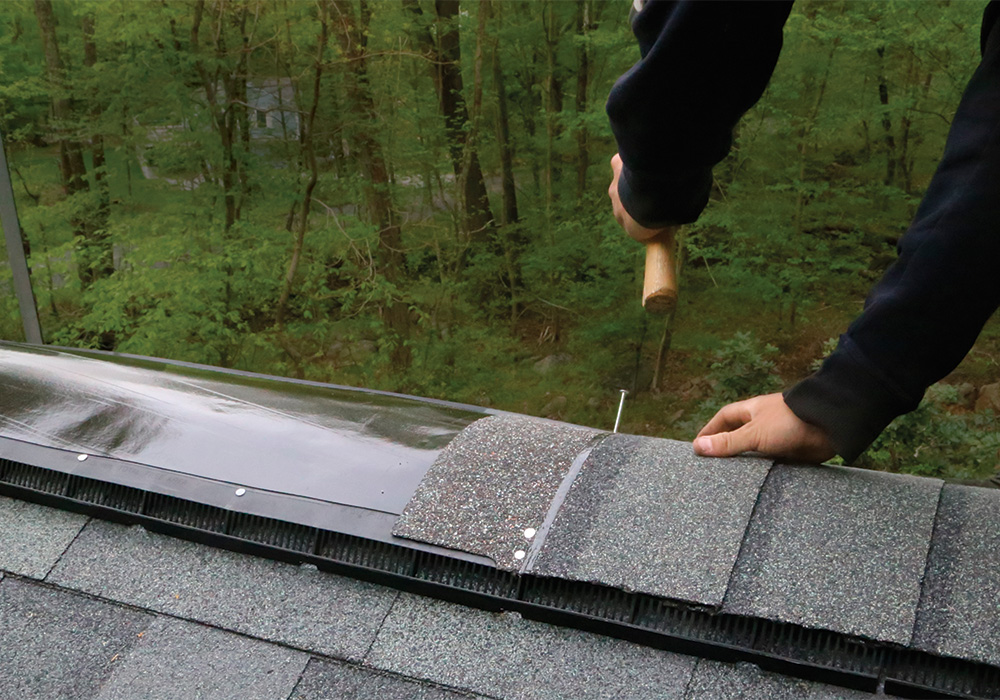
7. Stick the hip and ridge
Like the eave and rake edges, hips and ridges are vulnerable to wind. Key to securing the caps is using nails long enough to penetrate through the shingles below, any hip or ridge-vent material, and the roof sheathing. Check the manufacturer’s instructions to install the nails in the proper location. For extra hold, I also put a layer of Protecto Wrap’s Roof Edge Seal along the hips and ridge or ridge vent before installing the hip and ridge-cap shingles, and I double-nail the caps into sheathing.
When ridges aren’t being used for ventilation, the top lap of the last shingle course along the ridge can be lapped over the opposite roof surface as a means of backing up the cap shingles. This approach can also be used along a hip, where the end shingle in each course can overlap the hip by about 4 in.
8. Get the right ridge vent
Select a ridge vent that has passed the TAS 100(A)-95 test, which evaluates the wind-resistance and winddriven- rain resistance of ridge and soffit vents to meet Florida’s hurricane-focused building code. Many have built-in baffles that block wind-driven rain while still allowing free airflow. Nails are sometimes supplied with the ridge vent. When in doubt, I use 3-in. roofing nails to attach ridge vent because they work with all models. The nails should penetrate through the sheathing and protrude through the other side by at least 1 ⁄ 4 in.
9. Cold-weather backup
The self-seal strips on shingles typically need warm weather to activate. Roofing in colder seasons can delay this, making a roof vulnerable to winter winds. As a cold-weather backup, apply dabs of roof cement under the edges of field and cap shingles, and beads of cement under the outside edges of rake-edge shingles to help hold them down until the self-seal strips activate.
 |
 |
Mike Guertin is editorial adviser.
Photos by Matthew Millham, except where noted.
From Fine Homebuilding #281
To view the entire article, please click the View PDF button below.
More about building in high wind zones:
- Keeping Walls Steady in the Wind
- Uplift and Hold-downs
- Wind-Resistant Framing Techniques
- How it Works: High Winds vs. Houses
Fine Homebuilding Recommended Products
Fine Homebuilding receives a commission for items purchased through links on this site, including Amazon Associates and other affiliate advertising programs.

Roofing Gun
Fall Protection

Roof Jacks

View Comments
There was a strong hurricane that hit Florida and in one area the eight homes left standing were the ones built by Habitat for Humanity. Upon inspection it was noted that the Habitat homes had the roof shingles nailed down by hand as compared to the other homes in the area that had the shingles fastened with a gun and in the strong winds.
well done!