Vented attics with insulation on the floor are marvels of nature and man. After you air-seal openings in the attic floor and cover it with an appropriate amount of insulation, nature does the rest. Rising as it warms, air flows up from the eaves and out of ridge or gable vents, carrying off moisture that may have migrated from living spaces. In cold climates, insulation and ventilation combine to keep the roof cold, thus minimizing melting snow and ice dams. In hot climes, the same combination rids attics of sultry air and moderates temperatures in the floors below.
Codes require a net-free ventilation area (NFVA) of 1 sq. ft. of vents for each 300 sq. ft. of attic space, equally divided between eave and ridge vents. But building scientist Joe Lstiburek takes issue with that, opting instead for more ventilation at the eaves—say, a 60/40 split, with the eaves getting the greater proportion. Lstiburek reasons that giving eaves more ventilation “will slightly pressurize the attic. A depressurized attic can suck conditioned air out of the living space, and losing that conditioned air wastes money.”
As near perfect as vented attics are, though, they have weak points energy-wise. You can pile insulation as high as you like in the middle of the floor to attain required R-values, but the tight spaces where roof slopes meet sidewalls are a problem. Do your best to air-seal and pile insulation over top plates—without blocking soffit vents and the like. Installing rigid insulation over wall sheathing can reduce energy loss in this vulnerable juncture, but it’s a prohibitively expensive fix unless you already need to strip siding for some other reason.
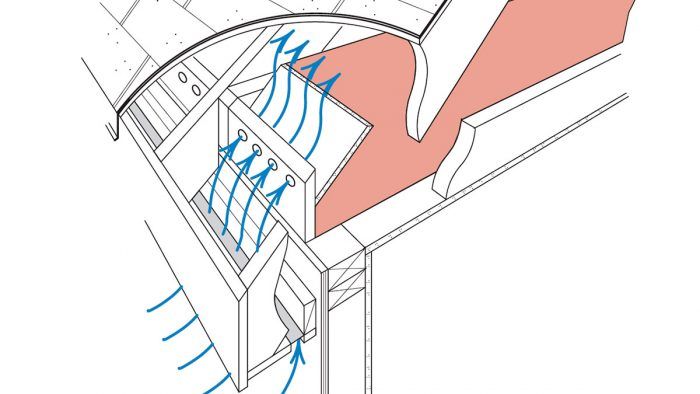
A Vented Soffit

Venting the Roof Deck
If you want to turn the attic into conditioned space or you’ve got a room with a cathedral (vaulted) ceiling, insulating and ventilating become more complex. The venting path is essentially the same—air flows up from the eaves and out at the ridge—but creating a vent channel under the roof deck can be challenging. (The IRC requires 1 in. of airspace under roof sheathing; Joe Lstiburek calls for 2 in. of airspace, minimum.) Installing a prefabricated vent baffle (above) is certainly the fastest and perhaps the most cost-effective way to create a vent channel: Staple prefab baffles between rafters and use canned spray foam to air-seal baffle edges.
Insulating under the roof is the conventional way to go and probably the most affordable if the roof is in good shape. Your heating zone, your budget, and the depth of your rafters will decide what type of insulation to use. Filling joist bays with closed-cell spray polyurethane foam will provide the greatest R-value per inch, but it’s the most expensive option. If you have 2×10 or 2×12 rafters, you may be able to reach requisite R-values, with some combination of batts between the rafters and XPS rigid foam under them. Furring out rafters to gain additional depth is another option, albeit a labor-intensive one.
Insulating Over the Roof
Insulating over the roof may be a more attractive option if your rafters aren’t deep enough or your roof is worn out and you need to strip it anyway before reroofing. The built-up roof shown in the drawing at right relies on an array of 2×4 purlins (horizontal pieces) that capture the foam panels installed over the existing roof deck and provide nailing surfaces for materials installed over the foam. An array of vertical 2×4 spacers creates vent channels over the foam and under the new plywood sheathing (a second roof deck) to which the new roofing will be nailed. This is a very complicated assembly, which should be attempted only by seasoned builders. Perhaps the most expensive solution is shown here.
Insulating Under the Roof
An unvented roof is often the only viable option when roof framing is complicated, such as when there are hips, valleys, dormers, or skylights that would prevent eave to ridge ventilation; when the house has no soffits and hence no soffit vents; or when adding eave vents would clash with the house’s architectural style. Unvented roofs also make a lot of sense in high-wind or high-fire areas, where vents might admit drenching rains or embers.
Unvented Roof
Here again, the choice of what insulation to use and whether to install it over or under the roof deck depends on the condition of the present roof, the depth of rafters, the R-value you must attain, and cost. Cost aside, the most straightforward route is spraying closed-cell polyurethane foam on to the underside of the roof deck. If you need additional R-value, install XPS foam panels to the underside of rafters, and then cover the foam with drywall. Correctly done, this assembly creates a premium air-and-thermal barrier. Again, it’s a complex roof that needs to be impeccably detailed by a pro.
Of course, there are caveats. (There are always caveats.) Unvented roofs in the snow belt may still need some type of venting to keep the roof cold and prevent ice dams. And some roofing manufacturers won’t honor warranties if their shingles are installed over unvented roofs. For more on this complex and constantly evolving topic, check out Building Science Corp’s website: www.buildingscience.com.
Fine Homebuilding Recommended Products
Fine Homebuilding receives a commission for items purchased through links on this site, including Amazon Associates and other affiliate advertising programs.

Flashing Boot Repair

Shingle Ripper

Ladder Stand Off


