How to Replace a Rotted Mudsill
Use simple lifting techniques and reliable flashing details to make this an easy and permanent repair.

Synopsis: Builder and contributing editor Mike Guertin takes readers step by step through this essential bit of old-house surgery. He offers a simple way to support the building in sections as the sill is replaced. Guertin also offers tips for avoiding future damage to this vulnerable framing member.
I could spend the rest of my career repairing decay in the homes throughout my town. Pretty good job security, I suppose. Wooden trim, siding, and framing are all susceptible to moisture, fungus, and insect damage.
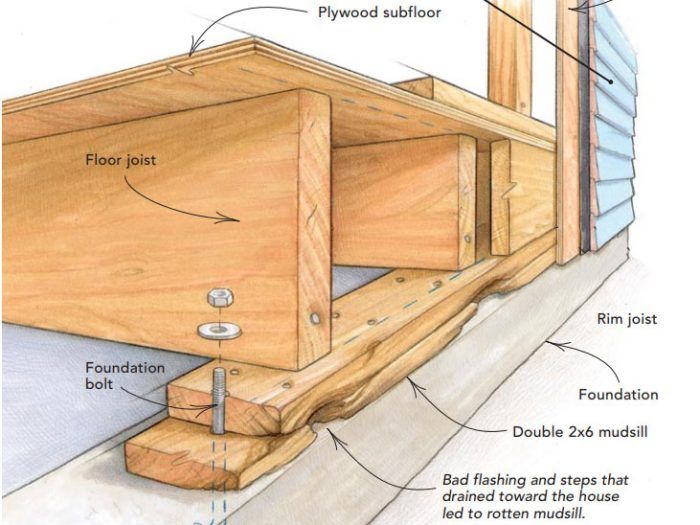
The worst damage usually occurs where porches, decks, and patios attach to the house because poor or nonexistent flashing details allow water to reach the framing. Mudsills seem to rot faster than other areas, perhaps because the top of the foundation collects water that has leaked into the structure, while more moisture wicks up through the foundation itself.
Replacing a rotten section of mudsill can be tackled from inside an unfinished crawlspace or basement, but I prefer working from outside because by the time signs of water damage are evident, the rot usually has spread into the rim joist and floor joists. Working from the exterior gives me a better view of what’s going on and better access to make repairs. In a few hours, I can open up a rim joist to expose the damage; support the floor joists while removing the affected portions of the mudsill; and replace the mudsill and rim joist where necessary.
In my area, houses built after the early 1950s have double-plate 2×6 mudsills, and the house shown here is no exception. Many houses have single-plate mudsills, but the repair technique is the same. Keep in mind that repairing the damage is only part of the solution; protecting against future moisture damage will ensure that your work was not in vain.
Remove the siding, sheathing, and rim joist
Because I’m working from outside the house, several layers need to be removed before I can access the mudsill and begin repairing the damage.
Support the floor joists with wedges
The weight of the house is transferred from the floor joists to the mudsill and then down to the foundation, so the joists must be supported properly while I cut and remove the damaged mudsill.
New sills require bolt slots and a bevel cut
Because the pressure-treated lumber that I’m installing for the lower plate of the new mudsill is slightly thicker than the dried-out lumber that was removed, I raise the floor joists slightly with a hydraulic jack, then tighten up the wedges.
Carefully seal the house
After the mudsill is in place and the wedges have been removed, it’s time to close up the house. Help to prevent future water damage by sealing the framing with sheathing, shingle underlayment, and housewrap before replacing the siding.
For more photos, drawings, and details, click the View PDF button below:
Fine Homebuilding Recommended Products
Fine Homebuilding receives a commission for items purchased through links on this site, including Amazon Associates and other affiliate advertising programs.

Magoog Tall Stair Gauges

Speed Square

QuikDrive PRO300s


View Comments
Some 10 mil polyethylene sheet between the foundation and the new mudsill will act as a lubricant. Likewise the joints between the rim joist and the subfloor & foundation. Ideally, you can arrange for the polyethylene to act as a WRB.