FHB Logo Facebook LinkedIn Email Pinterest Twitter Instagram Plus Icon Close Icon Navigation Search Icon Arrow Down Icon Video Guide Icon Article Guide Icon Modal Close Icon Guide Search Icon Skip to content
Main Menu
Subscribe

In every issue you'll find...

  • Expert insights on techniques and principles
  • Unbiased tool reviews
  • Step-by-step details to master the job
  • Field-tested advice and know-how
Subscribe Now!
Subscribe
  • How-To
  • Design
  • Tools & Materials
  • Videos
  • Blogs
  • Forum
  • Magazine
  • Members
  • FHB House
  • Podcast
  • Join
  • Log In
Main Menu Subscribe

Fine Homebuilding Project Guides

Wiring

Guide Home
Chapter
  • Working with Electricity
  • Tools and Materials
  • Receptacles and Switches
  • Lights and Fans
  • Rough-In
  • Outdoor Wiring
  • Panels and Subpanels
Tools & Materials

Tools for Wiring Rough-In

In addition to the standard electrical tools, this is the equipment you'll need for rough-in work.

By Mike Litchfield, Michael McAlister
Article Image

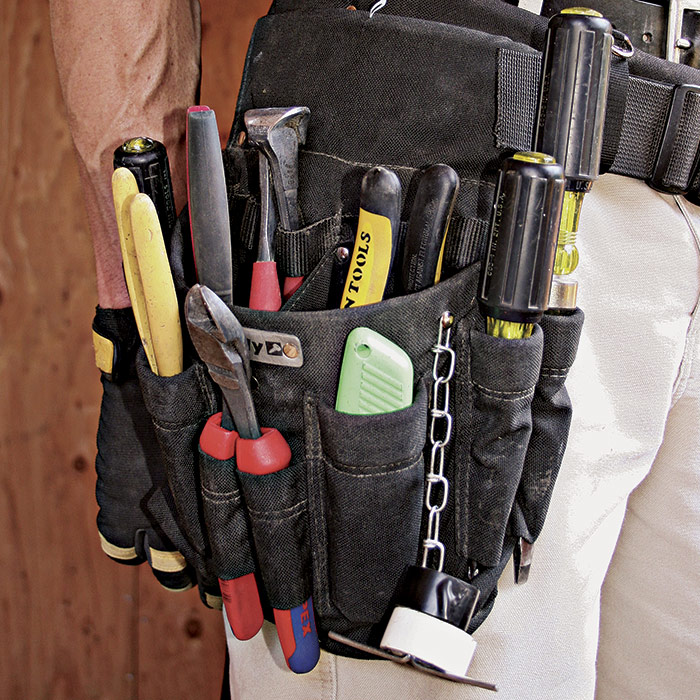
Many of the tools you’ll need for rough-in wiring are the same as those discussed in “Hand and Power Tools for Electrical Work“, so here we’ll focus on tools that make rough-in easier and more productive. All hand tools should have cushioned handles and fit your hand.

electrician’s toolbelt
A well-organized tool belt prevents you from looking for tools all day long.

Safety tools include voltage testers (a noncontact tester and a probe tester), eye protection, work gloves, hard-soled shoes, kneepads, a dust mask, and a hard hat. Hard hats are clunky but essential when you’re working in attics, basements, or any other location with limited headroom. Every job site should also have a fire extinguisher and a first aid kit visibly stored in a central location.

Adequate lighting, whether drop lights or light stands, is essential to both job safety and accuracy. If a site is too dark to see what color wires you’re working with, your chances of wrong connections increase.

Sturdy stepladders are a must. In the electrical industry, only fiberglass stepladders are OSHA compliant because they’re nonconductive. Wood ladders are usually nonconductive when dry, but if they get rained on or absorb ambient moisture, wood ladders can conduct electricity.

Shop vacuums, push brooms, dust pans, and garbage cans help keep the workplace clean. And a clean site is a safe site. Clean up whenever debris makes footing unsafe, especially if you’re cutting into walls or ceilings. Plaster lath is especially dangerous because it’s loaded with sharp little nails that can pierce the soles of your shoes.

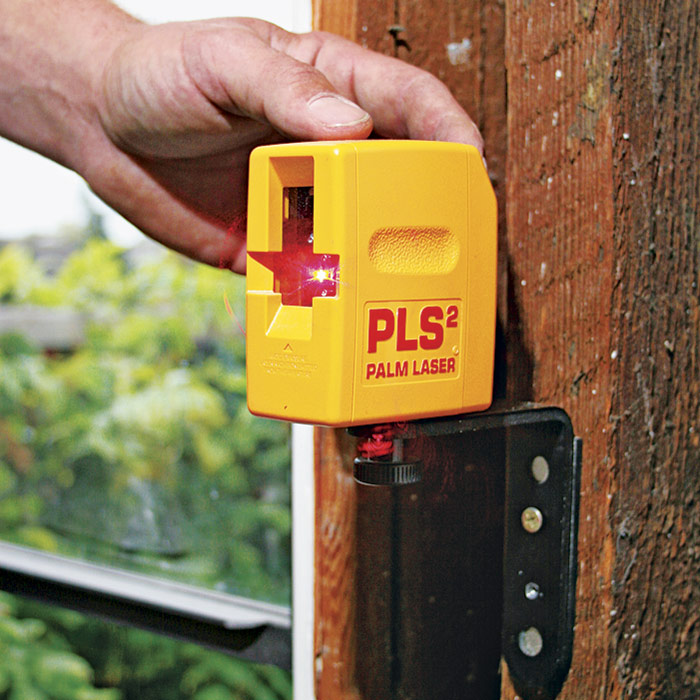
Layout tools include tape measures, spirit levels, chalklines, and lasers. Rough-in is a misleading term because there’s nothing rough or crude about locating fixtures or receptacles—layout is very exacting. For that reason, levels and plumb lasers are indispensable when laying out outlets A.

Lasers make for quick work when setting boxes
A) Lasers make for quick work when setting boxes.

A wire-nut driver speeds up wire splices
B) A wire-nut driver speeds up wire splices.

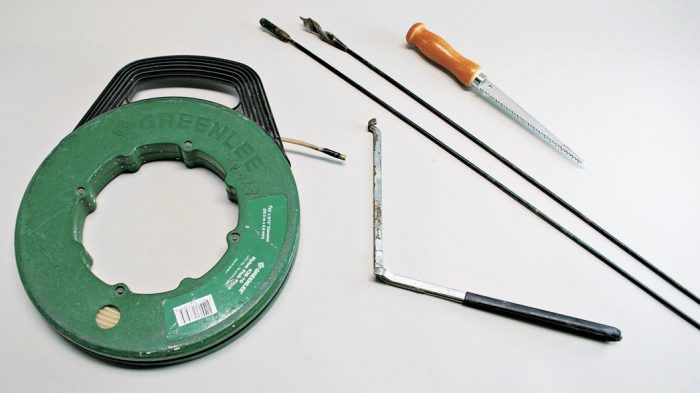
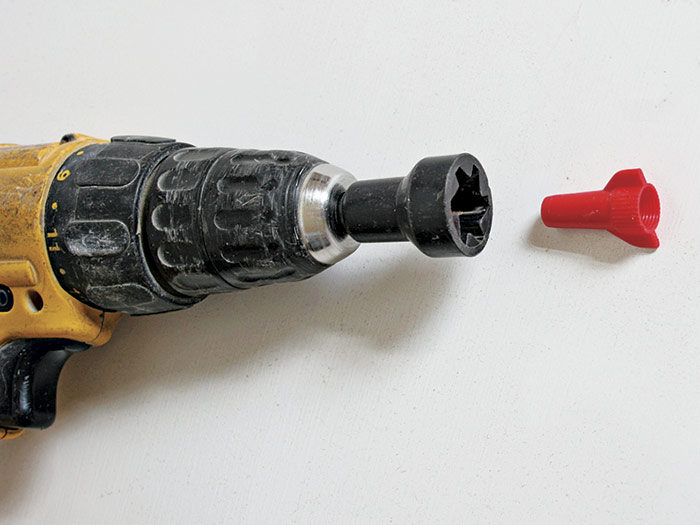
The most-used hand tools are the same pliers, cutters, strippers, levels, and screwdrivers mentioned throughout this book. It’s also handy to have a wire-nut driver B if you’ve got dozens of splices to make up. There’s also a nut-driver bit that fits into a screw gun C, but it tends to overtighten wire connectors if you’re not experienced in using it. If you’ll be cutting into and patching plaster or drywall, get a jab saw (drywall saw), a utility knife, and a taping knife. A flat bar (for prying) and an old, beat-up wood chisel are always busy in remodels, too.

A nut-driver bit speeds up splicing, but be careful not to overtwist wires.
C) A nut-driver bit speeds up splicing, but be careful not to overtwist wires.

An 18-in. auger bit bores easily through several studs.
D) An 18-in. auger bit bores easily through several studs.

Power tools help speed many tasks. Always wear eye protection when using them. A screw gun is preferable to nailing most of the time because you can easily remove a screw if you want to reposition, say, an outlet box.

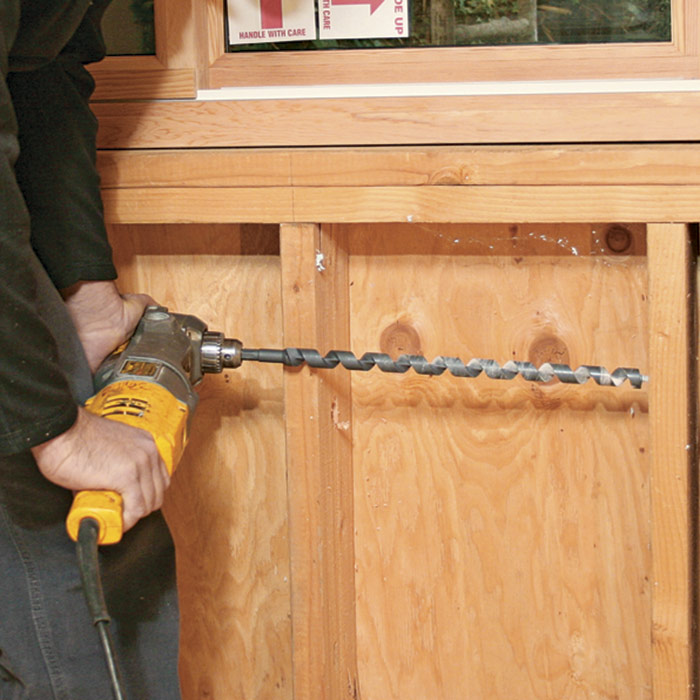
A right-angle drill with a 1⁄2-in. chuck is the workhorse of rough-in wiring because it has the muscle to drill through hard old lumber. If you will be drilling through nail-infested wood, get a “nail-eater bit”; a number of companies make them. If you use a standard 6-in.-long auger bit, the drill head and bit will fit between studs and joists spaced 16-in. on-center. It enables you to drill perpendicular to the framing to make wire pulling easier. Longer bits also have their merits: An 18-in. self-feeding auger bit D bores easily through several studs or doubled wall plates; it is also long enough that you probably won’t need a ladder to drill through top plates.

To cut larger holes in plaster or drywall—say, to retrofit pancake boxes or recessed light cans—use a fine-toothed hole saw.

Use a jab saw or an oscillating multi-tool to cut individual box openings into finish surfaces. Use a Universal E-cut multi-tool blade to cut through finish surfaces. When cutting through plaster lath, alternate cuts on each side of the opening rather than cutting one side completely. This will keep the lath from fluttering and cracking the plaster. Use a reciprocating saw to cut through framing or through plaster lath to create a wiring trench.

Use a demolition sawblade to cut through wood that contains nails or screws. It’ll hold up to such heavy work.

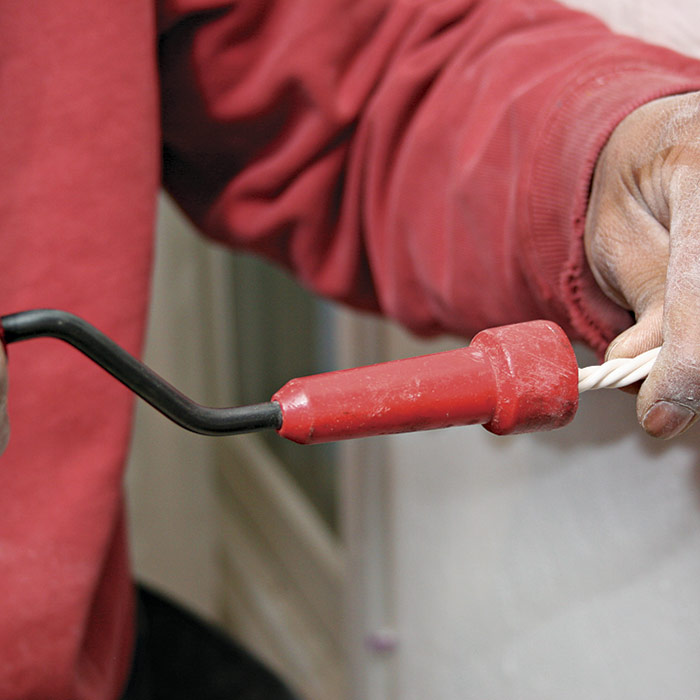
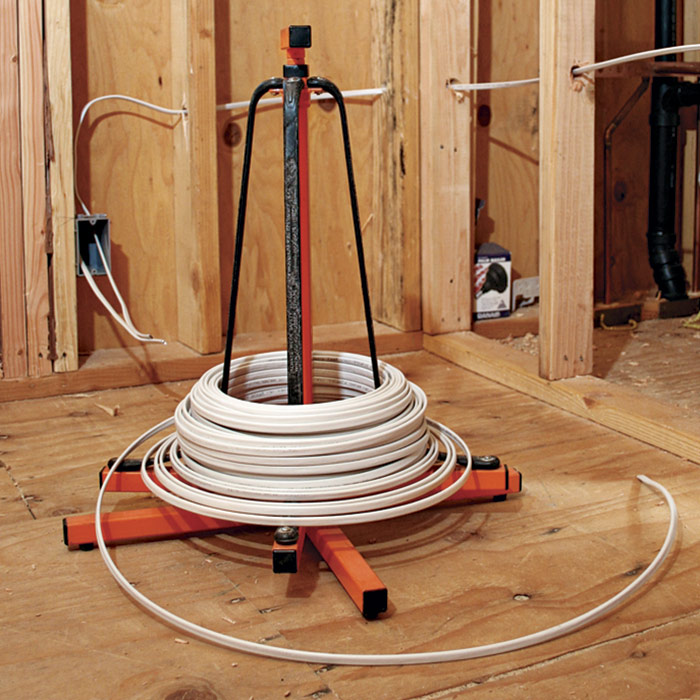
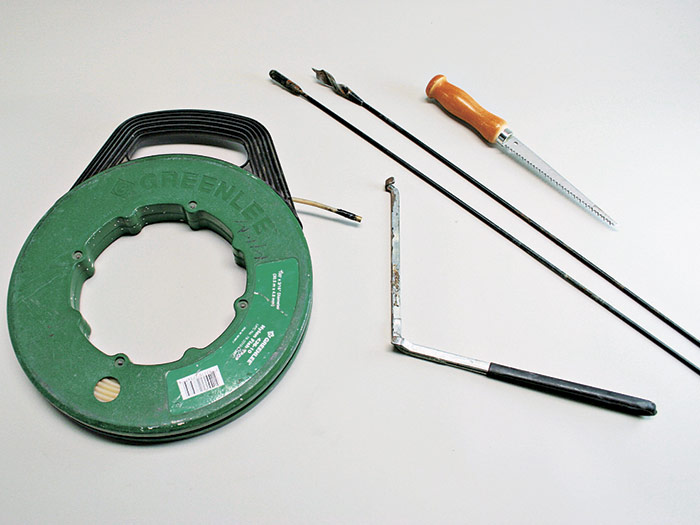
There are a number of specialty tools designed to ease rough-in. A wire reel, a rotating dispenser that enables you to pull cable easily to distant points, is worth having. Reels hold 250 ft. of cable E. A 25-ft. fishing tape—a flexible steel, fiberglass, or nylon tape—enables you to pull cable behind finish surfaces F. In most cases, however, it’s simpler to use a flex bit to drill through framing in one direction.

A wire reel prevents kinking cable as you pull it.
E) A wire reel prevents kinking cable as you pull it.

Remodel wiring tools. From right: drywall saw, flex bit, extension, flex bit steering guide, reel of fishing tape.
F) Remodel wiring tools. From right: drywall saw, flex bit, extension, flex bit steering guide, reel of fishing tape.

A 48-in. drill extension will increase the effective drilling length of a flex bit. Use a flex bit steering guide to keep the flex bit from bowing excessively.


Wiring Complete, 3rd Edition

Excerpted from Wiring Complete, 3rd Edition (The Taunton Press, 2017) by Michael Litchfield and Michael McAlister

Available in the Taunton Store and at Amazon.com.

Sign up for eletters today and get the latest how-to from Fine Homebuilding, plus special offers.

Sign Up
X
X
Previous: The Indispensable Digital Multimeter Next: Easy-Read Wire Strippers

Guide

Wiring

Chapter

Tools and Materials

Log in or create an account to post a comment.

Sign up Log in

Become a member and get full access to FineHomebuilding.com

Wiring

Wiring

Trusted, code-compliant guidance from the pros for working safely on any wiring project

View Project Guide

View All Project Guides »

Become a member and get unlimited site access, including the Wiring Project Guide.

Start Free Trial

Working with Electricity
  • Basics
  • Safety
  • Troubleshooting and Upgrades
Tools and Materials
  • Electrical Tools
  • Electrical Boxes
  • Cables and Wires
Receptacles and Switches
  • Materials
  • Wiring Receptacles
  • Wiring Switches
Lights and Fans
  • Lighting Design
  • Installing Lights
  • Fans
Rough-In
  • Planning
  • Installing Electrical Boxes
  • Running Cable
  • Retrofit Work
  • Making Connections in Boxes
  • Electrical Conduit
Outdoor Wiring
  • Basics
  • Outlets
  • Installing Lighting
Panels and Subpanels
  • Understanding Panels
  • Circuits
  • Installing a Subpanel

Fine Homebuilding

Follow

Newsletter

Get home building tips, offers, and expert advice in your inbox

Sign Up See all newsletters

Membership & Magazine

  • Online Archive
  • Start Free Trial
  • Magazine Subscription
  • Magazine Renewal
  • Gift a Subscription
  • Customer Support
  • Manage Preferences

Taunton Network

  • Green Building Advisor
  • Fine Woodworking
  • Fine Gardening
  • Threads
  • About
  • Contact
  • Advertise
  • Privacy Policy
  • Careers
  • Copyright
  • Terms of Use
  • Accessibility
  • California Privacy Rights

© 2021 The Taunton Press, Inc. All rights reserved.

    Main Menu

  • How-To
  • Design
  • Tools & Materials
  • Video
  • Blogs
  • Forum
  • Reader Projects
  • Magazine
  • Members
  • FHB House
  • Podcasts

  • FHB Podcast
  • ProTalk
  • Account

  • Log In
  • Join

    Podcasts

  • FHB Podcast
  • ProTalk
  • Popular Topics

  • Kitchens
  • Business
  • Bedrooms
  • Roofs
  • Architecture and Design
  • Green Building
  • Decks
  • Framing
  • Safety
  • Remodeling
  • Bathrooms
  • Windows
  • Tilework
  • Ceilings
  • HVAC

    Magazine

  • Current Issue
  • Past Issues
  • Magazine Index
  • Subscribe
  • Online Archive
  • Author Guidelines

    All Access

  • Member Home
  • Start Free Trial
  • Gift Membership

    Shop the Store

  • Books
  • DVDs
  • Taunton Workshops

    More

  • FHB Ambassadors
  • Reader Projects
  • Podcast
  • Customer Support

    Account

  • Log In
  • Join

Newsletter

Get home building tips, offers, and expert advice in your inbox

Sign Up See all newsletters

Follow

Join All Access

Become a member and get instant access to thousands of videos, how-tos, tool reviews, and design features.

Start Your Free Trial

Subscribe

FHB Magazine

Start your subscription today and save up to 52%

Subscribe

We hope you’ve enjoyed your free articles. To keep reading, become a member today.

Get complete site access to expert advice, how-to videos, Code Check, and more, plus the print magazine.

Start your FREE trial

Already a member? Log in