
Applying Stain to a New Deck
Learn some tips for thoroughly preparing and neatly applying a finish to a wood deck.
You completed your wood deck and can’t wait to stain it. You buy the stain and plan to have your deck transformed into the color you carefully chose. Then you read the directions on the can.
Different types of woods and finishes have different requirements. Some manufactures say you can apply their products right away, while others say that for best results you should let your deck weather for a month or more before staining. This is because the wood may harbor moisture that will repel the stain. While especially true of pressure-treated wood because of the chemicals autoclaved into it, even brand-new wood like cedar will harbor some moisture and might even have a waxy film on the surface. In the end, choosing a product that is compatible with the wood you’ve installed and following the manufacturers instructions is the best way to get good results.
Choosing the Right StainLIGHTLY TINTED OR CLEAR STAIN Nearly transparent, these stains gently enhance the color of the wood to show off—and preserve—its natural beauty. SEMI-TRANSPARENT For a bump in color, these add more tone while still allowing the beauty of the wood grain to show. SEMI-SOLID If color is your priority, this semi-opaque stain masks most of the wood grain. SOLID For decks that have been around for a while or when vibrant color is what you are after, solids add a smooth, colorful finish. |
After the seasoning period, your deck will need cleaning and perhaps brightening. Apply stain when air and wood surface temperatures are between 50°F and 90°F. If at all possible, avoid applying in direct sunlight. Don’t apply stain if rain is forecast within the next 12 to 24 hours.
TIPWhy brighten new wood? Even after a few weeks, wood will accumulate dirt and mold. More important, using a brightener with a cleaner removes mill glaze—a waxy finish common on new lumber—opening up the pores of the wood for better stain penetration. |
 1. Mix deck cleaner. Sweep the deck. Because the cleaner can be caustic, consider donning an inexpensive disposable hazmat suit. Wear gloves, boots, and eye protection. Follow the manufacturer’s instructions for mixing the deck cleaner. 1. Mix deck cleaner. Sweep the deck. Because the cleaner can be caustic, consider donning an inexpensive disposable hazmat suit. Wear gloves, boots, and eye protection. Follow the manufacturer’s instructions for mixing the deck cleaner. |
 2. Work in deck cleaner. Wet the surface. A stiff brush helps work the cleaner into the wood. Choose a cloudy day or a time of day when the deck is in the shade and the temperature is 40°F to 90°F for this chore. Attack any stubborn stains with a dash of full-strength cleaner. 2. Work in deck cleaner. Wet the surface. A stiff brush helps work the cleaner into the wood. Choose a cloudy day or a time of day when the deck is in the shade and the temperature is 40°F to 90°F for this chore. Attack any stubborn stains with a dash of full-strength cleaner. |
 3. Rinse. Rinse the deck thoroughly with a hose. If you use a pressure washer, make sure the setting is on LOW (500–1200 PSI). Allow the deck to dry overnight. 3. Rinse. Rinse the deck thoroughly with a hose. If you use a pressure washer, make sure the setting is on LOW (500–1200 PSI). Allow the deck to dry overnight. |
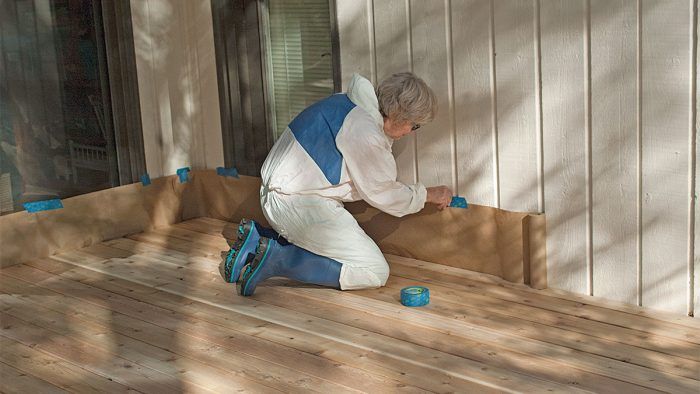
 4. Apply masking. To avoid a mishap, mask the walls surrounding the deck. Protect nearby plants with plastic sheeting or a drop cloth. 4. Apply masking. To avoid a mishap, mask the walls surrounding the deck. Protect nearby plants with plastic sheeting or a drop cloth. |
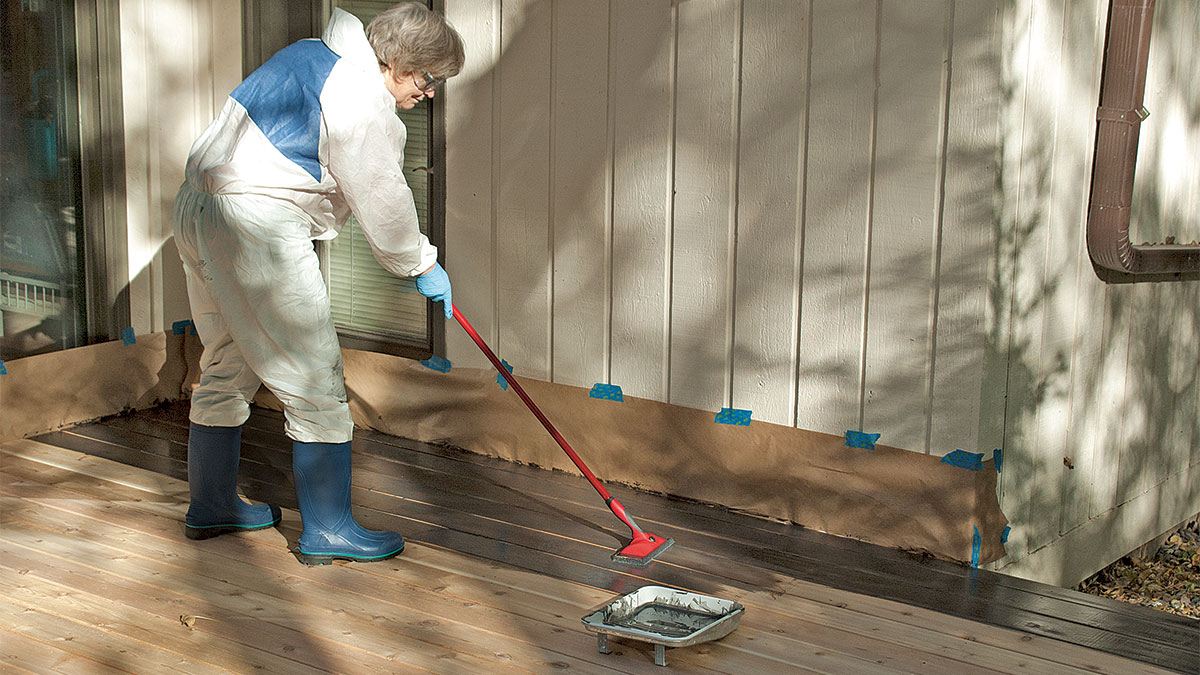 5. Apply the stain. Using the applicator recommended by the manufacturer, apply the stain. Cover the full length of three or four boards to avoid lap marks. 5. Apply the stain. Using the applicator recommended by the manufacturer, apply the stain. Cover the full length of three or four boards to avoid lap marks. |
 6. Brush the cracks. Have a brush and pan handy for working the stain into the cracks. Resist the temptation to apply multiple coats. The wood can only absorb one coat at a time. Adding too many coats will make the finish sticky. In addition, too heavy a coat of stain might flake over time. Allow plenty of drying time before using the deck. 6. Brush the cracks. Have a brush and pan handy for working the stain into the cracks. Resist the temptation to apply multiple coats. The wood can only absorb one coat at a time. Adding too many coats will make the finish sticky. In addition, too heavy a coat of stain might flake over time. Allow plenty of drying time before using the deck. |
TIPMost stains can be applied with a pump sprayer, a great way to get the stain into the cracks. |
Fine Homebuilding Recommended Products
Fine Homebuilding receives a commission for items purchased through links on this site, including Amazon Associates and other affiliate advertising programs.
4-Gallon Piston Backpack Sprayer
Standard Marking Chalk

Jigsaw
