Custom Details for a Grade-Level Deck - Fine Homebuilding FHB Logo Facebook LinkedIn Email Pinterest Twitter Instagram Plus Icon Close Icon Navigation Search Icon Arrow Down Icon Video Guide Icon Article Guide Icon Modal Close Icon Guide Search Icon Skip to content
Main Menu
Subscribe

In every issue you'll find...

  • Expert insights on techniques and principles
  • Unbiased tool reviews
  • Step-by-step details to master the job
  • Field-tested advice and know-how
Subscribe Now!
Subscribe
  • How-To
  • Design
  • Tools & Materials
  • Videos
  • Blogs
  • Forum
  • Magazine
  • Members
  • FHB House
  • Podcast
  • Join
  • Log In
Main Menu Subscribe

Fine Homebuilding Project Guides

Decks

Guide Home
Chapter
  • Design & Planning
  • Tools & Materials
  • Footings & Foundations
  • Framing a Deck
  • Installing Decking
  • Installing Railings
  • Deck Stairs
  • Custom Details
  • Finishes and Maintenance
  • Complete Deck Builds
How-To

Custom Details for a Grade-Level Deck

Dress up a small deck with a custom bench, a privacy wall, and skirtboards.

By Mike Guertin
Article Image

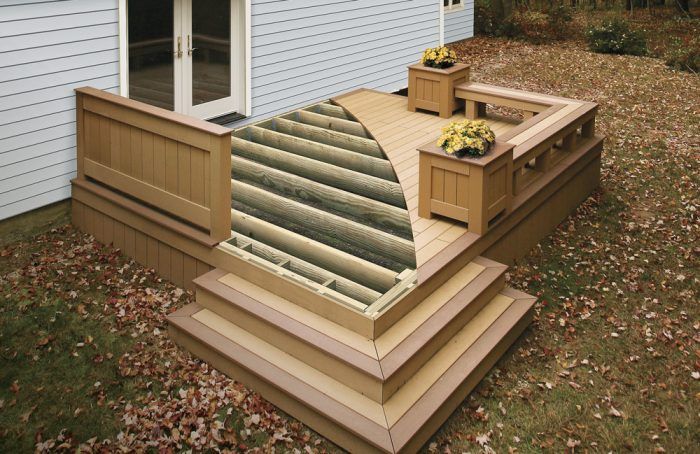
Built-in seating on a deck not only defines the perimeter of the deck, but it also provides a great place for folks to relax. We used the same decking, trim materials, and border pattern so that the bench would blend in with the rest of the deck.

build a bench on a deck

Place post sleeves before installing the bench frame
Place post sleeves before installing the bench frame. Rip trim stock with a 45° bevel, then assemble sleeves with two-part acrylic adhesive and stainless-steel micropins.

build a bench on a deck using placeholders.
Use placeholders. To locate the first board on the seat, space all three boards with loose deck clips to produce the appropriate overhang. Set the clips, drill pilot holes along the outside, drive in the screws, and plug the holes.

Trim the edges of the bench on a deck
Trim the edges. Cover the edge of the 2×4 frame with trim ripped to 4 in. wide and fastened with color-matched trim-head screws.


A half-wall creates privacy off the deck for a grill, recycling bin, or hose reel. Drill pilot holes before screwing together the 2×2 frame. After attaching 1/2-in. pressure-treated plywood on one side, apply joist tape where the joints for the vertical boards will be. Space boards 1/8 in. apart, and fasten with color-matched stainless-steel screws.


Check Code: Decks that are higher than 30 in. off the ground must have guardrails with a top rail at least 36 in. high. Some jurisdictions measure the guard height from the surface of built-in seating; others measure off the deck surface. Check to see how your local building department applies the code.


Start with a simple base. Size a 2×2 frame to fit between the two trimmed-out posts, but make it 3 in. shorter than the post height to create a gap at the bottom.

Screw the panel to the posts. Raise the half-clad panel on top of 3-in. spacer blocks, and align it 1/2 in. From the post cover edges. Drive screws through the 2x2s into the posts to secure the panel. Cover the unclad side with black tape, and install vertical trim boards.

Finish with trim. Screw the same trim material used to clad the wall to the top and bottom of the panel. For contrast, cap the top with one of the darker trim boards.


Dress up the perimeter

Our design called for the perimeter of the deck to be enclosed by a skirt made from 5⁄8-in.-thick composite trim boards installed vertically. To create nailing for the skirt, blocking hangs from the side joist.

dressing up the perimeter of the deck
Appearances matter here. To keep a consistent gap between each board, use a trim-head screw as a spacer at the top and bottom. Cut the skirtboards to reach from the top of the deck frame to grade, which can vary around the deck.
dressing up the perimeter of the deck

Photos by Charles Bickford, except product photo by Dan Thorton; drawing by Toby Welles, WowHouse.

The Complete Guide to Building a Grade-Level DeckTo see how we built this entire deck, read the article:
The Complete Guide to Building a Grade-Level Deck

Sign up for eletters today and get the latest how-to from Fine Homebuilding, plus special offers.

Sign Up
X
X
Next: Building a Privacy Screen

Guide

Decks

Chapter

Custom Details

Log in or create an account to post a comment.

Sign up Log in

Become a member and get full access to FineHomebuilding.com

Decks

Decks

Hundreds of articles and videos by top deck-building pros on how to design and build a beautiful, sturdy, and safe deck

View Project Guide

View All Project Guides »

Become a member and get unlimited site access, including the Decks Project Guide.

Start Free Trial

Design & Planning
  • Basic Design Options
  • Generating Plans
  • Calculating Deck Loads
  • Code Compliance
Tools & Materials
  • Deck Building Tools
  • Foundation and Framing Materials
  • Decking Materials
  • Fasteners and Hardware
Footings & Foundations
  • Choosing a Foundation
  • Sizing and Laying Out Footings
  • Excavation
  • Pouring the Foundation
Framing a Deck
  • Framing Overview
  • Installing the Ledger
  • Setting Posts and Beams
  • Installing Joists
Installing Decking
  • Decking Basics
  • Installation Process
  • Adding Fascia and Other Decorative Elements
Installing Railings
  • Installing Deck Railing Posts
  • Building Wood Rails and Balustrades
  • Non-Wood Railing Options
  • Installing Nonwood Balustrades
Deck Stairs
  • Deck Stairs Overview
  • Laying Out, Cutting, and Installing the Stringers
  • Installing Treads, Risers, and Stair Railings
Custom Details
  • Benches, Planters, and Privacy Features
  • Pergolas
  • Lighting
Finishes and Maintenance
  • Deck Finishes
  • Cleaning and Refinishing
  • Inspection and Repair
Complete Deck Builds
  • Grade-Level Decks
  • Raised Decks

Fine Homebuilding

Follow

Newsletter

Get home building tips, offers, and expert advice in your inbox

Sign Up See all newsletters

Membership & Magazine

  • Online Archive
  • Start Free Trial
  • Magazine Subscription
  • Magazine Renewal
  • Gift a Subscription
  • Customer Support
  • Manage Preferences

Taunton Network

  • Green Building Advisor
  • Fine Woodworking
  • Fine Gardening
  • Threads
  • About
  • Contact
  • Advertise
  • Privacy Policy
  • Careers
  • Copyright
  • Terms of Use
  • Accessibility

© 2021 The Taunton Press, Inc. All rights reserved.

    Main Menu

  • How-To
  • Design
  • Tools & Materials
  • Video
  • Blogs
  • Forum
  • Reader Projects
  • Magazine
  • Members
  • FHB House
  • Podcasts

  • FHB Podcast
  • ProTalk
  • Account

  • Log In
  • Join

    Podcasts

  • FHB Podcast
  • ProTalk
  • Popular Topics

  • Kitchens
  • Business
  • Bedrooms
  • Roofs
  • Architecture and Design
  • Green Building
  • Decks
  • Framing
  • Safety
  • Remodeling
  • Bathrooms
  • Windows
  • Tilework
  • Ceilings
  • HVAC

    Magazine

  • Current Issue
  • Past Issues
  • Magazine Index
  • Subscribe
  • Online Archive
  • Author Guidelines

    All Access

  • Member Home
  • Start Free Trial
  • Gift Membership

    Shop the Store

  • Books
  • DVDs
  • Taunton Workshops

    More

  • FHB Ambassadors
  • Reader Projects
  • Podcast
  • Customer Support

    Account

  • Log In
  • Join

Newsletter

Get home building tips, offers, and expert advice in your inbox

Sign Up See all newsletters

Follow

Join All Access

Become a member and get instant access to thousands of videos, how-tos, tool reviews, and design features.

Start Your Free Trial

Subscribe

FHB Magazine

Start your subscription today and save up to 52%

Subscribe

We hope you’ve enjoyed your free articles. To keep reading, become a member today.

Get complete site access to expert advice, how-to videos, Code Check, and more, plus the print magazine.

Start your FREE trial

Already a member? Log in