
The Complete Guide to Building Second-Story Deck Over a Patio
Angled planks and a custom railing make this deck special. Here’s how to make it your own.
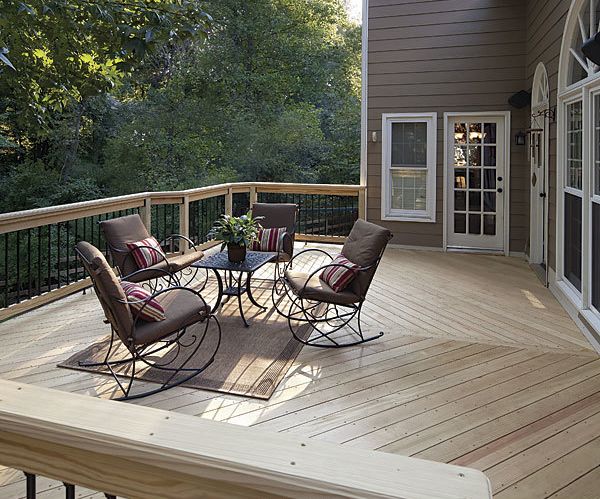
Synopsis: Follow veteran deck builder Bobby Parks and his crew as they construct a new raised deck on a Georgia home. Featuring clipped corners, tubular balusters, and decking laid diagonally, the project combines standard lessons in deck construction with smart ideas any deck builder can use to make a simple deck special. Parks explains his approach step-by-step, with advice on framing, building stairs, setting posts, and adding railings.
My company designed and built the deck profiled here to replace a relatively new deck whose code violations were too numerous to mention. Our clients, who live in an Atlanta suburb, had asked us to integrate the new deck with an existing grade-level patio and to use materials that would perform well and look good for many years. Because they liked the look of natural wood but wanted to minimize maintenance, we used vertical grain pressure-treated decking kiln-dried after treatment (KDAT). The frame and railings are pressure-treated as well, and the balusters are aluminium.
A crew of three built this deck. They established the ledger, erected the beam, and then filled in the framing. Decking was installed next, followed by the footings, posts, railings, and stairs. To be efficient, we didn’t wait to complete each stage of the process before moving to the next. While one carpenter was starting the layout for one phase, the other two could finish the previous phase.
Attach the ledger
Because the ledger is connected to the house’s framing, it must be flashed to prevent water from getting behind the ledger and into the framing, where it could compromise the attachment points and cause the deck to separate from the house. I use three pieces of vinyl flashing, bending the bottom piece into a “Z” to fit behind the ledger. For more protection, use self adhesive membrane as the final piece, which laps over the top.
 Bend vinyl with a nail set. The easiest way to make precise bends on vinyl flashing is to use a straightedge and to score the bend line with a nail set or a similar tool that won’t cut through the material. Bend vinyl with a nail set. The easiest way to make precise bends on vinyl flashing is to use a straightedge and to score the bend line with a nail set or a similar tool that won’t cut through the material. |
 Put the ledger in place. After you install the Z-flashing and a wide piece of vinyl flashing, tack the 2×12 ledger in place with 16d galvanized nails. Its position is determined by a previously chalked level line and checked with a level during installation. Put the ledger in place. After you install the Z-flashing and a wide piece of vinyl flashing, tack the 2×12 ledger in place with 16d galvanized nails. Its position is determined by a previously chalked level line and checked with a level during installation. |
 The fast way to lay out bolts. My crew typically doesn’t drill the holes for the carriage bolts that secure the ledger to the house until the joists are tacked in place temporarily. The wait lets them space the bolts so that they don’t interfere with the joist hangers. The fast way to lay out bolts. My crew typically doesn’t drill the holes for the carriage bolts that secure the ledger to the house until the joists are tacked in place temporarily. The wait lets them space the bolts so that they don’t interfere with the joist hangers. |
Frame the deck
We use a post-and-beam cantilever method rather than a doubled outer-deck band. Cantilevering deck joists over a carrying beam creates a stronger structure that minimizes the distance the joists have to span. In turn, this increases the deck’s live-load capacity, or its ability to carry weight beyond that of the deck itself. This method also makes it easier to include bays and bump-outs in the deck’s design without locating a post at every corner.
 For more photos, drawings, and details, click the View PDF button below:
Fine Homebuilding Recommended Products
Fine Homebuilding receives a commission for items purchased through links on this site, including Amazon Associates and other affiliate advertising programs.
Cepco BoWrench Decking Tool
Standard Marking Chalk

Metal Connector Nailer
