
Attach a Deck to Any Wall
Builder Mike Guertin outlines code-compliant ledger and lateral-tie details for all types of deck builds.
Synopsis: Mike Guertin details the most common ledger and lateral-tie requirements for building decks on most homes, including location and spacing of lag screws, and attachment details for 1500-lb. and 750-lb. connectors to solid lumber and to web trusses and i-joists. The article include labeled illustrations of the connection details as specified in DCA 6 and the International Residential Code.
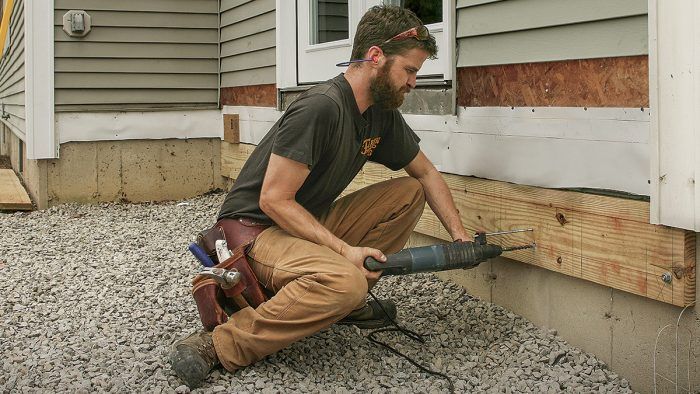
Even a 12-ft. by 14-ft. deck’s ledger has to support a minimum of two tons—a lot to ask of a single board screwed to the side of a house. In addition to gravity loads, we also have to make sure the deck can resist lateral load, which is the horizontal force that pulls a deck away from the house. For many years, the international residential code (IRC) only gave us a performance criteria to meet: “Where supported by an exterior wall, decks shall be positively anchored to the primary structure and designed for both vertical and lateral loads.” Unless you hired an engineer to design the ledger and lateral-load attachments or you knew how to apply engineering principles, you couldn’t competently design and mount a code-compliant deck to a house.
Most of us now rely on prescriptive tables and illustrations to achieve a structurally sound, code-compliant ledger attachment. There are three main resources: prescriptive measures outlined in the IRC, instructions provided by fastener or engineered- lumber manufacturers with an international code council Evaluation Service report (ICC-ESR), or an “approved” technical guide provided by an industry association.
There are variations in deck sizes and loading, house framing, and deck-designer and deck-builder preferences. We can’t address every scenario in a short article, but here are the most common ledger and lateral-tie requirements for building decks on most homes. Some code jurisdictions have developed their own prescriptive deck-ledger attachment requirements and may prohibit some of the solutions presented here. Check with your local building-code official to ensure you’re following the locally enforced code provisions. also, remember that properly flashing a ledger is key to a safe, long lasting deck. For clarity, the drawings in this article don’t show WRB or flashing details. See my step-by-step videos in the Ultimate Deck Build for some of these.
Ledger Basics
The specified location of the lag screws or through-bolts ensures there’s enough ledger wood above the top row of fasteners and enough rim-joist wood below the bottom row of fasteners to reduce splitting. In addition, there are minimum and maximum distances the two rows of fasteners can be spaced apart. Proper pilot and clearance holes are also required, and the fasteners must be hot-dipped galvanized or stainless steel. Recessed heads are not allowed, nor are carriage bolts.

The fastening schedule provided in the 2018 IRC and earlier versions cannot be used for decks with live or ground snow loads in excess of 40 psf, or dead loads in excess of 10 psf. The 2021 IRC has fastening schedules for snow loads as high as 70 psf. The connections must allow for inspection to ensure edge spacing and proper penetration (threads beyond nut for bolts and beyond tapered tip for lags).
Deck builders in snowy regions often build decks 5 in. to 7 in. lower than the interior floor level to keep snow from building up against doors that access the deck. This can’t be accomplished when following the IRC table, because of the required edge distances.
What about structural screws?
FastenMaster’s LedgerLOK, Simpson’s SDWH and SDWS, SPAX’s PowerLags, MiTek’s WS series, and GRK’s RSS structural screws have ledger-fastening schedules. Unlike bolts or lags, most ledger-ready structural screws include fastener spacing for engineered rim joists. Some are suitable for live loads greater than 40 psf, which is great for areas with heavy snow.
And for those deck builders who like to set the deck one step down from the house-floor level, the lower row of screws can be driven into the center of the mudsill or wall plate (predrilling may be required). Some manufacturers permit the ledger to be mounted into studs rather than into a rim joist, which is great for midwall stair landings. These less-common applications aren’t widely publicized in the product literature, so it’s best to contact technical support.
Attaching ledgers to solid lumber
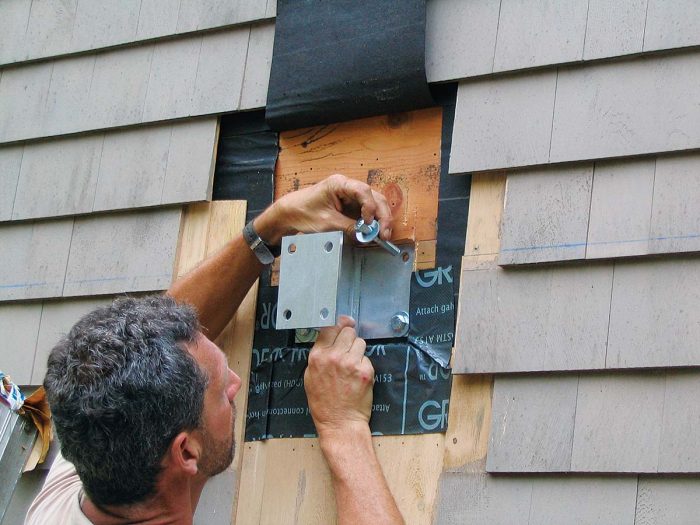
Lateral-load connections prevent deck loads from pulling the rim joist off the house, leading to a deck collapse. The code offers two solutions: Two 1500-lb. or four 750-lb. connectors.
1500-lb. lateral-load connectors
1500-lb. lateral-load connectors join two floor joists or blocks inside the house to two deck joists outside. The interior and exterior parts are held together with a continuous 1⁄2-in. threaded rod. The connectors must be installed in not less than two locations per deck, within 24 in. of each end of the deck. When the floor joists and the deck joist don’t align horizontally, you can angle the rod or install blocking fastened to the side of the joist to bring them into closer alignment. Some 1500-lb. connectors don’t have enough offset in their mounting plates to clear joist-hanger flanges. You can either install a concealed flange hanger on the two deck joists where the connectors will be attached or screw blocks to the sides of the joist so the threaded rod clears the flange.
This style of lateral-load connection sometimes requires holes in finished ceilings. You can minimize the amount of patching necessary by adding a small access panel on the ceiling underneath where the tension tie is mounted. The connector can also be installed from the outside by removing a section of rim joist. When the deck joists run perpendicular to the floor joists, 1500-lb. connectors are the only IRC-approved prescriptive option.
750-lb. later-load connectors
Because they install entirely from the exterior, 750-lb. lateral-load connections are faster and easier to install. The connection is made between a deck joist and the mudsill, wall top plate, or wall stud. One connector is required within 2 ft. of both ledger ends, with two additional connectors equidistant between the end connectors. Several mounting locations and blocking arrangements are illustrated in manufacturer literature, and installation methods must comply with their instructions. Unfortunately, 750-lb. connectors can’t be used when the home and deck joists are perpendicular.
If the floor framing is parallel, you can use 1500-lb. lateral ties simply to connect the floor joists and the deck joists. Installation methods are similar, but consult the respective manufacturer for specifics. You can also install four 750-lb. ties.
If the floor framing is perpendicular, you can use the same 1500-lb. lateral ties. The installation is different, and requires the interior connector to be mounted in the second joist bay on blocking installed between the joists.
With exterior rigid foam, you can make a code-compliant assembly by simply omitting the foam layer behind the ledger. This allows you to use the prescriptive ledger-fastener and spacing requirements described in the IRC and DCA 6. The 1500-lb. lateral-tie methods are the same as assemblies without foam. You can also use four 750-lb. lateral ties, assuming the house and deck joists are parallel and
the screws are embedded 3 in. into the framing.
With thick exterior rigid foam, brick, stone, adhered stone, or stucco, the ledger-mounting details get more complicated. The Cold Climate Research Center’s REMOTE construction guide offers one option, using stand-off blocks and through-bolts to mount ledgers up to several inches off the wall. There is no prescriptive guide for spacing the bolts and blocks, so you’ll need to have a structural engineer adapt the system to suit each situation. You can also build a freestanding deck, which is often less expensive than an engineered solution.
Off-the-shelf alternatives
Attaching ledgers to web trusses and I-joists
Mounting a deck ledger to an open-web floor-truss system is pretty straightforward. The Structural Building Components Association (SBCA) provides the details. Fastener options are 1⁄2-in. galvanized lag screws or hex bolts. The spacing is the same for both options and you can’t use proprietary structural screws. The fastener spacing is either 24 in., 12 in., or 8 in. on center, which coincides with the
typical 24-in.-on-center truss spacing. Ledgers mounted to floor-truss systems must be either 2x10s or 2x12s, even when the deck is framed with 2×8 or 2×6 joists. Fasteners must be positioned to avoid damaging or penetrating any truss plates, and you can’t fasten
to the ribbon board.
If trusses are parallel, fastener spacing and details depend on the joist spacing. When the ledger-fastener spacing is 24 in. on center, a bolt or screw is driven into the end of each truss. At a 12-in. or 8-in. spacing, “key blocks” made of two 2x4s are fit between the trusses for additional fastening. The first layer of the key blocks is cut so it fits between the ribbon board and the mudsill or top plate. A second layer of 2×4 that reaches to the top of the ribbon board is nailed to the back for extra support. If the ledger is bearing on a stud wall with a single top plate, the key blocks must line up with the studs below.
If trusses are perpendicular, there is often an end truss specified to provide vertical members spaced 8 in.,12 in., or 16 in. on center, instead of the diagonal webs common to standard trusses. In these cases, the deck ledger is attached to the vertical members directly. If the end trusses have diagonal members like the rest of the floor, blocking can be fit between the top and bottom chords, but how this is accomplished must be specified by the truss manufacturer or a structural engineer.
If I-joists are parallel to the deck joists, the lateral-load connection is similar to the one used for solid lumber, but it includes a 3-ft. piece of 2×6 attached to the side of the joist with sixteen 10d nails and nineteen 8d nails through the sheathing into the joist. The threaded rod can be angled horizontally or vertically up to 1 in. in 12 in. for easier installation. This detail comes from DCA 6 and I-joist manufacturers.
If I-Joists are perpendicular to the deck joists, the lateral-load connection is challenging. Simpson’s Stronge-Tie’s DTT2Z requires blocking between the rim board and the interior I-joists extending 6 ft. back into the floor system with the 1500-lb. connector mounted on the farthest block. MiTek’s DTB-TZ only has to extend to the second joist bay, making it less invasive. Unfortunately you can’t use four 750-lb. lateral-load connectors. Installing the blocking and lateral ties requires big holes on existing ceilings and subsequent patching and painting. One alternative is to build a freestanding deck, which doesn’t require a ledger or lateral ties.
Concrete and masonry
The Fairfax County, Va., Deck Construction Guide lists a prescriptive table for attaching deck ledgers to solid concrete or fully-grouted CMU using 1⁄2-in. adhesive anchors or wedge anchors. In order to use this detail you need to get approval from the local code official. Follow minimum depths and edge distances prescribed by the anchor manufacturer. In addition to wedge anchors and adhesive anchors, Simpson Strong-Tie’s stainless-steel Titen HD can be used to mount a ledger to solid concrete or grouted CMU. Note: the standard galvanized Titen HD cannot be used.
Fairfax County also permits ledgers to be fastened to hollow CMU using adhesive anchors and a “screen” (mesh tube) on the inside to retain the adhesive. Follow the adhesive-anchor-system manufacturer instructions.
Photos courtesy of Charles Bickford; drawing courtesy of Christopher Mills.
RELATED LINKS
- Lateral Load Deck Connector Options
- Build a Grade-Level Deck: Install a Ledger
- Get Your Deck Off to a Good Start
Fine Homebuilding Recommended Products
Fine Homebuilding receives a commission for items purchased through links on this site, including Amazon Associates and other affiliate advertising programs.

Homebody: A Guide to Creating Spaces You Never Want to Leave

Lithium-Ion Cordless Palm Nailer

Musings of an Energy Nerd: Toward an Energy-Efficient Home
