FHB Logo Facebook LinkedIn Email Pinterest Twitter X Instagram Tiktok YouTube Plus Icon Close Icon Navigation Search Icon Navigation Search Icon Arrow Down Icon Video Guide Icon Article Guide Icon Modal Close Icon Guide Search Icon Skip to content
Subscribe
Log In
  • How-To
  • Design
  • Tools & Materials
  • Restoration
  • Videos
  • Blogs
  • Forum
  • Magazine
  • Members
  • FHB House
  • Podcast
Log In

Fine Homebuilding Project Guides

Decks

Guide Home
  • Design & Planning
  • Tools & Materials
  • Footings & Foundations
  • Framing a Deck
  • Installing Decking
  • Installing Railings
  • Deck Stairs
  • Custom Details
  • Finishes, Repairs, and Maintenance
  • Complete Deck Builds
How-To

2 Ways to Install Post Bases in Concrete Footings

Wet-set or dry-set? Consider the pros and cons of each method before pouring your deck footings.

  • X
  • facebook
  • linkedin
  • pinterest
  • email
  • add to favorites Log in or Sign up to save your favorite articles

There are generally two ways to install footing hardware: either while the concrete is still wet or once it has set. Wet-setting hardware has the advantage that there is no drilling or application of epoxy. However, there is a limited amount of time to get the placement perfect. Dry-setting hardware in footings is just the opposite. You’ll have all the time you want, but drilling out the hole and setting the bolt with epoxy can be an aggravating process. Also, there are fewer hardware options that are designed for dry setting.

Wet-setting hardware

As mentioned, the main challenge in wet-setting foundation hardware is quickly locating the hardware exactly where it needs to go; depending on the juiciness of the concrete mix, getting the hardware to stay put while the concrete sets can present an additional challenge. A simple alignment technique is to position a board to register the hardware against. Align the board to the edge of the post run and install all the hardware with one edge touching the board. Depending on the weight of the board, you may have to secure it temporarily by tacking the board to the blocks. After about 5 minutes, check the hardware to make sure that is has not shifted or sagged off alignment.

1. Set the post base’s anchor in the wet concrete aligned with the layout line.


2. Use a straight board aligned with the edge of the run of posts as a positive stop to position the post bases.


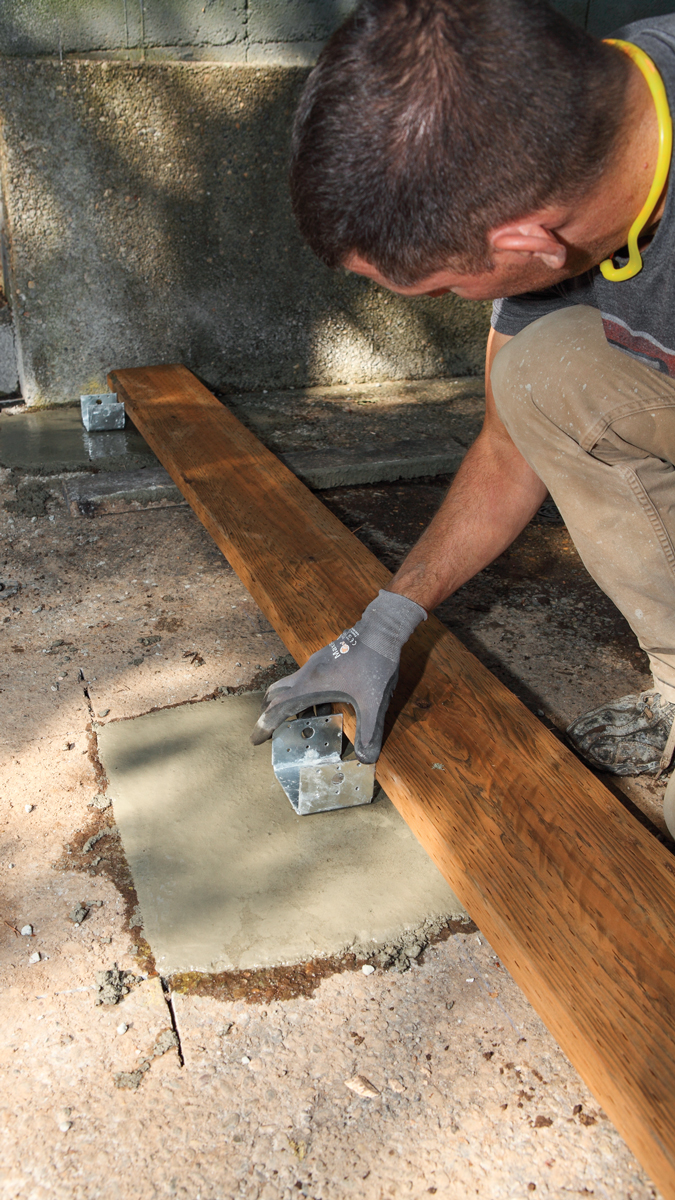
3. Check the position after 5 minutes to make sure the post base has not shifted out of position. If necessary, attach it to the alignment board.


Dry-setting hardware

To dry-set hardware, let the concrete cure for at least 24 hours (drilling green concrete runs the risk of cracking it). Most attachment hardware systems have a plate or washer that the bolt slides through. This plate can be used to locate where to drill the bolt hole. When drilling for a 5⁄8-in. bolt, make the hole slightly oversize; otherwise, the dust and debris in the hole will clog the bolt and not allow it to set fully in the hole. Hardware manufacturers will specify the appropriate size bolt and hole for their specific hardware.

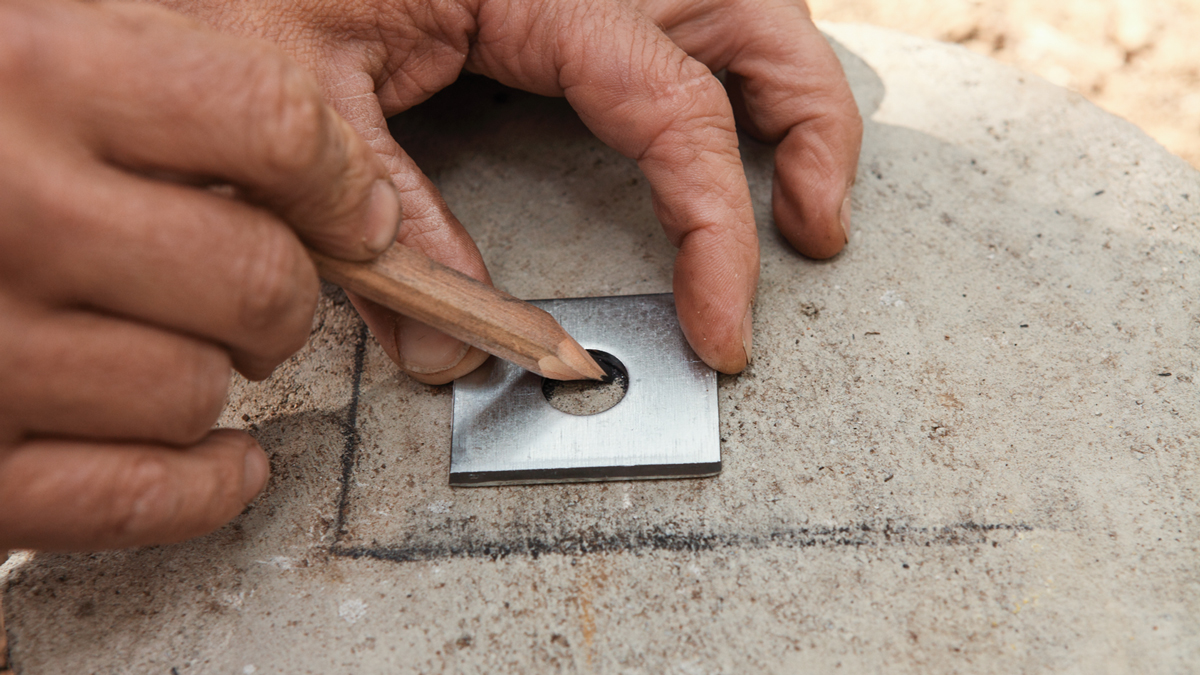
1. Locate the bolt’s center mark using the post base’s attachment plate.


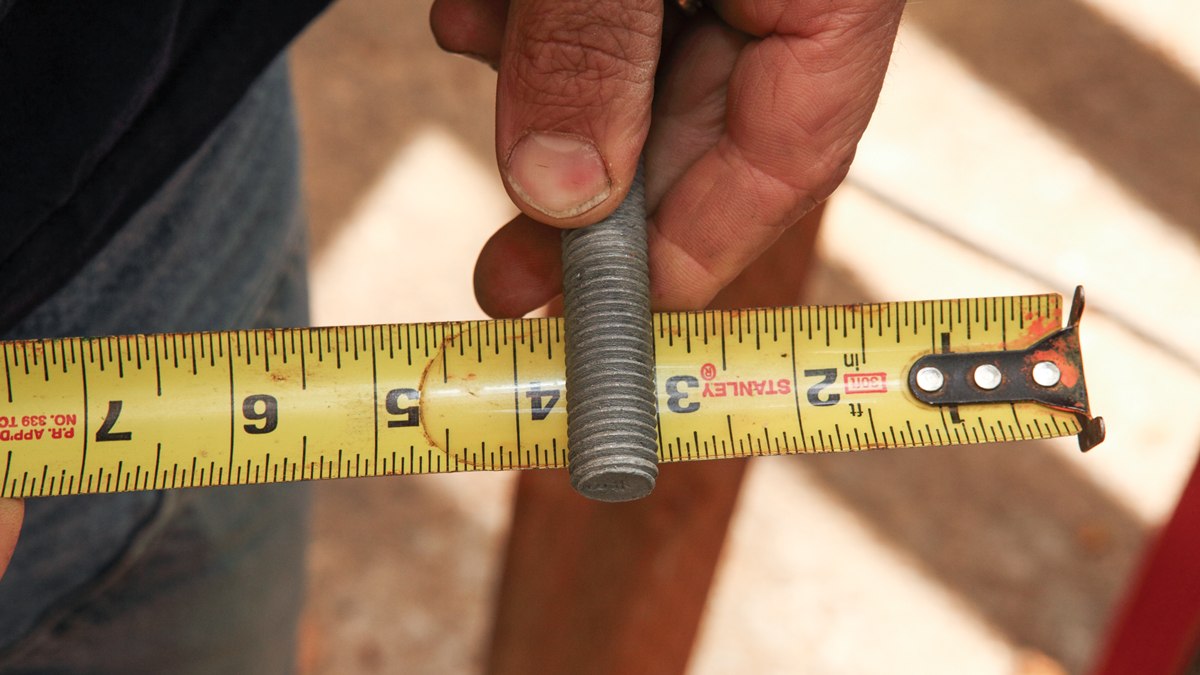
2. Check the bolt size and compare it to the manufacturer’s specified bit size.


Using the right equipment to safely drill holes

It was once considered acceptable to drill holes in concrete without collecting or protecting from dust, but concerns about silica-related respiratory diseases have causes OSHA to require special equipment to protect people on the job site. OSHA has a silica-dust-control fact sheet which provides the information you need to safely drill holes. The risks are great enough that you may just opt for wet setting your hardware for this reason alone.

Installing epoxy anchoring systems

If you have decided to drill the holes and you’re ready to install the bolts, there is a fairly detailed protocol for securing a bolt with epoxy. Be sure to follow the instructions provided by the manufacturer to ensure a good bond, but here’s a general description of how most epoxy adhesives work.

Two-part epoxy enters the mixing tube as separate black and white elements and mixes as it progresses down the tube. It should be an even gray when it exits the end of the tube, which indicates that it’s thoroughly mixed. The applicator tube should be of a small enough diameter to allow you to insert the tube into the bolt hole and apply the epoxy up from the bottom of the hole. The first time you insert the bolt it will want to spring back up because of the epoxy’s elasticity. To avoid this springback, plunge the bolt until the epoxy has worked up the sides of the hole and the bolt shank. Then, if necessary, hold the bolt down until it decides it wants to stay. Note that the nut should be threaded on during this process. The nut provides a handle to work the bolt with and also protects the threads from getting gooped up with excess epoxy. While the epoxy is still pliable, scrape away any excess from around the bolt that might prevent the post base from fully resting on the footing surface.

  7. Mix the two-part epoxy by passing it through a mixing-tube applicator.


 8. Run a small sample line to check that the epoxy is adequately mixed.


9. Apply the epoxy by inserting the nozzle into the hole and filling from the bottom.


10. Insert the bolt and plunge it several times to work the epoxy up the sides.


11. Hold the bolt fully plunged for a few seconds to allow the epoxy to relax.


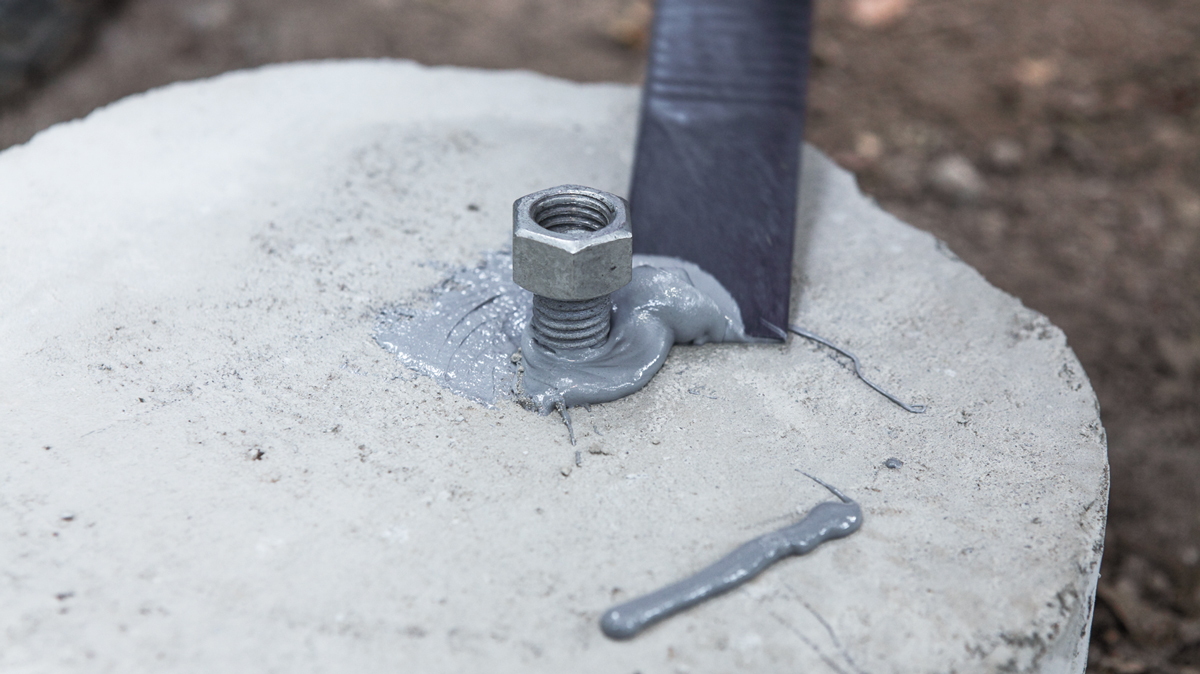
12. Remove any excess epoxy before it dries.

Fine Homebuilding Recommended Products

Fine Homebuilding receives a commission for items purchased through links on this site, including Amazon Associates and other affiliate advertising programs.

FastenMaster Screw Bolt Fastening System

These solid, time-saving bolts don't require pre-drilling and come in very handy when it comes to guard rail posts.
Buy at Amazon

Angel Guard Deck Demon

Demo has never been easier with the deck demon. The tool keeps the worker in an upright position and uses leverage to remove decking from framing, a must have tool for demo.
Buy at Amazon

Drill Driver/Impact Driver

Whether you're pre-drilling holes or driving screws, this Milwaukee® compact cordless driver is the way to go when it comes to building decks.
Buy at Amazon
Previous: How to Install a Spread-Base Deck Footing Next: Deck Building Tip: Anchor-Bolt Depth Stop

Guide

Decks

Chapter

Footings & Foundations

Sign up for eletters today and get the latest how-to from Fine Homebuilding, plus special offers.

Signing you up...

This site is protected by reCAPTCHA and the Google Privacy Policy and Terms of Service apply.
See all newsletters
See all newsletters

View Comments

  1. Paul_V | Apr 15, 2021 12:41pm | #1

    There is also the actually dry technique, which is to use bolts which don't need epoxy, such as wedge anchors or screw anchors, such as the Simpson Titen brand.

    1. Mike_Guertin | Apr 15, 2021 10:49pm | #2

      I agree on the wedge / expansion anchor. I believe the regular SST Titen anchor screws aren't supposed to be used for permanent exterior installation (they are only mechanically galvanized) but the stainless steel Titen HD is okay. You just have to use stainless hardware so there's no galvanic reaction.

  2. Prettger | Jun 23, 2022 12:52pm | #3

    The article is great on “how to” but I found it light on “pros and cons.” Do both methods provide equal results? Are there situations where one is recommended over the other? If you had a choice of either, which is preferred? What are the “Cons” of each option?

  3. CT_Yankee | Jun 23, 2022 06:18pm | #4

    Wet-set anchors are always my preferred choice. Using a hammer drill to provide holes for either true 'dry-set' concrete screws or epoxy anchoring of bolts ore threaded rod runs the risk of minute cracks in small diameter concrete piers. I would NEVER use a wedge-bolt style anchor in piers or thin walls - they can easily split the concrete. Using a core drill is preferred but the epoxy manufacturers frown on this because the wall of the hole is too smooth to provide adequate anchorage against uplift.

Log in or create an account to post a comment.

Sign up Log in

Become a member and get full access to FineHomebuilding.com

Decks

Decks

Hundreds of articles and videos by top deck-building pros on how to design and build a beautiful, sturdy, and safe deck

View Project Guide

View All Project Guides »

Become a member and get unlimited site access, including the Decks Project Guide.

Start Free Trial

Design & Planning
  • Basic Design Options
  • Generating Plans
  • Calculating Deck Loads
  • Code Compliance
Tools & Materials
  • Deck Building Tools
  • Foundation and Framing Materials
  • Decking Materials
  • Fasteners and Hardware
Footings & Foundations
  • Choosing a Foundation
  • Sizing and Laying Out Footings
  • Excavation
  • Pouring the Foundation
Framing a Deck
  • Framing Overview
  • Installing the Ledger
  • Setting Posts and Beams
  • Installing Joists
Installing Decking
  • Decking Basics
  • Installation Process
  • Adding Fascia and Other Decorative Elements
Installing Railings
  • Installing Deck Railing Posts
  • Building Wood Rails and Balustrades
  • Non-Wood Railing Options
  • Installing Nonwood Balustrades
Deck Stairs
  • Deck Stairs Overview
  • Laying Out, Cutting, and Installing the Stringers
  • Installing Treads, Risers, and Stair Railings
Custom Details
  • Benches, Planters, and Privacy Features
  • Pergolas
  • Lighting
Finishes, Repairs, and Maintenance
  • Deck Finishes
  • Cleaning and Refinishing
  • Inspection and Repair
Complete Deck Builds
  • Grade-Level Decks
  • Raised Decks

Fine Home Building

Newsletter Sign-up

  • Fine Homebuilding

    Home building tips, offers, and expert advice in your inbox.

  • Green Building Advisor

    Building science and energy efficiency advice, plus special offers, in your inbox.

  • Old House Journal

    Repair, renovation, and restoration tips, plus special offers, in your inbox.

Signing you up...

This site is protected by reCAPTCHA and the Google Privacy Policy and Terms of Service apply.
See all newsletters

Follow

  • Fine Homebuilding

    Dig into cutting-edge approaches and decades of proven solutions with total access to our experts and tradespeople.

    Start Free Trial Now
    • Facebook
    • Instagram
    • X
    • LinkedIn
  • GBA Prime

    Get instant access to the latest developments in green building, research, and reports from the field.

    Start Free Trial Now
    • Facebook
    • YouTube
  • Old House Journal

    Learn how to restore, repair, update, and decorate your home.

    Subscribe Now
    • Facebook
    • Instagram
    • X

Membership & Magazine

  • Online Archive
  • Start Free Trial
  • Magazine Subscription
  • Magazine Renewal
  • Gift a Subscription
  • Customer Support
  • Privacy Preferences
  • About
  • Contact
  • Advertise
  • Careers
  • Terms of Use
  • Site Map
  • Do not sell or share my information
  • Privacy Policy
  • Accessibility
  • California Privacy Rights

© 2025 Active Interest Media. All rights reserved.

Fine Homebuilding receives a commission for items purchased through links on this site, including Amazon Associates and other affiliate advertising programs.

  • Home Group
  • Antique Trader
  • Arts & Crafts Homes
  • Bank Note Reporter
  • Cabin Life
  • Cuisine at Home
  • Fine Gardening
  • Fine Woodworking
  • Green Building Advisor
  • Garden Gate
  • Horticulture
  • Keep Craft Alive
  • Log Home Living
  • Military Trader/Vehicles
  • Numismatic News
  • Numismaster
  • Old Cars Weekly
  • Old House Journal
  • Period Homes
  • Popular Woodworking
  • Script
  • ShopNotes
  • Sports Collectors Digest
  • Threads
  • Timber Home Living
  • Traditional Building
  • Woodsmith
  • World Coin News
  • Writer's Digest
Active Interest Media logo
X
X
This is a dialog window which overlays the main content of the page. The modal window is a 'site map' of the most critical areas of the site. Pressing the Escape (ESC) button will close the modal and bring you back to where you were on the page.

Main Menu

  • How-To
  • Design
  • Tools & Materials
  • Video
  • Blogs
  • Forum
  • Project Guides
  • Reader Projects
  • Magazine
  • Members
  • FHB House

Podcasts

  • FHB Podcast
  • ProTalk

Webinars

  • Upcoming and On-Demand

Podcasts

  • FHB Podcast
  • ProTalk

Webinars

  • Upcoming and On-Demand

Popular Topics

  • Kitchens
  • Business
  • Bedrooms
  • Roofs
  • Architecture and Design
  • Green Building
  • Decks
  • Framing
  • Safety
  • Remodeling
  • Bathrooms
  • Windows
  • Tilework
  • Ceilings
  • HVAC

Magazine

  • Current Issue
  • Past Issues
  • Magazine Index
  • Subscribe
  • Online Archive
  • Author Guidelines

All Access

  • Member Home
  • Start Free Trial
  • Gift Membership

Online Learning

  • Courses
  • Project Guides
  • Reader Projects
  • Podcast

More

  • FHB Ambassadors
  • FHB House
  • Customer Support

Account

  • Log In
  • Join

Newsletter

Get home building tips, offers, and expert advice in your inbox

Signing you up...

This site is protected by reCAPTCHA and the Google Privacy Policy and Terms of Service apply.
See all newsletters
See all newsletters

Follow

  • X
  • YouTube
  • instagram
  • facebook
  • pinterest
  • Tiktok

Join All Access

Become a member and get instant access to thousands of videos, how-tos, tool reviews, and design features.

Start Your Free Trial

Subscribe

FHB Magazine

Start your subscription today and save up to 70%

Subscribe

We hope you’ve enjoyed your free articles. To keep reading, become a member today.

Get complete site access to expert advice, how-to videos, Code Check, and more, plus the print magazine.

Start your FREE trial

Already a member? Log in

Privacy Policy Update

We use cookies, pixels, script and other tracking technologies to analyze and improve our service, to improve and personalize content, and for advertising to you. We also share information about your use of our site with third-party social media, advertising and analytics partners. You can view our Privacy Policy here and our Terms of Use here.

Cookies

Analytics

These cookies help us track site metrics to improve our sites and provide a better user experience.

Advertising/Social Media

These cookies are used to serve advertisements aligned with your interests.

Essential

These cookies are required to provide basic functions like page navigation and access to secure areas of the website.

Delete My Data

Delete all cookies and associated data