
The Complete Guide to Building a Multi-Level Deck
See every step–from footings to framing to finish details–that went into the construction of this custom deck in Annapolis, Maryland.
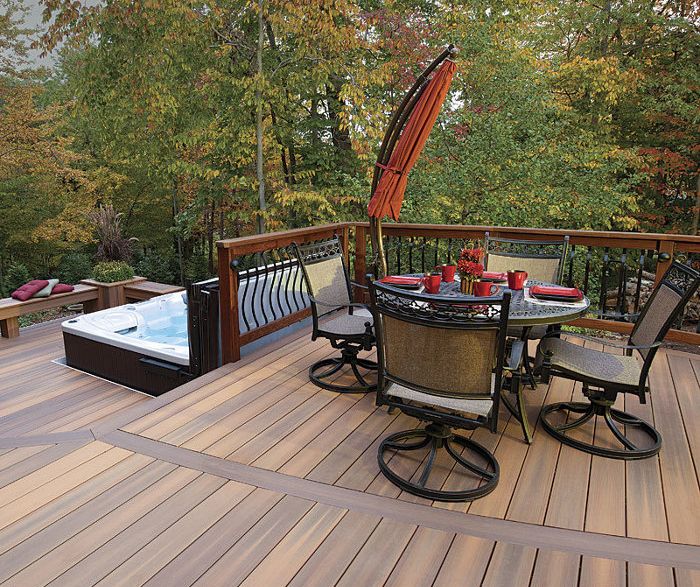
Synopsis: Peer over the shoulders of Clemens Jellema and his crew as they build this low, multilevel deck in Maryland. The project illustrates basic deck construction as well as real-world solutions, and it features diagonal synthetic decking, hardwood railings, and a separate area for a hot tub. Jellema explains the process step by step, from digging footings and erecting framing to crafting a built-in seating area for seasons of spa-side gatherings.
When I build a deck, I want the result of my design and construction to improve the homeowners’ property as well as their lifestyle. In this case, my crew and I were hired to build a replacement for my clients’ old deck, a simple 24-ft. by 14-ft. rectangle. They rarely used that deck even though they loved to entertain outdoors. It was time for a change.
My clients wanted a dining area that wasn’t too close to the house and a place to relax where they could grill. They also wanted a hot tub, but they weren’t sure if the tub was possible because of space and privacy concerns.
After discussing the project with the homeowners, I made a number of computer-generated drawings and came up with a design they liked: a low, two-level deck that curved along one side. (For 3D renderings, I use a program called Realtime Landscaping Architect by Idea Spectrum.) Several large trees limited the buildable space, but a curve on one side was an ideal way to optimize the space without resorting to a traditional rectangle.
After demolishing the old deck, we started to build the new one. Because the deck was nearly on grade, much of the work was easier than if we had to work from ladders. Our first task was to establish the footing locations, then dig the holes and pour concrete. At the same time, we formed and poured the hot tub’s pad. Framing, decking, stairs, and skirting followed in sequence.
Ledger installation
A deck needs a ledger-to-house connection for support and extra rigidity. Although the design of this low deck made it a self-supporting structure, I still paid careful attention to the details of the ledger, which would act as a fail-safe support for the deck.
Flashing the ledger protects the house from water damage that could compromise the ledger’s connection to the house, as well as the house itself.

Layout
Deck frames high enough to stand under can be built first on temporary posts that then are used to locate the required footings. This deck’s height was less than 3 ft., however, so we had to locate, dig, and pour the footings before we could frame. Working from the ledger, we used stringlines and long lengths of framing lumber to extend perpendicular lines, then temporarily braced the lumber plumb and level. We used those references to measure and plumb down for post locations. The post holes for this project were spaced at a maximum of 8 ft.
 String is easiest. To locate the footings that support the beam closest to the house, the crew stretches a string parallel to the foundation and plumbs it down. Footing centers are flagged. String is easiest. To locate the footings that support the beam closest to the house, the crew stretches a string parallel to the foundation and plumbs it down. Footing centers are flagged. |
 The ledger reference point is the same. To establish the second beam’s footings, the crew tacks a 16-ft. 2×6 to the ledger, then braces it so that it is perpendicular to the foundation and level. The ledger reference point is the same. To establish the second beam’s footings, the crew tacks a 16-ft. 2×6 to the ledger, then braces it so that it is perpendicular to the foundation and level. |

Close to the ground is good. Rather than set the layout string high and then use a level to determine the second beam’s footings, it’s better to position the line lower, just above the footings. |
Editors Note: The term ‘Handrail’ is misused as the title of the sidebar section and in the first sentence on page 85. The proper term used in the building code is “Guard” or sometimes called a “Guardrail“. A Guard prevents people from falling off the deck. A handrail is the rail you use for support walking up and down a stairway.
The term ‘Grab rail’ is used in the caption to the third photo on left – pg. 85. The proper code term is ‘Handrail”.
 For more photos, drawings, and details, click the View PDF button below:
Fine Homebuilding Recommended Products
Fine Homebuilding receives a commission for items purchased through links on this site, including Amazon Associates and other affiliate advertising programs.

N95 Respirator

Jigsaw

Angel Guard Deck Demon

View Comments
Some opinions from a structural engineer who has been doing foundation inspections for over 13 years:
1. My concerns stem from the water damage I consistently see when examining the foundation for defects and and improper or little regard for ground conditions under the deck.
2. Grade under the deck should be well compacted (in 6" lifts) and have a prominent slope away from the home. Soil WILL settle over time and the largest amount of settlement consistently occurs next to the foundation. This can create a depression along the foundation where water can pool. It's also beneficial to lay down some landscape fabric or geotextile covered by coarse crushed stone to match the deck's footprint. Helps to mitigate the soil/mud splashback onto the piers, posts & foundation.
3. I use an inspection robot to examine foundations restricted by close-to-the-ground decks (too old to belly-crawl under a deck). I am sometimes amazed at all of the deck construction debris left under the deck. Come on guys, clean that stuff up before you install the decking.
4. While ledger boards and joists running perpendicular to the house wall are most common, I would almost always advocate for the main beams running perpendicular to the house. My goal is a minimum of connections to the house wall. I'd prefer a deck that is structurally independent of the house even though it adds additional posts, footings and lateral bracing requirements. What it does accomplish is fewer places where water intrusion can occur.
5. As noted about main beam orientation in #4, anchoring the ends to the house wall can still be accomplished with the various lateral tie hardware available. This mitigates movement in a direction perpendicular to the house wall. Movement parallel to the wall can be mitigated with horizontal bracing (i.e. diagonal cables) directly below the joists.
6. All decks should be sloped down away from the home. A pitch of 1/8" per foot is hardly discernible by the average person. Far too many homeowners do not remove snow & ice from their decks in the Winter season. Radiant heat from the home's exterior wall (however minimal) will melt snow cover next to it resulting a trough that encourages subsequent rain to flow into it. That water can be trapped for a period of time allowing water to really test the integrity of the flashing and water barrier that should (may) have been installed.
The above opinions are based on the hundreds of foundation inspections I have performed. I have seen what water can do to both the deck support as well as the foundation AND the interior damage resulting from water migrating through cracked or somewhat porous concrete.