Critical Roof Flashings Keep Water Out
Building expert Mike Guertin explains the what, where, and why of roof flashing.

August 26, 2021, is the first annual International Flashing Awareness Day—a day for all builders, remodelers, roofers, and siding installers to pause and think about their flashing practices and evaluate whether those practices are sufficient to prevent water from leaking into the homes they work on. Flashing keeps our houses dry and roof flashings are a critical part of a leak-proof roofing installation. We want our houses to stay dry so we and our belongings stored in the home don’t get wet, and we want the roof structure to stay dry so it won’t rot and lead to expensive repairs. In this article, I’ll review several typical roof flashings that block water entry: boot flashing, step flashing, continuous flashing, kickout flashing, skylight flashing, and valley flashing.
Roofs don’t usually leak in the field of the roofing unless there’s damage or very poor installation. Instead, roofs leak at connections between the roof and a wall, one roof plane to an adjacent plane, or at penetrations like vent exhausts and plumbing vent pipes. These locations require flashing to block water from getting into the connections and to redirect water onto the surface of the roofing so it can drain harmlessly off the roof. Flashing can be made from metal, plastic, or self-adhering membrane that meets the requirements of the building code.
The importance of roof flashing is often overlooked by roofing installers today. Part of that is due to legacy flashing practices that have carried over from one generation of roofers to the next—practices that worked years ago are no longer sufficient yet many roofers continue to follow them. It’s the old explanation: “This is the way I learned how to do it and I’ve been doing it this way for [fill in the blank] years without a problem.” Unfortunately, they’ve never gone back to check to see how those flashings failed. And part if it is due to a lack of awareness of current good flashing practices, building code requirements, and manufacturer requirements.
20th-century flashing practices meet 21st-century building science
For a long period of time, homes were built with little or no insulation in the attics. Small water leaks along flashings wet the solid wood sheathing planks and framing beneath, but water didn’t reach and stain the ceiling below so homeowners were unaware of the leaks. The water would do little or no harm to the wood. It would dry due to the heat in summer or the heat escaping from the living space into the attic in winter. And when leaks in flashing were bad enough that water reached the ceiling, homeowners noticed the stains and had repairs made before rot took hold.
Over the past 50 years, several things have changed in the way we build homes that raise the importance of roof flashing. Roof framing and lumber aren’t the same. Roof trusses with 2×4 or 2×6 top chords have replaced 2×8, 2×10, and 2×12 stick-framed roofs. Rot in smaller truss chords will lead to structural failure faster than in larger-depth rafters. And the lumber is from younger, rapidly growing trees that will decay faster than old-growth lumber of a generation ago. Roof sheathing has shifted from old-growth solid wood planks to plywood and then OSB; with each change, the potential for decay increased. Insulation and building airtightness requirements— especially in cold climates—have increased. Heat loss into the attic in winter is no longer enough to dry damp wood due to small flashing leaks, so wood stays wetter for longer and will begin to rot. And once wood-decaying fungus takes hold it can consume the wood quickly.
The insulation itself can hide roof leaks that would have stained ceilings in an older home. Spray foam applied directly to the underside of the roof sheathing is becoming more common. Water that leaks at flashing and saturates the roof sheathing and framing can no longer dry into the attic. The wood stays wet for a long time and rot can take hold. Even thick fibrous insulation can hold more water and prevent small and moderate flashing leaks from staining a ceiling. This results in the roof sheathing and framing repeatedly getting wet without water reaching the ceiling and alerting the owners that there’s a roof leak occurring.
There’s no such thing as overkill when it comes to roof flashing
Longer-lifespan roofing means less-frequent replacement, which means critical flashing won’t get checked and replaced as regularly. So it makes sense to buy, fabricate, and properly install good flashing that will last whether installing a new roof or replacement roof.
Here’s my list of critical roof flashing and resources to guide selection and installation. But first, consider backing up all flashing with a second line of defense—a strategic use of self-adhering, self-sealing underlayment applied at all junctions and roof edges that collects water that may get behind flashing and redirects the water to the surface of the roofing. I call the process “stormproofing a roof,” but it’s effective in ordinary weather too.
Boot flashings often rely on rubber or plastic seals around pipes to block water. The rubber or plastic deteriorates with the extremes of heat, cold, and sunlight on a roof, so a choosing a better boot flashing that will last longer is wise. And before installing any boot flashing, preflash the pipe to the shingles using flexible flashing tape for backup protection.
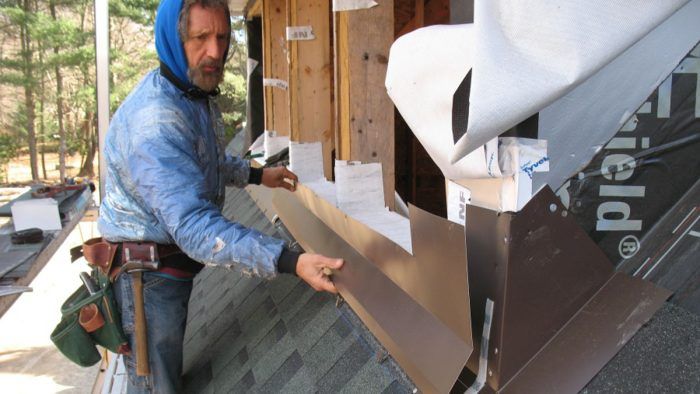
Vertical-wall, outside-corner, and step flashings are applied in sequence around the perimeter of a dormer to block water from getting into the roof.
Step flashing is installed along sidewalls where the end of asphalt, wood, and synthetic shingle courses meet a wall. Size and thickness matter in order to meet requirements of building codes and roofing manufacturers. Some building-materials dealers stock step flashings that don’t meet code requirements, so here’s what you need to know to ensure your step flashings do.
Continuous sidewall flashing is an alternative to installing step flashing. Rather than individual pieces of flashing installed at the end of each shingle course, an L- shaped continuous flashing is installed either below or on top of the shingle courses. The continuous flashing method is permitted in the building code and is common in some parts of North America. And some types of interlocking and panel roofing systems utilize continuous flashing along sidewalls because they don’t have horizontal courses.

Whether you install step flashing or continuous flashing along sidewalls, the code requires a kickout flashing (diverter flashing or kickout diverter) at the bottom of a roof eave that terminates along a wall—think the eave of a one-story part of a house meeting the wall of a two-story portion. A kickout flashing is the first piece of step flashing along the eave edge that directs water collected by the step flashing or continuous flashing away from the wall so it doesn’t leak into the wall. Kickout flashings have been required by building codes for 15+ years yet are often overlooked.
This kickout flashing video demonstrates one approach to installing the layers of preflashing tape, housewrap, and the kickout flashing.
Skylights present their own flashing challenges. Fortunately, most skylight manufacturers provide specially designed base, head, and step flashing to install around a skylight curb. But when working on an existing skylight that doesn’t have good flashing or the flashing can’t be reused, you can follow this site-made skylight flashing system.
Flashings around a masonry chimney are installed by the mason when laying up the brick or stone. Over time, the flashing will deteriorate or become damaged and need to be replaced. Here’s a simple retrofit counterflashing approach.
|
|
|
Valleys collect rainwater from two roof planes and channel it off the roof. The water volume can overwhelm the joints and overlaps where roofing materials meet in a valley so the building code requires valley liner or flashing beneath the primary roofing material. Valley liner can be self-adhering membrane, roll roofing, or metal. And the valley itself can be open metal that is treated much like a sidewall continuous flashing where the roofing materials on each roof plane overlap and drain onto it. This article focuses on asphalt shingles but the valley liner and open metal valley details can be used with many roofing systems.
RELATED ARTICLES:
- 4 Ways to Shingle a Valley (Valley Flashing)
- Stormproof Your Roof
- Time-Tested Approach to Chimney Flashing
- Direct Water into Gutters with a Kickout Flashing Diverter
- Kickout Flashing: How to Flash Troublesome Roof to Wall Intersections
- Retrofitting a Curbed Skylight
- Looking Out for Future Roofers (Step Flashing)
Fine Homebuilding Recommended Products
Fine Homebuilding receives a commission for items purchased through links on this site, including Amazon Associates and other affiliate advertising programs.

Hook Blade Roofing Knife

Ladder Stand Off

Fall Protection


