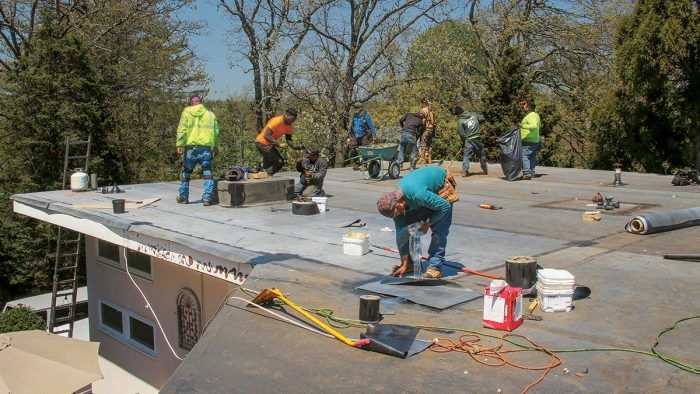
A roof is a system. Sheathing, insulation, roof membrane, and flashings all work together to keep a low-slope roof watertight. The products must be compatible with each other and the crew must be trained to install them correctly.
The PVC roof on my clients’ midcentury-modern home was decades old and well past its useful life. The patches that seal the fasteners were split and part of a system abandoned by its manufacturer years ago. The homeowners had a local roofer attempt to fix the leaking fastener patches with a fluid-applied waterproofing, but when this didn’t stop the leaks, they began to do their own research and contacted Carlisle, a commercial roofing manufacturer. As one of their premier installers, we were put in touch.
I met with the homeowners and reviewed the condition of the roof. The existing PVC was in such bad condition—and the underlying insulation and original roof were so wet—that the existing roof had to be removed, and we replaced it with an EPDM (ethylene propylene diene monomer, a type of synthetic rubber) membrane roof. The process involved hundreds of hours and several days of work, but the end result is a roof finally suited for home’s modern architecture and ready to stand up to the elements.
Off with the old
The existing roof had two roofing systems on top of the sheathing. First was the original hot-mopped asphalt roof. On top of that was a PVC membrane roof, likely added when the original roof started to leak. Under the hot-mop roof was a layer of wood-fiber insulation. Under the PVC was a layer of Perlite insulation. It all added up to 210 yards of debris that we tossed into seven 30-yard dumpsters.
Cut and peel. We cut the screw covers with a utility knife and back out the screws that hold the PVC to the roof sheathing. Then we cut the PVC into manageable pieces and roll them up for disposal.
Make a mess. The wood-fiber insulation, asphalt felt, gravel, and Perlite insulation must be broken up and shoveled into contractor bags or carted to the roof edge in wheelbarrows before being tossed into the dumpster. It’s hard, messy work.
Patch the holes. A leaky roof generally leads to some rotted sheathing. We used 3⁄4-in. CDX plywood, the same sheathing material as the rest of the roof, to patch two rotted sections.
Install Insulation and Membrane
Membrane roofs are almost always installed over a continuous insulation layer. Combined with the 6-in. batts in the rafters, the roughly R-8 polyiso layer will make this roof R-28. The clients opted not to spend more for additional insulation. The EPDM rubber membrane is glued to the insulation and is completely watertight when complete—unlike an asphalt-shingle roof, which is described by roofers as “water-shedding.”
1. Prep the edges. Roof edges are vulnerable to high winds, which can cause the insulation and membrane to lift and lead to a failure. 2x6s around the roof perimeter provide a secure point of attachment for the edge metal, which helps hold the roof down. The metal parts that secure and finish the edges will be installed later.
2. Fit and fasten the insulation. We fit the 4×8 sheets of 11⁄2-in. polyisocyanurate insulation with the seams staggered. Then we fasten them to the sheathing with 3-in. roofing screws and 3-in. insulation plates using a 24-in.-on-center spacing.
3. Prep for drains. We connect the new drains to new 4×6-in. downspouts before we cut holes into the sheathing. The bottom half of the drains are installed before the insulation and EPDM layers.
4. Clean up. We thoroughly sweep the insulation layer and blow away all debris before we install the EPDM membrane. This ensures proper adhesion and prevents lumps and damage to the roofing.
5. Cut to length. We roll out and cut the 10-ft. by 100-ft. rolls of EPDM roofing with scissors.
6. Apply adhesive. With the piece of membrane folded in half, we spray EPDM adhesive onto the insulation and the membrane and allow it to tack up for a few minutes. Waiting a few minutes allows the solvent to evaporate to prevent bubbles. The hotter the weather, the faster the solvent evaporates.
7. Position the roofing. Once the adhesive is dry to the touch, we carefully place the membrane and lap the seams between pieces. Several roofers work together to ensure there are no wrinkles or bubbles in the membrane.
8. Broom it down. We use a broom in long strokes over the entire piece of EPDM to ensure the membrane is fully bonded to the insulation layer.
9. Seal the seams. We wipe the seams where the pieces of EPDM meet with a membrane cleaner using paper rags, and then coat them with seam primer, before positioning and rolling the tape.
10. Roll it again. After the tape is rolled, we position the EPDM over the tape and then roll the seam again, both parallel and perpendicular to the seam along its entire length and width.
Trimming the Edge
The edges of this low-slope roof have a detail common to commercial roofs—a two-part edge metal with an extruded aluminum cleat and a powder-coated cover; this one is Anchor-Tite by Metal-Era. The metal keeps the roof edges from lifting in high winds. The manufacturer provides several options that can be used with different thicknesses and types of roofing.
Make it stick. An adhesive strip on the cleat seals the edge metal to the roof.
Hold tight. We screw the cleat to the subfascia with 2-in. hex-head stainless-steel screws. The screws are placed in different parts of their slotted holes depending on the roof assembly, so confirm the correct placement for your roof.
Fit the fascia. We cut the 0.04-in.-thick aluminum cover with aviation snips and form the corners with hand seamers. This work will be visible from the ground, so it requires care and precision by the roofer.
Snap on the fascia. The Anchor-Tite fascia cover is snapped onto the cleat with pieces overlapping 3 in. When installed correctly on commercial projects, the manufacturer provides a 215-mph-winds warranty. Residential roofs are not warrantied because of a lack of training and certification for residential roofers.
Clever Fix for Flawed Gutter
The trickiest part of this roof was the existing Yankee gutter. It was 128 ft. long, starting on the home’s north side and curving to the front, over the front entrance. It had 3500 sq. ft. of roof draining into a 2-in.-deep trough framed into the roof, providing a volume of about 10 cu. ft., and it would overflow almost every time it rained. A roof this size really needs a gutter with several times the volume. With both a hanging box and a K-style gutter as aesthetic nonstarters given the home’s architecture, we raised the roof edge, filled in the old system, and designed a much larger gutter that won’t overflow, even with heavy rain.
Gutter must go. The roof’s existing gutter was framed into the roof and was a source of frustration for the 20-plus years the homeowners have lived in this house. The overflowing roof water left debris on the fascia and dripped on anyone who used the front door during a storm.
Fill the trough. We filled in the existing Yankee gutter with 2 in. of polyiso and built up the outside edge to match the inside edge of the original gutter. We flashed the edge with EPDM before installing the new gutter.
Make a new gutter. The new gutter is made from 5.2-in. Eliminailer-T (see below), which creates a dam along the roof perimeter. The heavy-gauge aluminum pieces are best cut with a metal-cutting circular saw or grinder.
Cover conceals the gutter. The new gutter is hidden from the ground with an aluminum cover that matches the covers on the other roof edges.
It snaps on so it can expand and contract with temperature changes.
Build a Better Gutter
Metal-Era’s Eliminailer-T is an extruded aluminum angle commonly used to replace wood blocking on the edge of flat roofs. It’s designed to accommodate 5.2 in. of insulation (R-30), which is local code for flat roofs on commercial buildings. In this case, we did not put any insulation behind the Eliminailer, so it projected 5.2 in. above the finished roof. We sealed the Eliminailer with EPDM and detailed it into a watertight dam that holds the water until it drains into the downspouts.
Make Penetrations Watertight
Commercial roofing systems have tested methods for sealing common roof penetrations like pipes, ducts, chimneys, and skylights.In addition to multiple skylights—including a 6-ft. round one—this roof had plumbing and mechanical penetrations and an 8-ft.-wide masonry chimney with leaky flashing. Methods vary for dealing with penetrations, but a skilled roofer should be able to solve most problems with tested assemblies. Detail drawings are often available from the roofing manufacturer.
Heal the cut. The EPDM membrane may need to be cut over penetrations. We wipe the area around the cut with membrane cleaner and coat it with primer before adding a patch of cured flashing tape.
Prevent lift-off. We clip the corners of the self-adhering flashing tape patch in order to prevent them from lifting and creating a toehold for a leak.
Roll the patch. The flashing tape has a pressure-sensitive adhesive that must be rolled for a strong bond. We roll the entire patch in both directions.
Prime for the boot. We wipe the area under the pipe flashing with membrane cleaner and then prime it with adhesive primer.
Bead at the top. Before installing the flashing, we add a bead of Water Block around the pipe, placed so that it will align with the top seal of the flashing boot when the seal is slipped over the pipe.
Fit the flashing. The flashing is molded to accommodate pipes from 1 in. to 6 in. in 1⁄2-in. increments and is trimmed to be just smaller than the pipe diameter, creating a tight seal.
Stick the bottom. The pipe flashing has pressure-sensitive adhesive that’s rolled like flashing tape for a strong bond. Notice the bead of Water Block at the top of the boot.
Seal it up. The pipe boot bottom and the patch are sealed around their perimeter, with an extra blob of lap sealant where they meet. At the top, a tightened pipe clamp seals the waterblock to the pipe.
Cross your “T”s. We cover spots where patches and membrane seams intersect with T- joint covers made by the roofing manufacturer as a second line of defense against water. These are also rolled and their edges sealed with lap sealant.
Fix a leaky chimney. The chimney can’t be seen from the ground, so it made sense to insulate it and cover it with EPDM so it could be more reliably flashed and in order to reduce thermal bridging. The insulation is held to the masonry with concrete screws. Drive anchors hold the termination bars.
Flash the top. Once the termination bars are in place, we prime the areas around them and cover them with uncured flashing tape, which is more flexible but not as long-lasting as the cured version. It must be rolled like other seams and transitions. The skinny roller in the foreground is for corners.
Why EPDM?
While there are other options, for me, choosing EPDM for a low-slope roof is an easy decision. It’s cost-effective and low maintenance, and makes for an incredibly long-lasting and reliable roof. That’s why, when we install it on a commercial building, the manufacturer will provide a 20-year full-system warranty (unfortunately, it’s not available for single-family homes.) Because it’s UV-stable, EPDM won’t dry and crack like this home’s previous roof, and it does not require any coating on the seams. The tape used on the seams makes the joints between pieces almost as strong as the membrane, resistant to opening and resultant leaks. The whole insulation and roofing system installs with fasteners and adhesive, eliminating the high-power torches that used to be an everyday part of commercial roof systems and a huge fire risk for a wood-framed home. Another big plus is that the flashings used with Calrlisle’s EPDM membrane call for a primer and tape from the same manufacturer’s system, make them relatively easy to install and more reliable.
✚ PROS
✖ CONS
EPDM
✚ The most UVstable roofing membrane available
✚ Strong seams, every 10 ft.
✚ Clean installations with no fire risk
✚ Moderately tolerant of standing water
✖ Only available through commercial
distribution, in minimum 500-sq.-ft. rolls
✖ Requires skilled, experienced installers
✖ Installed price can be expensive
✖ Black color can be an aesthetic issue
ASPHALT ROLL ROOFING
✚ Readily available from big-box stores to commercial roofing distributors
✚ Often inexpensive
✖ Weak seams, every 3 ft.
✖ Not UV-stable (requires granules or aluminum paint)
✖ Fire risk (if torch-applied)
✖ Because of wide availability, often installed by inexperienced crews
✖ Not tolerant of standing water
✖ Requires 2 plies (layers) for long-term performance
THERMOPLASTIC POLYOLEFIN (TPO)
✚ Moderate UV stability
✚ Seams stronger than EPDM, every 10 ft.
✚ Clean installation with no fire risk
✚ Very tolerant of standing water
✚ Very reflective
✖ Only available through commercial distribution, comes in minimum 500-sq.-ft rolls
✖ Requires skilled, experienced installers with specialized equipment
Fine Homebuilding receives a commission for items purchased through links on this site, including Amazon Associates and other affiliate advertising programs.
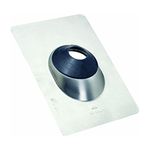
Flashing Boot Repair
Prolonged exposure to the sun and weather can compromise the rubber gasket on standard vent flashing. Use this to quickly and permanently fix failed seals or to help protect the gasket in new-construction applications.
All-steel construction makes these roof brackets durable and long lasting, and their adjustability allows you to create a flat, safe standing surface on most any pitched roof.
This is a dialog window which overlays the main content of the page. The modal window is a 'site map' of the most critical areas of the site. Pressing the Escape (ESC) button will close the modal and bring you back to where you were on the page.


View Comments
Why not tpo /?