FHB Logo Facebook LinkedIn Email Pinterest Twitter X Instagram Tiktok YouTube Plus Icon Close Icon Navigation Search Icon Navigation Search Icon Arrow Down Icon Video Guide Icon Article Guide Icon Modal Close Icon Guide Search Icon Skip to content
Subscribe
Log In
  • How-To
  • Design
  • Tools & Materials
  • Restoration
  • Videos
  • Blogs
  • Forum
  • Magazine
  • Members
  • FHB House
  • Podcast
Log In

Fine Homebuilding Project Guides

Decks

Guide Home
  • Design & Planning
  • Tools & Materials
  • Footings & Foundations
  • Framing a Deck
  • Installing Decking
  • Installing Railings
  • Deck Stairs
  • Custom Details
  • Finishes, Repairs, and Maintenance
  • Complete Deck Builds
How-To

Framing Stairs to an Out-of-Level Landing

A simple solution to framing new stairs to an out-of-level, 100-year-old patio.

By Kevin Manning Issue 306 - April/May 2022
  • X
  • facebook
  • linkedin
  • pinterest
  • email
  • add to favorites Log in or Sign up to save your favorite articles

Synopsis: While adding a new deck to the back of this house, the build team ran into the problem of a visibly sloping brick patio where the stairs would land. The clients did not want to interfere with the historical, moss-covered patio, which called for incorporating slope into stringer calculations during framing.


Historic remodels often present challenges that involve plumb, square, and level. On this house, floors and ceilings were out of level up to 4 in. in some areas. When adding a new deck to the back of the house, we also encountered similar issues typical of a home that’s over 100 years old—for example, the visibly sloping brick patio where the stairs would land.

Typically, leveling the landing zone would be a straightforward process: Pull up some bricks, pour a level pad, then reintegrate bricks around the pad. But the clients didn’t want to disturb the historic, moss-covered patio—they wanted the stairs to land on the bricks as if they had always been there. For us, that meant incorporating the slope into our stringer calculation during framing.

illustration of rise and run measurements

measuring the overall rise
Find the overall rise. At a central location across the deck frame, we used a level to extend the deck height outward 55 in. At this point we found the grade 3 in. lower than at the edge of the 42-in.-high deck frame, for an overall rise of 45 in.

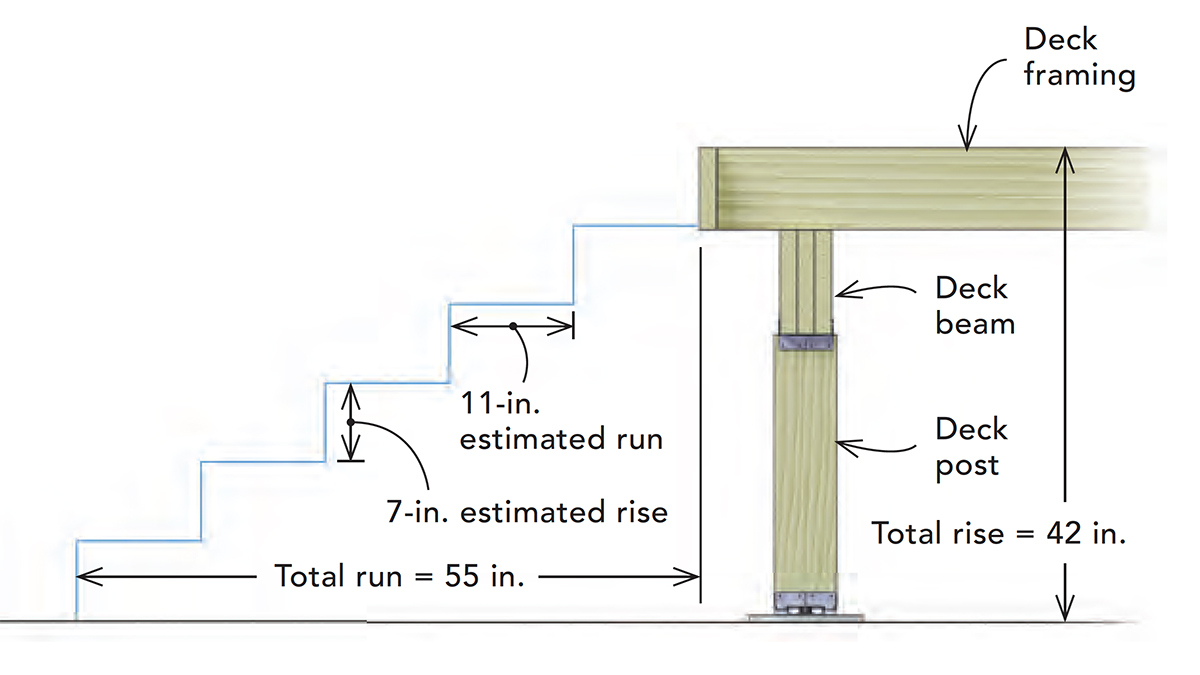
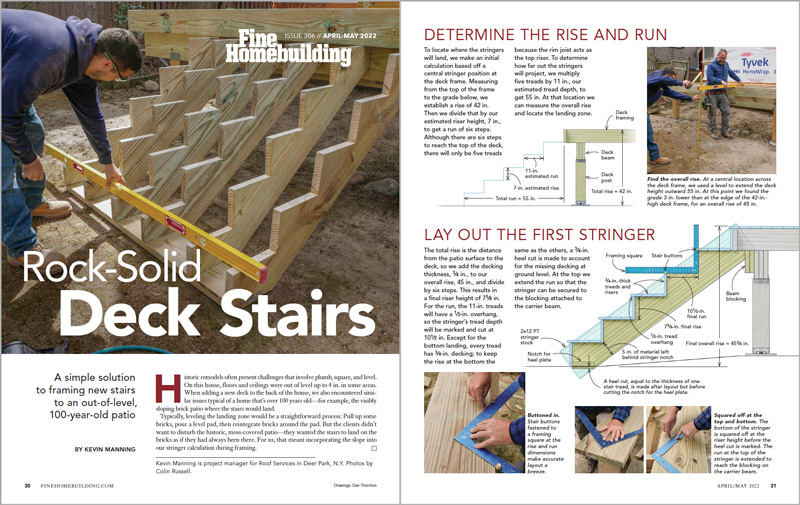
Determine the rise and run

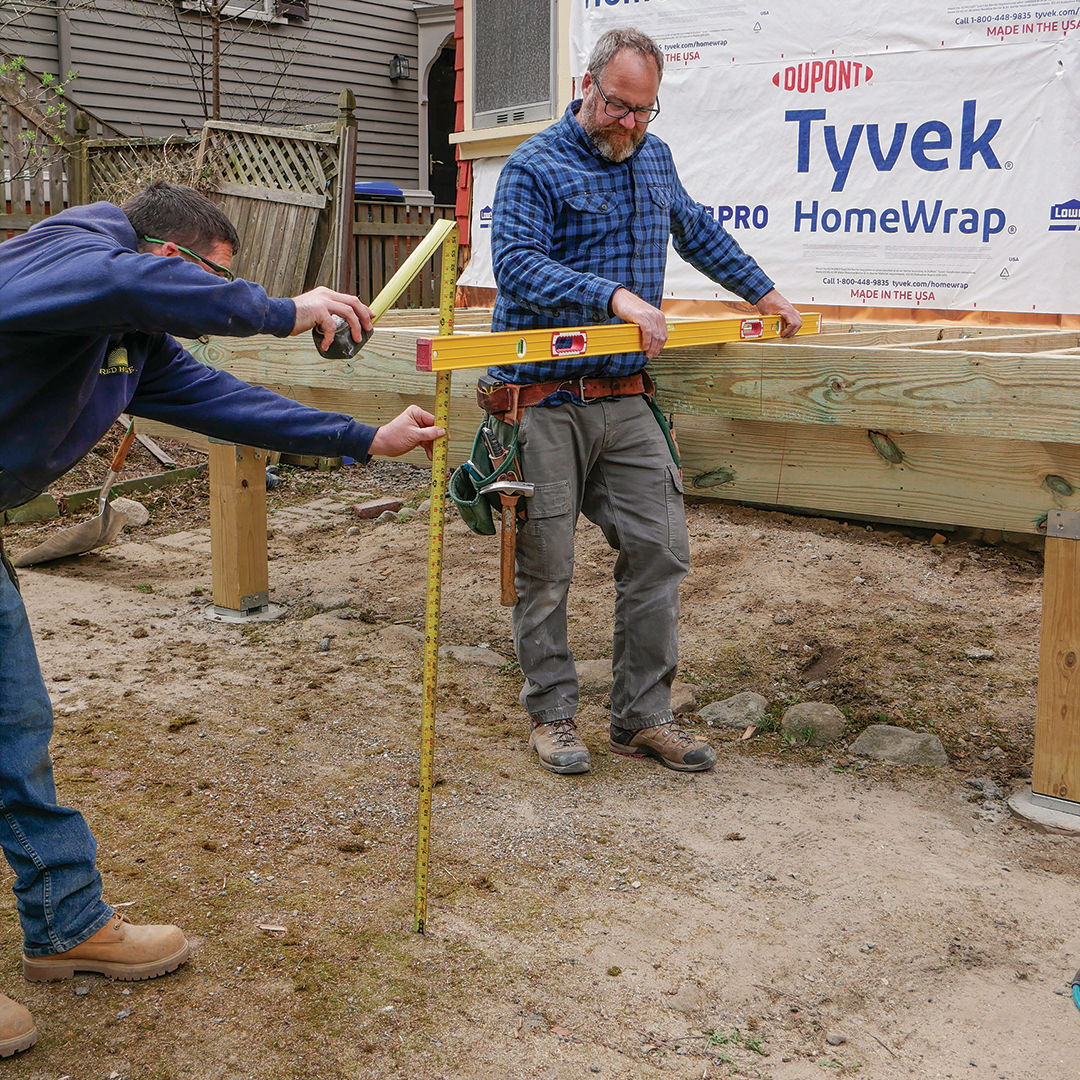
To locate where the stringers will land, we make an initial calculation based off a central stringer position at the deck frame. Measuring from the top of the frame to the grade below, we establish a rise of 42 in. Then we divide that by our estimated riser height, 7 in., to get a run of six steps. Although there are six steps to reach the top of the deck, there will only be five treads because the rim joist acts as the top riser. To determine how far out the stringers will project, we multiply five treads by 11 in., our estimated tread depth, to get 55 in. At that location we can measure the overall rise and locate the landing zone.

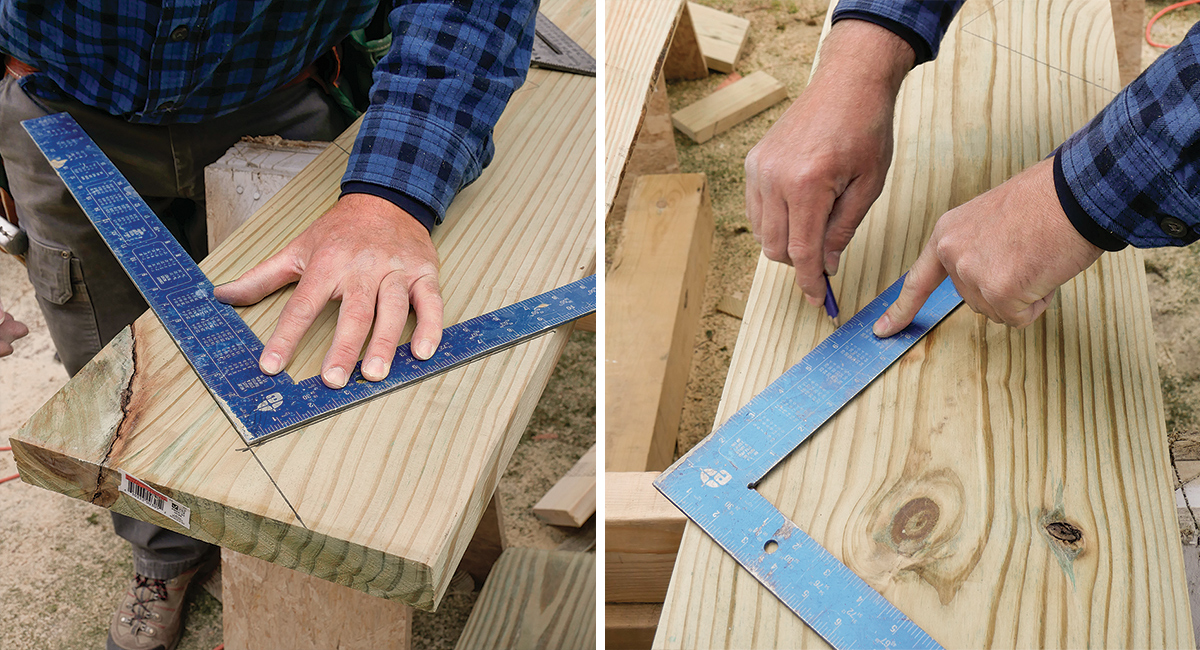
Lay out the first stringer

illustration of the first stringer layout

using stair buttons
Buttoned in. Stair buttons fastened to a framing square at the rise and run dimensions make accurate layout a breeze.

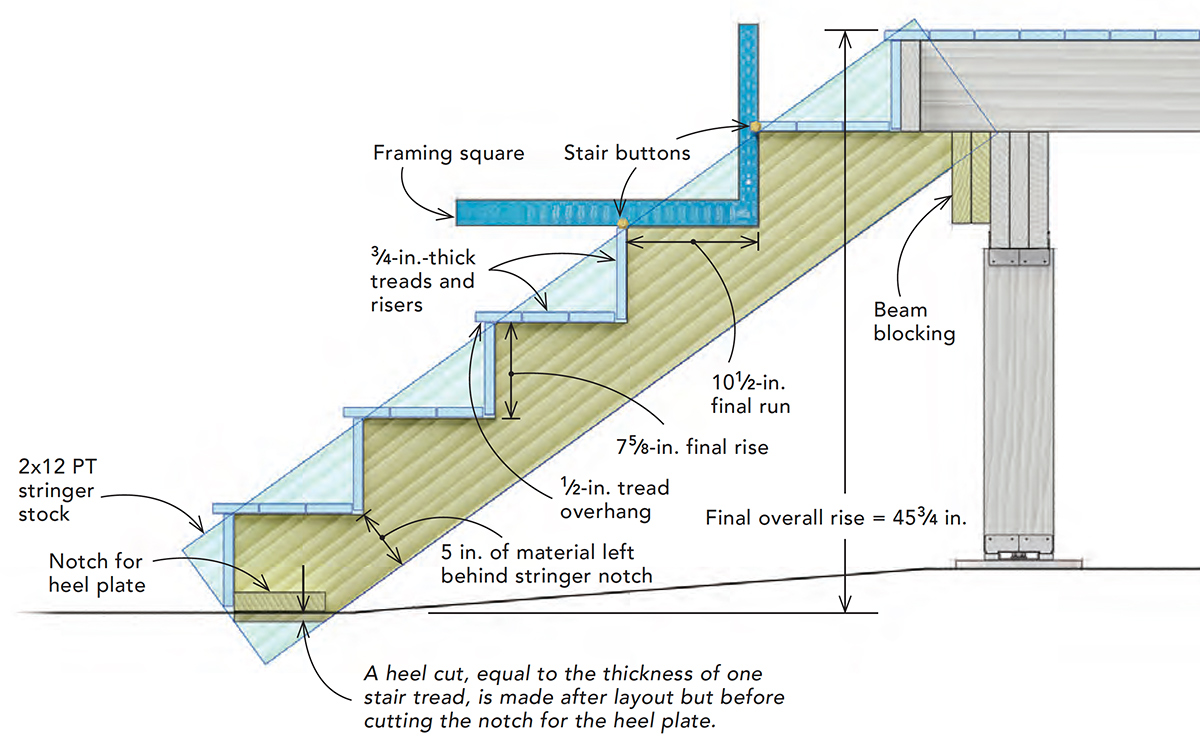
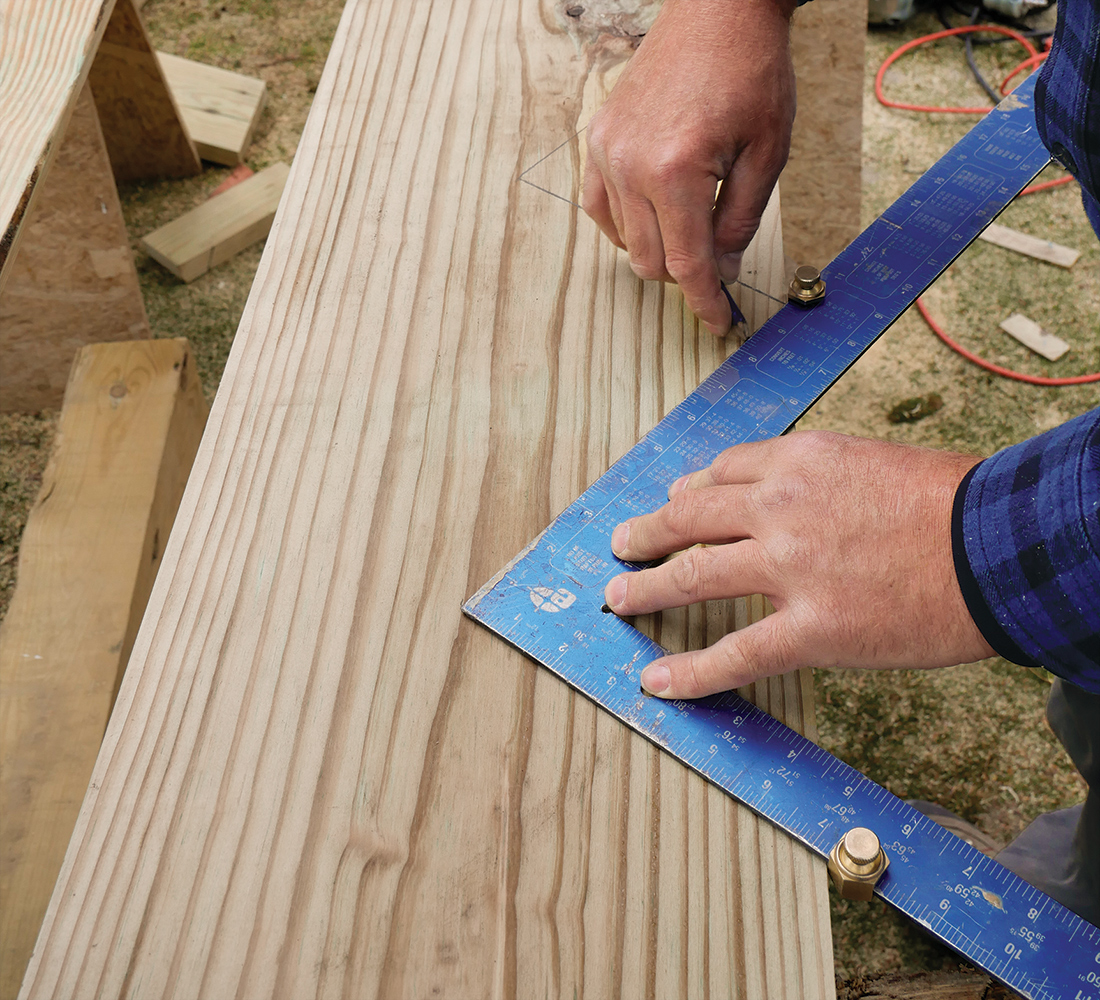
The total rise is the distance from the patio surface to the deck, so we add the decking thickness, 3/4 in., to our overall rise, 45 in., and divide by six steps. This results in a final riser height of 7-5/8 in. For the run, the 11-in. treads will have a 1/2-in. overhang, so the stringer’s tread depth will be marked and cut at 10-1/2 in. Except for the bottom landing, every tread has 3/4-in. decking; to keep the rise at the bottom the same as the others, a 3/4-in. heel cut is made to account for the missing decking at ground level. At the top we extend the run so that the stringer can be secured to the blocking attached to the carrier beam.

squaring off the top and bottom of the stringer
Squared off at the top and bottom. The bottom of the stringer is squared off at the riser height before the heel cut is marked. The run at the top of the stringer is extended to reach the blocking on the carrier beam.

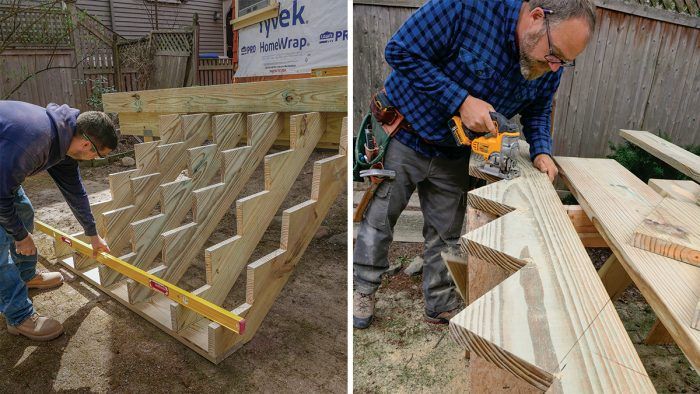
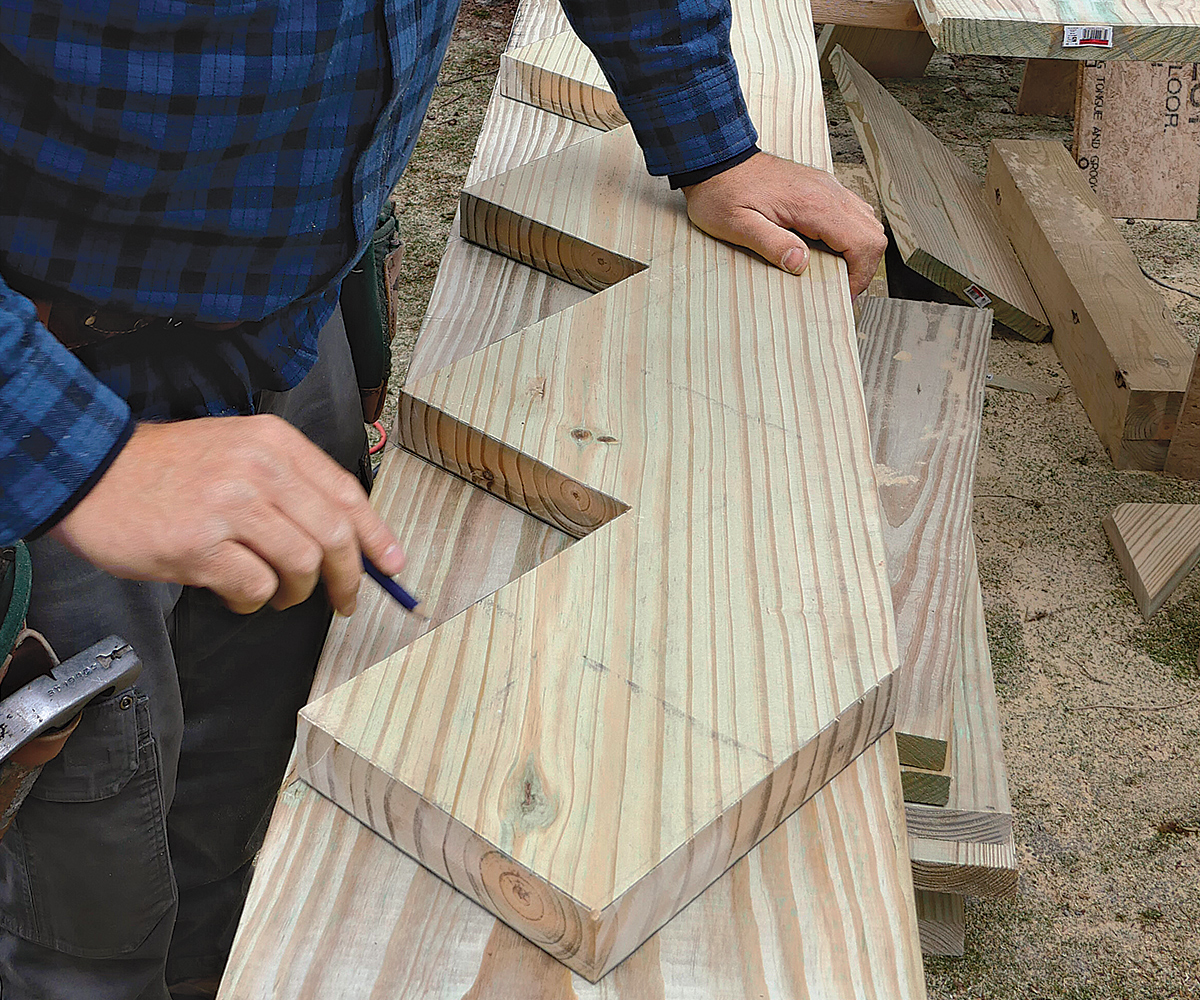
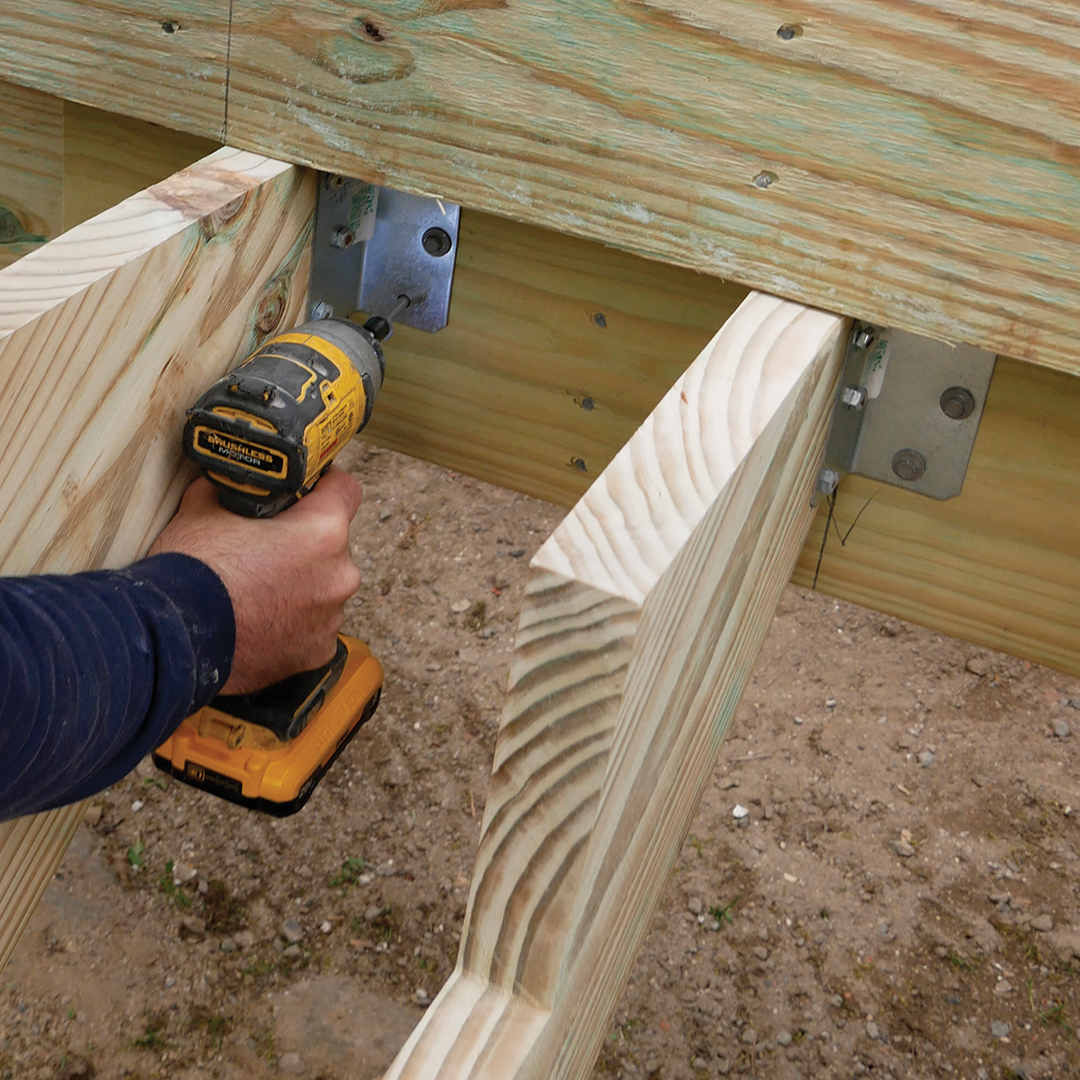
Cut the first stringer

When it comes to cutting stringers, being precise is a time-saver later. This deck will be wrapped in mahogany hardwood, so to get the finished details right, we need to spend less time battling framing. When cutting stringers, we make initial cuts right up to the line with a circular saw, and complete the cuts with a jigsaw. We use the first stringer as a template for the remaining stringers. We leave the heel cuts for last so that there’s enough material to dial them in one at a time to compensate for the patio’s slope from left to right.

cutting the first stringer

marking the second stringer
Use the first stringer as a template. Align the straight edge of the template to the new stock, and hold it firmly in position. Use a sharp pencil to transfer the layout.

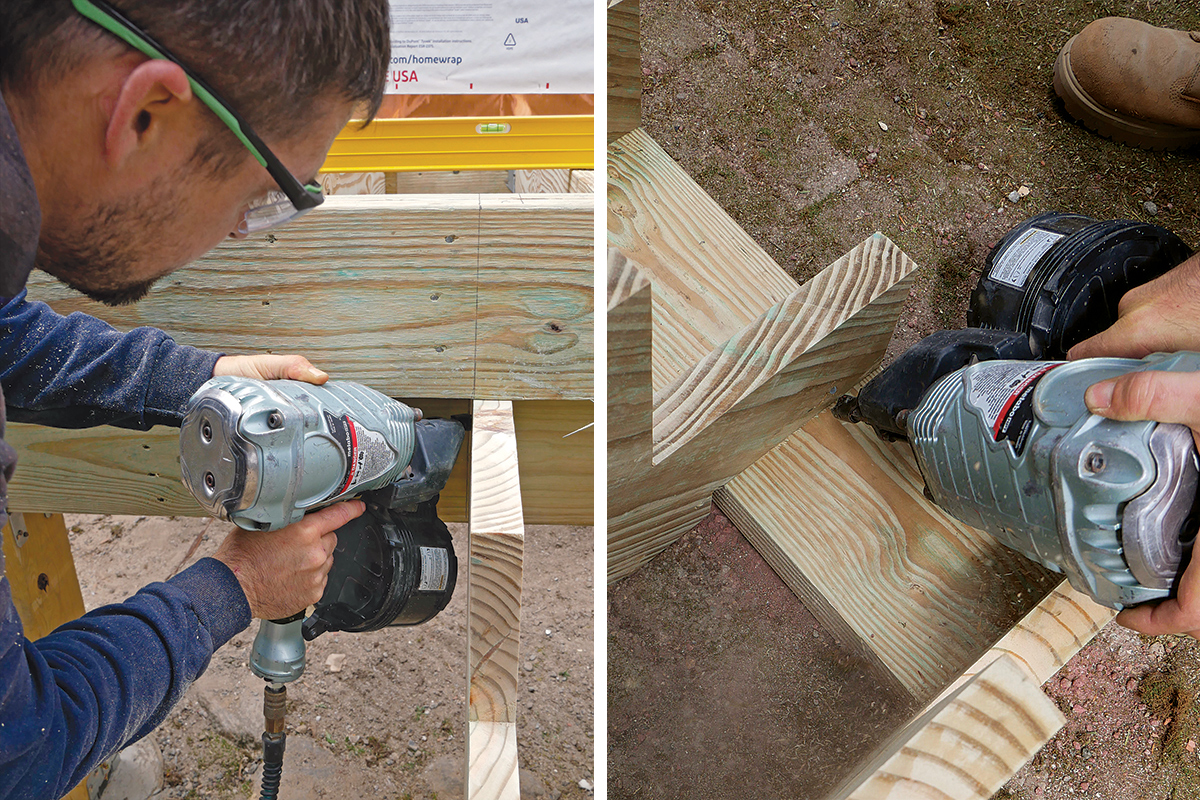
Fit the first stringer

cutting the heal and checking for level
Cut the heel and check the fit. The first heel cut matches the thickness of the decking. Make the cut, then position the stringer so that it’s tight against the carrier beam and snug to the band joist above. Use a torpedo level to ensure treads are level.
notching the heel and checking the level with plate
Notch the heel to fit the plate. Use a circular saw followed by a jigsaw to cut an accurate notch for receiving the 2×10 plate that will tie the assembly together. Dry fit both pieces, and check that the treads are still level.

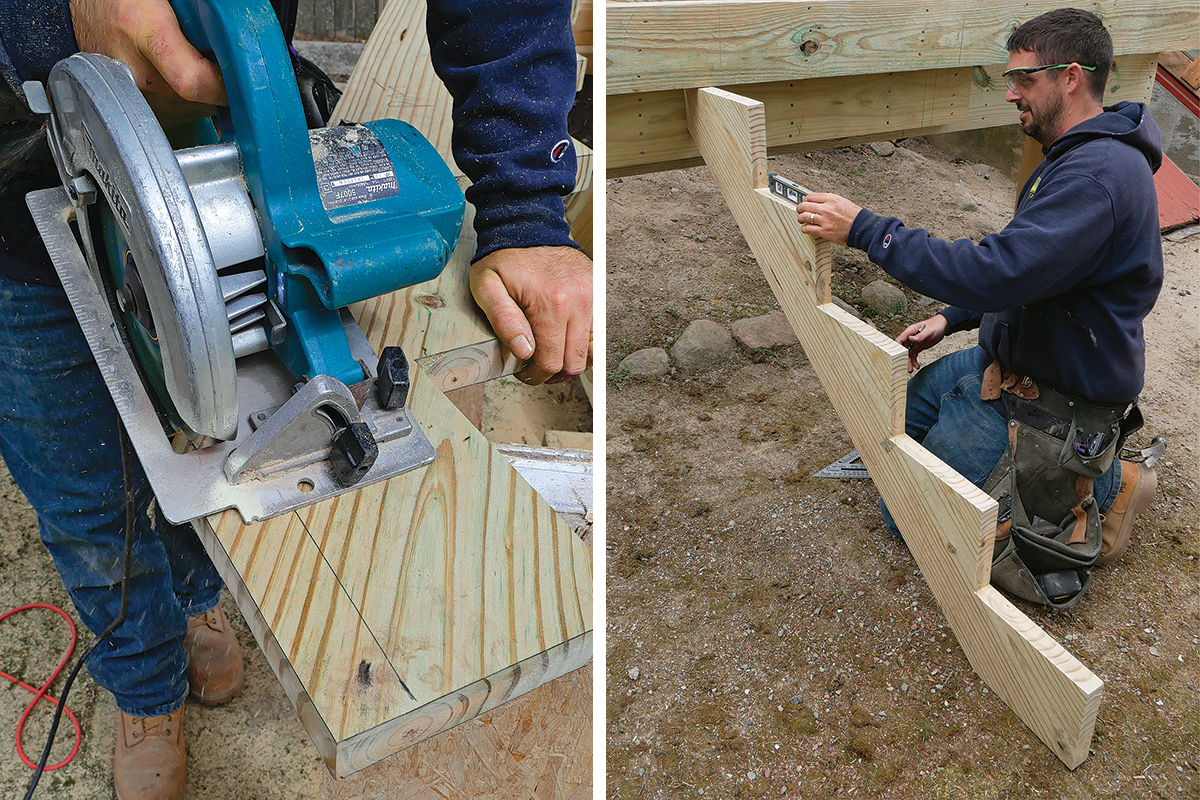
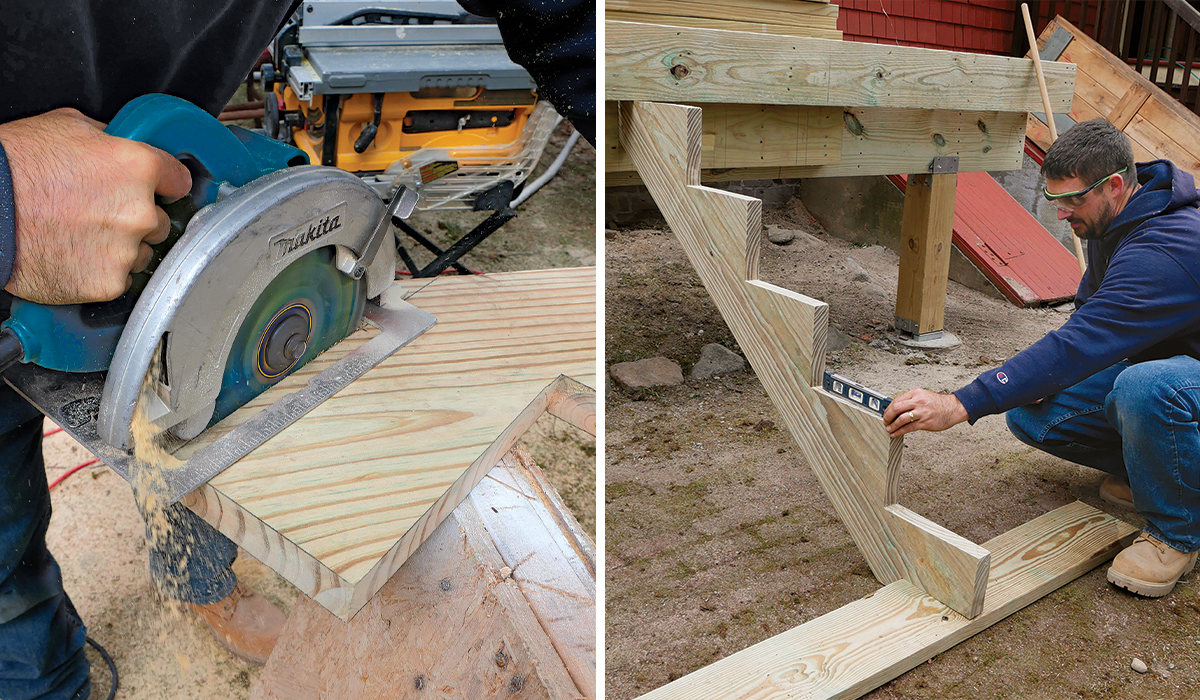
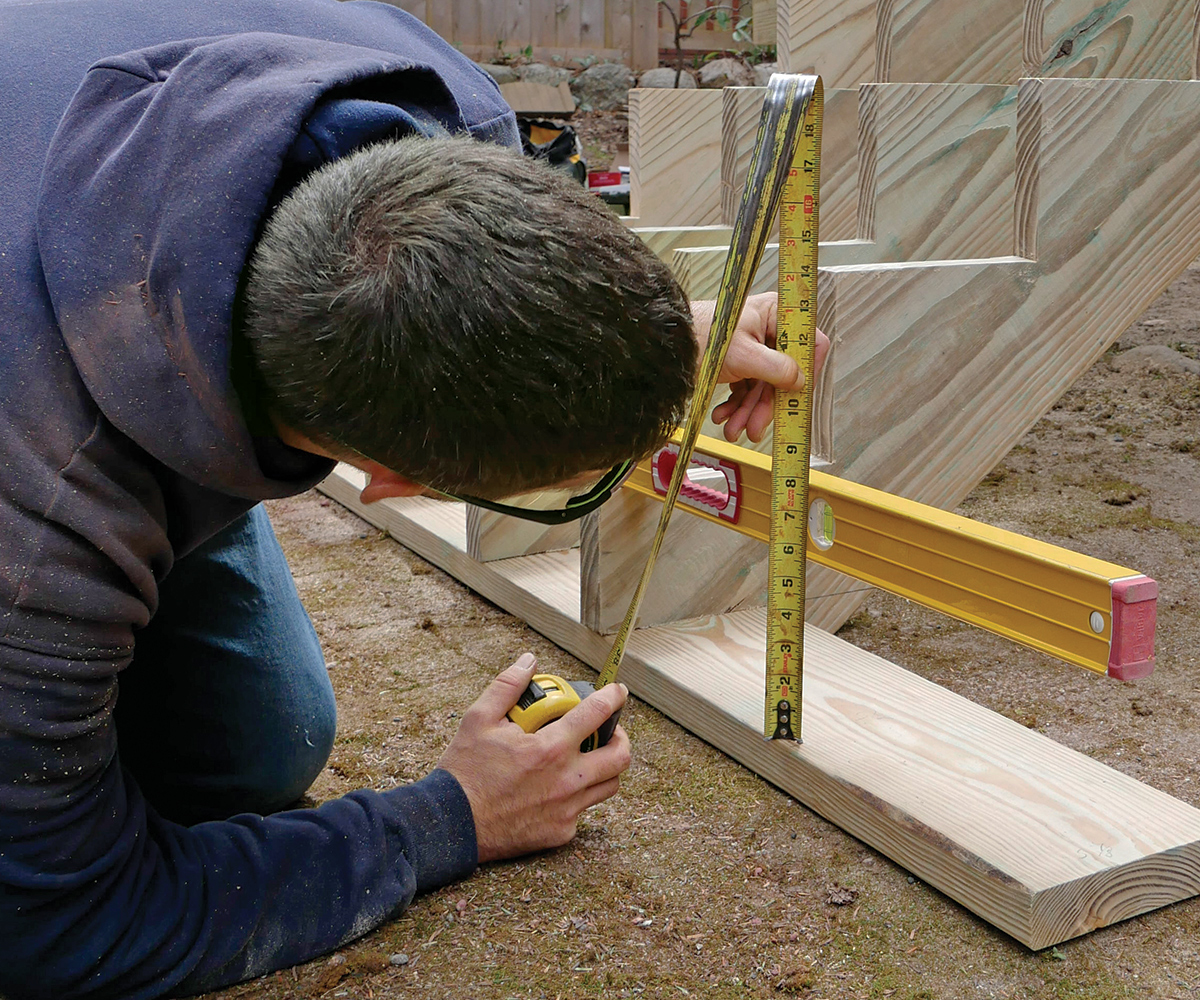
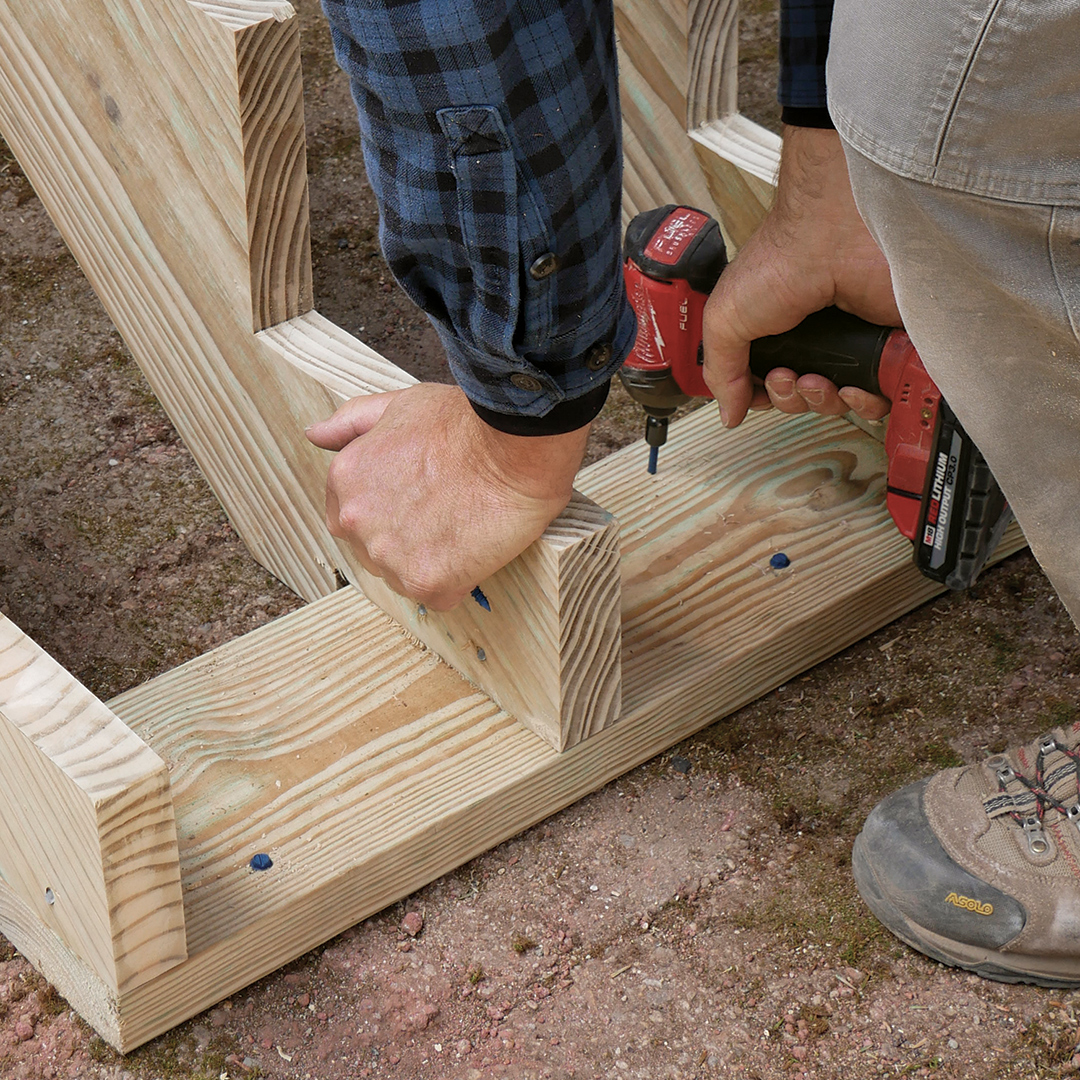
Dial in the heel cuts

frame of deck stairs

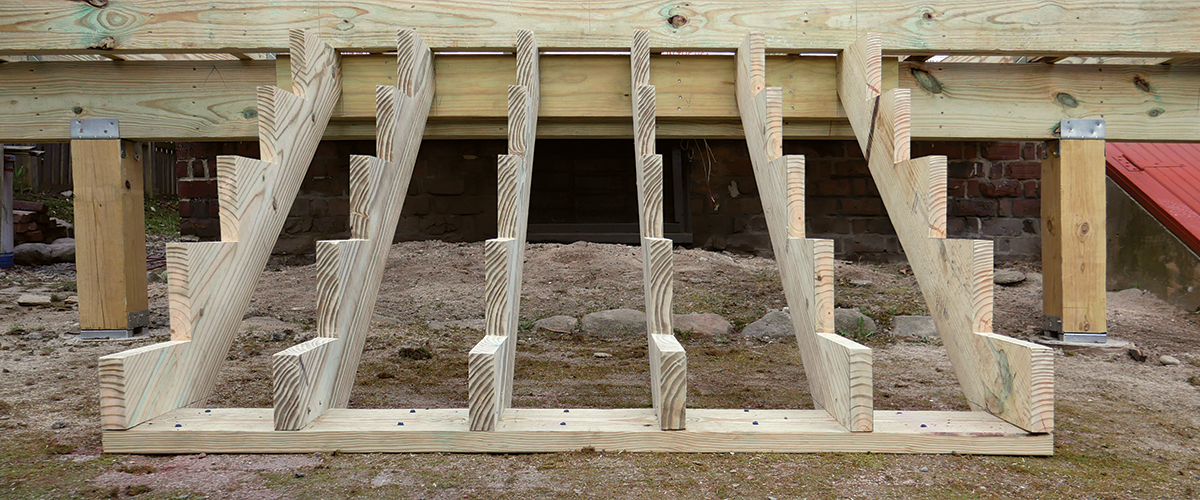
Now that the first stringer is fit, we can address the out-of-level base. All we need to do is find the riser height for the first step of each stringer so we can trim the stringers individually. Because the patio slopes from left to right, that means we’ll be taking more material off on the left and less on the right.

Incorporate the slope
Incorporate the slope. Extend a level across the first step of the first stringer. Measure the distance to the plate at the location of each additional stringer, add the plate thickness, and cut the heel before notching for the heel plate.
toenailing the stringers
Toenail in place. Position and toenail the stringers into the carrier beam to hold each in position. Then toenail the heel of the stringer to the bottom plate.

Secure the stringers to the frame
Secure the stringers to the frame. Fasten the stringers to the blocking attached to the carrier beam using structural connectors and compatible screws to make the final connection.

Lock down the heel plate
Lock down the heel plate. Use a mason’s bit to drill holes through the plate and into the brick. Then drive concrete screws, two between each stringer, to lock the plate into position.

Kevin Manning is project manager for Red House Design Build in Providence, RI. Photos by Colin Russell.

Rock-Solid Deck Stairs spread

From Fine Homebuilding #306


RELATED STORIES

  • Best Practices for Building a Deck-Stair Landing
  • Stairs to a Pitched Landing
  • Trimming Deck Stairs

Fine Homebuilding Recommended Products

Fine Homebuilding receives a commission for items purchased through links on this site, including Amazon Associates and other affiliate advertising programs.

N95 Respirator

PPE is a must, especially when cutting and sanding. We recommend you always have a box of respirator masks on the job site.
Buy at Amazon

Jigsaw

When it comes to fitting and installing decking, a cordless jigsaw is a must-have for custom cuts — especially around posts.
Buy at Amazon

Flashing and Joist Tape

Flashing joists is a great way to prolong the life of a deck frame — after all, moisture management is key to longevity.
Buy at Amazon
View PDF
Previous: Curved Deck Stairs Next: How to Avoid Sloped Stringers on Deck Stairs

Guide

Decks

Chapter

Deck Stairs

Sign up for eletters today and get the latest how-to from Fine Homebuilding, plus special offers.

Signing you up...

This site is protected by reCAPTCHA and the Google Privacy Policy and Terms of Service apply.
See all newsletters
See all newsletters

View Comments

  1. user-4953588 | Mar 19, 2022 10:13pm | #1

    3/4” decking ? Huh.

    1. Hmbldr5 | Mar 21, 2022 05:59pm | #3

      Actually, I would think 1x fir, mahogany or ipe decking is stiffer than Trex, Azek, Timbertex decking

  2. Hmbldr5 | Mar 21, 2022 05:33pm | #2

    The sill plate/heel cut should be at the back of the stringer, so the main structural portion of the stringer is properly supported to the ground/landing. Horrified to see this as the cover photo

  3. Mashabear21 | Jul 04, 2022 04:50am | #4

    Nice idea.. Thanks.
    Masha @ Arlington texas bathroom remodeling

Log in or create an account to post a comment.

Sign up Log in

Become a member and get full access to FineHomebuilding.com

Decks

Decks

Hundreds of articles and videos by top deck-building pros on how to design and build a beautiful, sturdy, and safe deck

View Project Guide

View All Project Guides »

Become a member and get unlimited site access, including the Decks Project Guide.

Start Free Trial

Design & Planning
  • Basic Design Options
  • Generating Plans
  • Calculating Deck Loads
  • Code Compliance
Tools & Materials
  • Deck Building Tools
  • Foundation and Framing Materials
  • Decking Materials
  • Fasteners and Hardware
Footings & Foundations
  • Choosing a Foundation
  • Sizing and Laying Out Footings
  • Excavation
  • Pouring the Foundation
Framing a Deck
  • Framing Overview
  • Installing the Ledger
  • Setting Posts and Beams
  • Installing Joists
Installing Decking
  • Decking Basics
  • Installation Process
  • Adding Fascia and Other Decorative Elements
Installing Railings
  • Installing Deck Railing Posts
  • Building Wood Rails and Balustrades
  • Non-Wood Railing Options
  • Installing Nonwood Balustrades
Deck Stairs
  • Deck Stairs Overview
  • Laying Out, Cutting, and Installing the Stringers
  • Installing Treads, Risers, and Stair Railings
Custom Details
  • Benches, Planters, and Privacy Features
  • Pergolas
  • Lighting
Finishes, Repairs, and Maintenance
  • Deck Finishes
  • Cleaning and Refinishing
  • Inspection and Repair
Complete Deck Builds
  • Grade-Level Decks
  • Raised Decks

Fine Home Building

Newsletter Sign-up

  • Fine Homebuilding

    Home building tips, offers, and expert advice in your inbox.

  • Green Building Advisor

    Building science and energy efficiency advice, plus special offers, in your inbox.

  • Old House Journal

    Repair, renovation, and restoration tips, plus special offers, in your inbox.

Signing you up...

This site is protected by reCAPTCHA and the Google Privacy Policy and Terms of Service apply.
See all newsletters

Follow

  • Fine Homebuilding

    Dig into cutting-edge approaches and decades of proven solutions with total access to our experts and tradespeople.

    Start Free Trial Now
    • Facebook
    • Instagram
    • X
    • LinkedIn
  • GBA Prime

    Get instant access to the latest developments in green building, research, and reports from the field.

    Start Free Trial Now
    • Facebook
    • YouTube
  • Old House Journal

    Learn how to restore, repair, update, and decorate your home.

    Subscribe Now
    • Facebook
    • Instagram
    • X

Membership & Magazine

  • Online Archive
  • Start Free Trial
  • Magazine Subscription
  • Magazine Renewal
  • Gift a Subscription
  • Customer Support
  • Privacy Preferences
  • About
  • Contact
  • Advertise
  • Careers
  • Terms of Use
  • Site Map
  • Do not sell or share my information
  • Privacy Policy
  • Accessibility
  • California Privacy Rights

© 2025 Active Interest Media. All rights reserved.

Fine Homebuilding receives a commission for items purchased through links on this site, including Amazon Associates and other affiliate advertising programs.

  • Home Group
  • Antique Trader
  • Arts & Crafts Homes
  • Bank Note Reporter
  • Cabin Life
  • Cuisine at Home
  • Fine Gardening
  • Fine Woodworking
  • Green Building Advisor
  • Garden Gate
  • Horticulture
  • Keep Craft Alive
  • Log Home Living
  • Military Trader/Vehicles
  • Numismatic News
  • Numismaster
  • Old Cars Weekly
  • Old House Journal
  • Period Homes
  • Popular Woodworking
  • Script
  • ShopNotes
  • Sports Collectors Digest
  • Threads
  • Timber Home Living
  • Traditional Building
  • Woodsmith
  • World Coin News
  • Writer's Digest
Active Interest Media logo
X
X
This is a dialog window which overlays the main content of the page. The modal window is a 'site map' of the most critical areas of the site. Pressing the Escape (ESC) button will close the modal and bring you back to where you were on the page.

Main Menu

  • How-To
  • Design
  • Tools & Materials
  • Video
  • Blogs
  • Forum
  • Project Guides
  • Reader Projects
  • Magazine
  • Members
  • FHB House

Podcasts

  • FHB Podcast
  • ProTalk

Webinars

  • Upcoming and On-Demand

Podcasts

  • FHB Podcast
  • ProTalk

Webinars

  • Upcoming and On-Demand

Popular Topics

  • Kitchens
  • Business
  • Bedrooms
  • Roofs
  • Architecture and Design
  • Green Building
  • Decks
  • Framing
  • Safety
  • Remodeling
  • Bathrooms
  • Windows
  • Tilework
  • Ceilings
  • HVAC

Magazine

  • Current Issue
  • Past Issues
  • Magazine Index
  • Subscribe
  • Online Archive
  • Author Guidelines

All Access

  • Member Home
  • Start Free Trial
  • Gift Membership

Online Learning

  • Courses
  • Project Guides
  • Reader Projects
  • Podcast

More

  • FHB Ambassadors
  • FHB House
  • Customer Support

Account

  • Log In
  • Join

Newsletter

Get home building tips, offers, and expert advice in your inbox

Signing you up...

This site is protected by reCAPTCHA and the Google Privacy Policy and Terms of Service apply.
See all newsletters
See all newsletters

Follow

  • X
  • YouTube
  • instagram
  • facebook
  • pinterest
  • Tiktok

Join All Access

Become a member and get instant access to thousands of videos, how-tos, tool reviews, and design features.

Start Your Free Trial

Subscribe

FHB Magazine

Start your subscription today and save up to 70%

Subscribe

We hope you’ve enjoyed your free articles. To keep reading, become a member today.

Get complete site access to expert advice, how-to videos, Code Check, and more, plus the print magazine.

Start your FREE trial

Already a member? Log in

Privacy Policy Update

We use cookies, pixels, script and other tracking technologies to analyze and improve our service, to improve and personalize content, and for advertising to you. We also share information about your use of our site with third-party social media, advertising and analytics partners. You can view our Privacy Policy here and our Terms of Use here.

Cookies

Analytics

These cookies help us track site metrics to improve our sites and provide a better user experience.

Advertising/Social Media

These cookies are used to serve advertisements aligned with your interests.

Essential

These cookies are required to provide basic functions like page navigation and access to secure areas of the website.

Delete My Data

Delete all cookies and associated data