FHB Logo Facebook LinkedIn Email Pinterest Twitter Instagram Tiktok YouTube Plus Icon Close Icon Navigation Search Icon Navigation Search Icon Arrow Down Icon Video Guide Icon Article Guide Icon Modal Close Icon Guide Search Icon Skip to content
Subscribe
Log In
  • How-To
  • Design
  • Tools & Materials
  • Videos
  • Blogs
  • Forum
  • Magazine
  • Members
  • FHB House
  • Podcast
Log In

Fine Homebuilding Project Guides

Decks

Guide Home
  • Design & Planning
  • Tools & Materials
  • Footings & Foundations
  • Framing a Deck
  • Installing Decking
  • Installing Railings
  • Deck Stairs
  • Custom Details
  • Finishes, Repairs, and Maintenance
  • Complete Deck Builds
How-To

How to Install Deck Rim Joists

Learn 3 ways to secure rim joists to the field joists.

By Scott Grice

There are a few different ways to install rim joists depending on the situation. Here, we will discuss two ways to install rim joists that run perpendicular to the field joists and one way to install a rim joist that runs parallel.

Method 1: Through screwing

When a beam supports the joists from below, securing the rim joist to the field joists with through screws will save time over using hangers. Also, in this situation hangers are redundant because the rim joist carries little weight. The main function of the rim joist here is to keep the joists aligned.

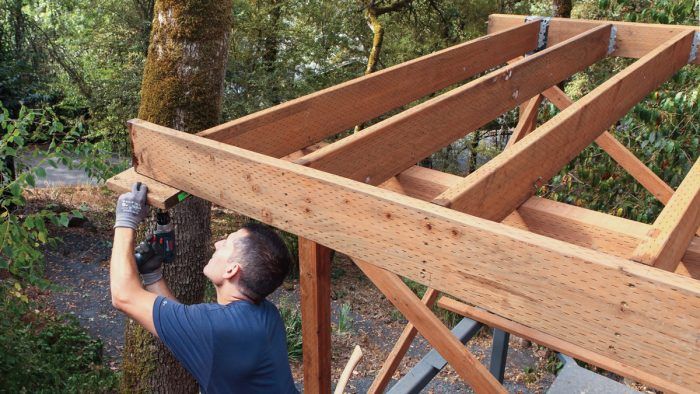
As seen in the photos below, pull and mark the joist layout on the inside face of the rim joist, and then extend the layout lines down the rim joist’s face and over the top. Be sure to mark which side of the line the field joist falls to and then start a 3-in. screw to fasten the rim joist to the field joist. If you’re working alone, start this screw in the middle so you can balance the rim joist while holding it for the installation. Align the top of the field joist with one hand and drive the screw to secure the rim joist. Align the field joist to the layout mark you made on the inside face and then permanently secure the rim joist with two more fasteners. Finally, align and secure the rim joist to the rest of the field joists with through screws in the same manner.

1. Measure and mark the joist layout on the rim joist, remembering to indicate which side of the mark the joist will fall.

2. Use a square to extend the layout marks across the face and top of the joist.

3. Start the first screw near the top of a middle joist based on the layout marks you made on the face.

4. Align the rim top to the joist and fasten it to the joist with a screw.

5. Fasten the rim joist permanently to the joist with two more through screws.

What can go wrong

If the joists are attached to the beam, you may be fighting to get everything perfectly lined up. To correct this, loosen the top screw to realign the joist plumb.

If the joists are attached to the beam, you may be fighting to get everything perfectly lined up.

Method 2: Installing hangers

If it’s not convenient to stand on the outside of the rim joist to through-screw the fasteners, installing hangers to the rim joist before fastening it in position is a good option. Two key points with this method are to make sure that layout is as accurate as possible and to check that the rim joists don’t vary in height by more than 1⁄16 in.

To install the field joists this way, begin by pulling layout across the inside rim joist face and mark the side of the layout that the field joist falls to. Use an end cut that matches the joist’s dimension to align the joist hanger on the layout 2. When the top of the end cut is flush with the top of the rim joist, drive the hanger’s tab to hold it in place and then drive 11⁄4-in. nails into the hanger holes to secure the hanger. Install all the hangers per the layout and then install the rim joist, fitting the field joists into the hanger.

1. Pull and mark layout across the face of the rim joist using a square to extend the lines from top to bottom.

2. Align a joist hanger with a scrap of lumber to the layout lines and flush with the joist top.

3. Depress the hanger tab to hold the joist in the right position.

4. Drive 11⁄4-in. Teco nails through the hanger holes to secure it to the rim joist.


Method 3: Parallel rim joist

When a rim joist runs parallel to the field joists, the installation can be quick and uncomplicated. Once the adjacent rim joists are installed and fully secured, measure between them for the rim-joist length. If you are approaching the installation from above or working alone, secure a block to the underside of the adjacent joist to act as a third-hand helper. Use the block to support one side of the rim joist while you install the other side. Last, secure the end supported by the block with 3-in. through screws.

1. Find the length of the end rim joist by hooking the tape and measuring from outside to outside.

2. Attach a block to the bottom of the adjacent rim joist to act as a third hand.

3. Position the rim joist on the block while attaching the other end.

4. Through-screw the rim joist with 31⁄2-in. screws to permanently secure it and then remove the block.

Sign up for eletters today and get the latest how-to from Fine Homebuilding, plus special offers.

Signing you up...

This site is protected by reCAPTCHA and the Google Privacy Policy and Terms of Service apply.
See all newsletters
See all newsletters
Previous: Build an Elevated Deck Series: Installing Joists Next: Site-Built Deck Drainage

Guide

Decks

Chapter

Framing a Deck

Log in or create an account to post a comment.

Sign up Log in

Become a member and get full access to FineHomebuilding.com

Decks

Decks

Hundreds of articles and videos by top deck-building pros on how to design and build a beautiful, sturdy, and safe deck

View Project Guide

View All Project Guides »

Become a member and get unlimited site access, including the Decks Project Guide.

Start Free Trial

Design & Planning
  • Basic Design Options
  • Generating Plans
  • Calculating Deck Loads
  • Code Compliance
Tools & Materials
  • Deck Building Tools
  • Foundation and Framing Materials
  • Decking Materials
  • Fasteners and Hardware
Footings & Foundations
  • Choosing a Foundation
  • Sizing and Laying Out Footings
  • Excavation
  • Pouring the Foundation
Framing a Deck
  • Framing Overview
  • Installing the Ledger
  • Setting Posts and Beams
  • Installing Joists
Installing Decking
  • Decking Basics
  • Installation Process
  • Adding Fascia and Other Decorative Elements
Installing Railings
  • Installing Deck Railing Posts
  • Building Wood Rails and Balustrades
  • Non-Wood Railing Options
  • Installing Nonwood Balustrades
Deck Stairs
  • Deck Stairs Overview
  • Laying Out, Cutting, and Installing the Stringers
  • Installing Treads, Risers, and Stair Railings
Custom Details
  • Benches, Planters, and Privacy Features
  • Pergolas
  • Lighting
Finishes, Repairs, and Maintenance
  • Deck Finishes
  • Cleaning and Refinishing
  • Inspection and Repair
Complete Deck Builds
  • Grade-Level Decks
  • Raised Decks

Fine Homebuilding

Follow

  • YouTube
  • instagram
  • facebook
  • pinterest
  • Tiktok
  • twitter

Newsletter

Get home building tips, offers, and expert advice in your inbox

Signing you up...

This site is protected by reCAPTCHA and the Google Privacy Policy and Terms of Service apply.
See all newsletters
See all newsletters

Membership & Magazine

  • Online Archive
  • Start Free Trial
  • Magazine Subscription
  • Magazine Renewal
  • Gift a Subscription
  • Customer Support
  • Privacy Preferences

Taunton Network

  • Green Building Advisor
  • Fine Woodworking
  • Fine Gardening
  • Threads
  • About
  • Contact
  • Advertise
  • Careers
  • Copyright
  • Terms of Use
  • Site Map
  • Do not sell or share my information
  • Privacy Policy
  • Accessibility
  • California Privacy Rights

© 2023 The Taunton Press, Inc. All rights reserved.

X
X
This is a dialog window which overlays the main content of the page. The modal window is a 'site map' of the most critical areas of the site. Pressing the Escape (ESC) button will close the modal and bring you back to where you were on the page.

Main Menu

  • How-To
  • Design
  • Tools & Materials
  • Video
  • Blogs
  • Forum
  • Project Guides
  • Reader Projects
  • Magazine
  • Members
  • FHB House

Podcasts

  • FHB Podcast
  • ProTalk

Webinars

  • Upcoming and On-Demand

Podcasts

  • FHB Podcast
  • ProTalk

Webinars

  • Upcoming and On-Demand

Popular Topics

  • Kitchens
  • Business
  • Bedrooms
  • Roofs
  • Architecture and Design
  • Green Building
  • Decks
  • Framing
  • Safety
  • Remodeling
  • Bathrooms
  • Windows
  • Tilework
  • Ceilings
  • HVAC

Magazine

  • Current Issue
  • Past Issues
  • Magazine Index
  • Subscribe
  • Online Archive
  • Author Guidelines

All Access

  • Member Home
  • Start Free Trial
  • Gift Membership

Shop the Store

  • Books
  • DVDs
  • Taunton Workshops

More

  • FHB Ambassadors
  • Reader Projects
  • Podcast
  • FHB House
  • Customer Support

Account

  • Log In
  • Join

Newsletter

Get home building tips, offers, and expert advice in your inbox

Signing you up...

This site is protected by reCAPTCHA and the Google Privacy Policy and Terms of Service apply.
See all newsletters
See all newsletters

Follow

  • YouTube
  • instagram
  • facebook
  • pinterest
  • Tiktok
  • twitter

Join All Access

Become a member and get instant access to thousands of videos, how-tos, tool reviews, and design features.

Start Your Free Trial

Subscribe

FHB Magazine

Start your subscription today and save up to set_percent%

Subscribe

We hope you’ve enjoyed your free articles. To keep reading, become a member today.

Get complete site access to expert advice, how-to videos, Code Check, and more, plus the print magazine.

Start your FREE trial

Already a member? Log in