FHB Logo Facebook LinkedIn Email Pinterest Twitter Instagram Plus Icon Close Icon Navigation Search Icon Arrow Down Icon Video Guide Icon Article Guide Icon Modal Close Icon Guide Search Icon Skip to content
Main Menu
Subscribe

In every issue you'll find...

  • Expert insights on techniques and principles
  • Unbiased tool reviews
  • Step-by-step details to master the job
  • Field-tested advice and know-how
Subscribe Now!
Subscribe
  • How-To
  • Design
  • Tools & Materials
  • Videos
  • Blogs
  • Forum
  • Magazine
  • Members
  • FHB House
  • Podcast
  • Join
  • Log In
Main Menu Subscribe

Fine Homebuilding Project Guides

Decks

Guide Home
Chapter
  • Design & Planning
  • Tools & Materials
  • Footings & Foundations
  • Framing a Deck
  • Installing Decking
  • Installing Railings
  • Deck Stairs
  • Custom Details
  • Finishes and Maintenance
  • Complete Deck Builds
How-To

Installing a Railing Cap

Dress up a railing with a mitered custom cap secured with top-down fasteners.

By Scott Grice
Article Image

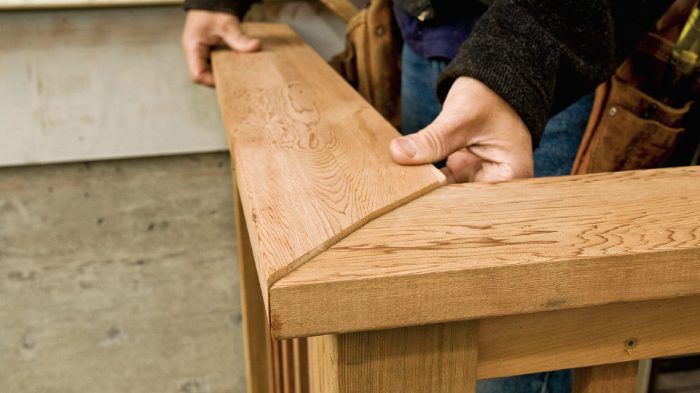
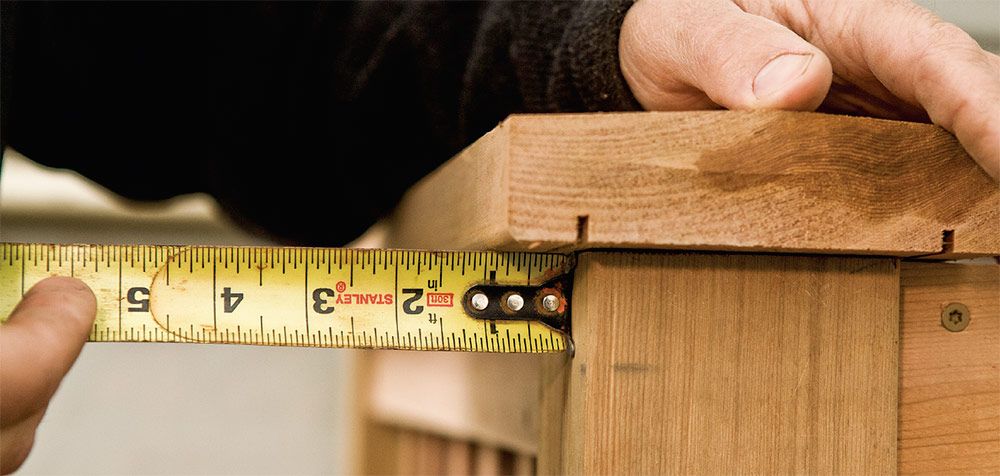
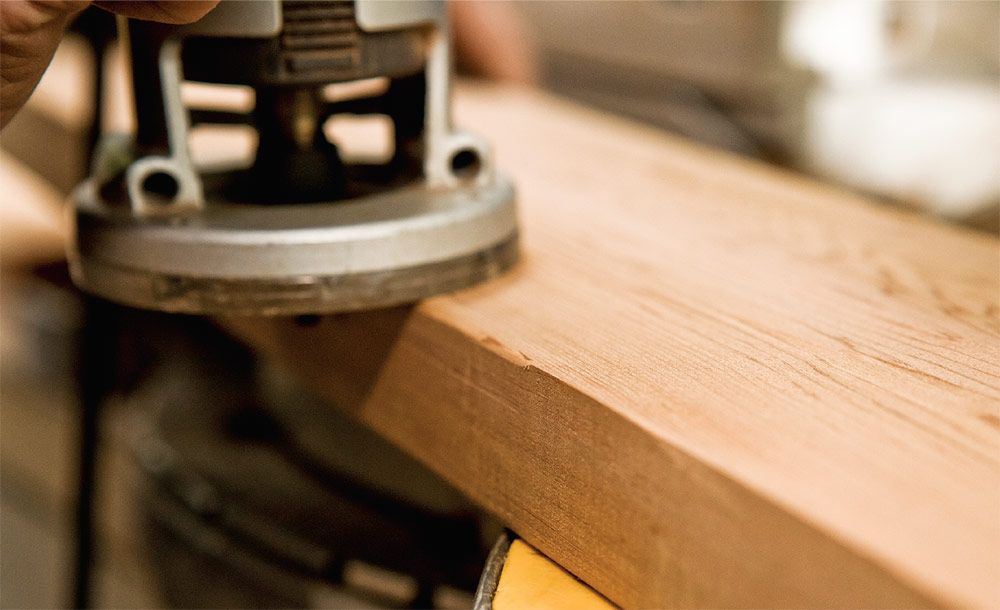
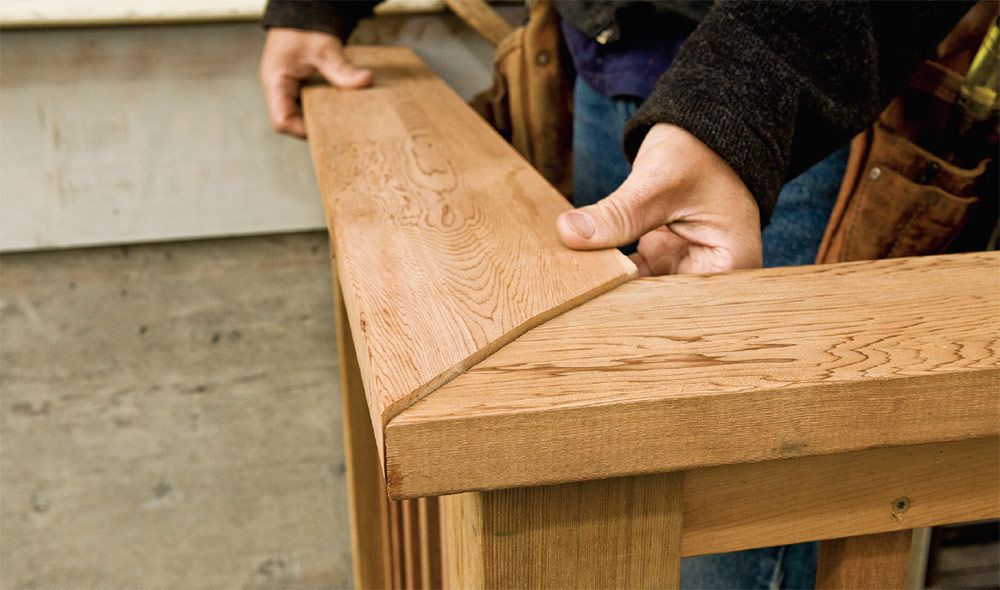
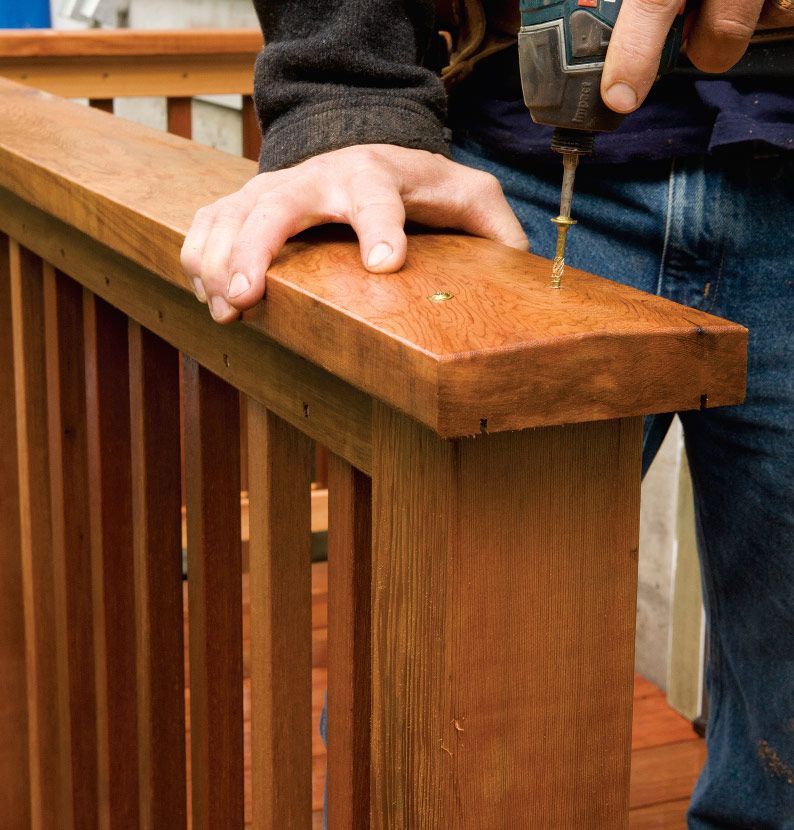
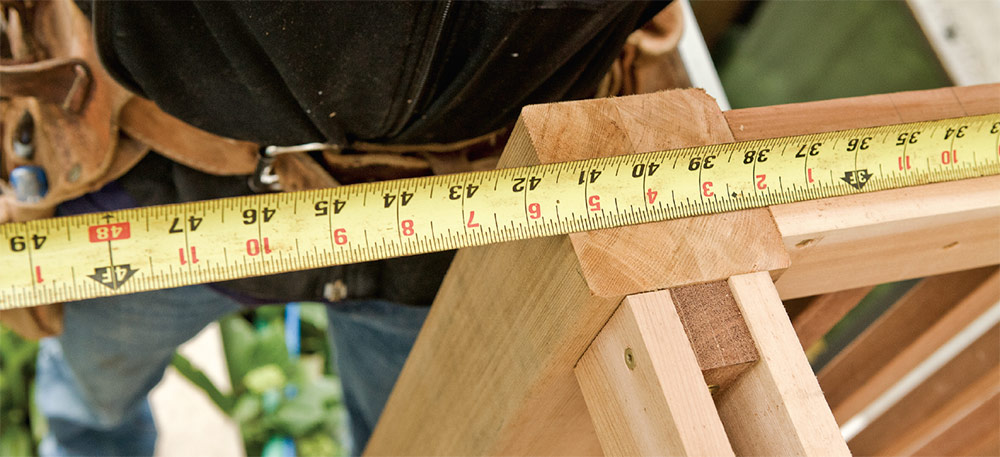
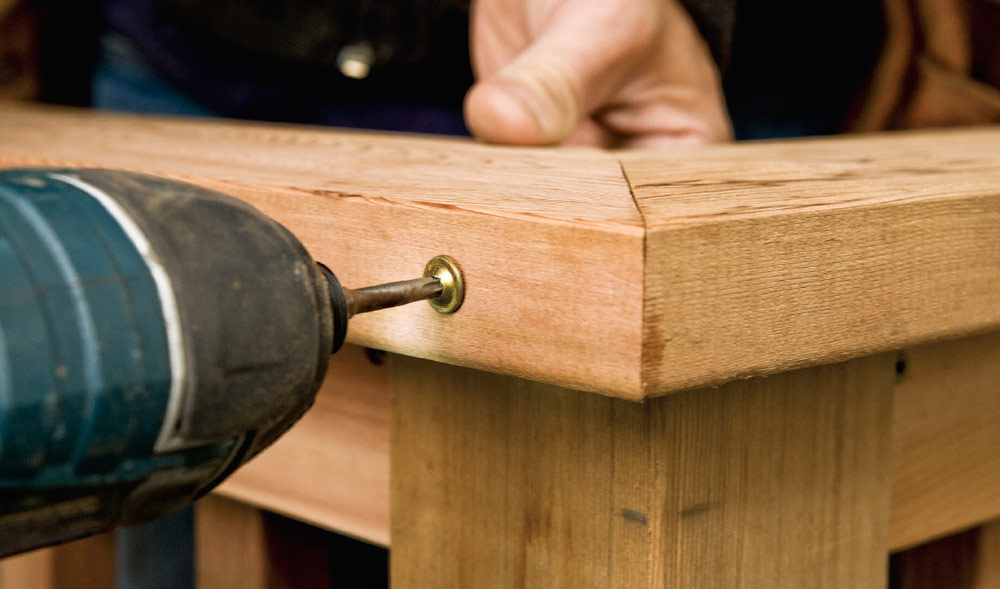
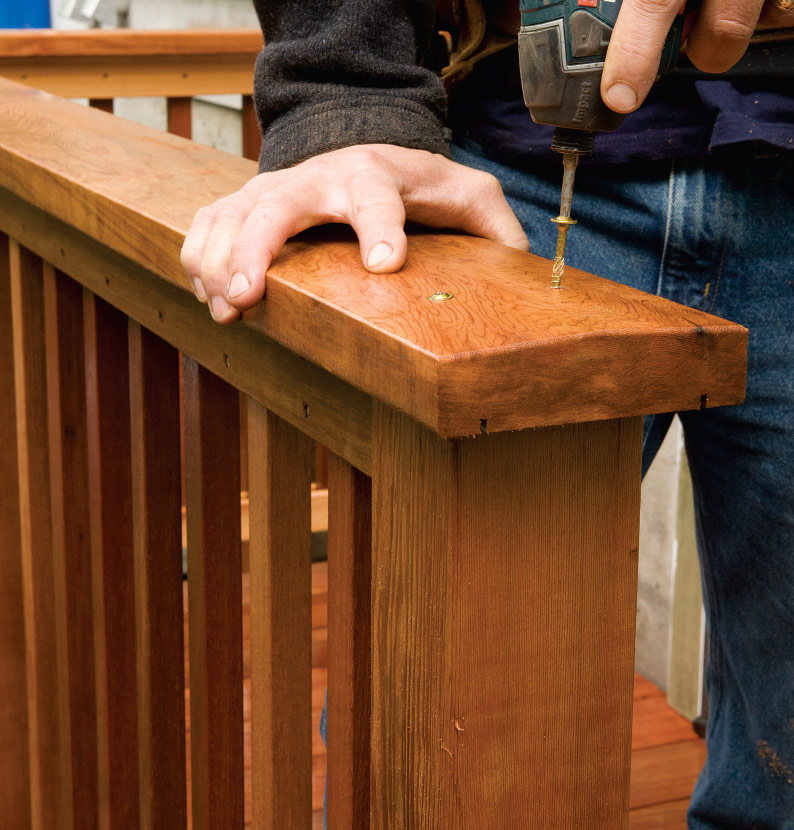
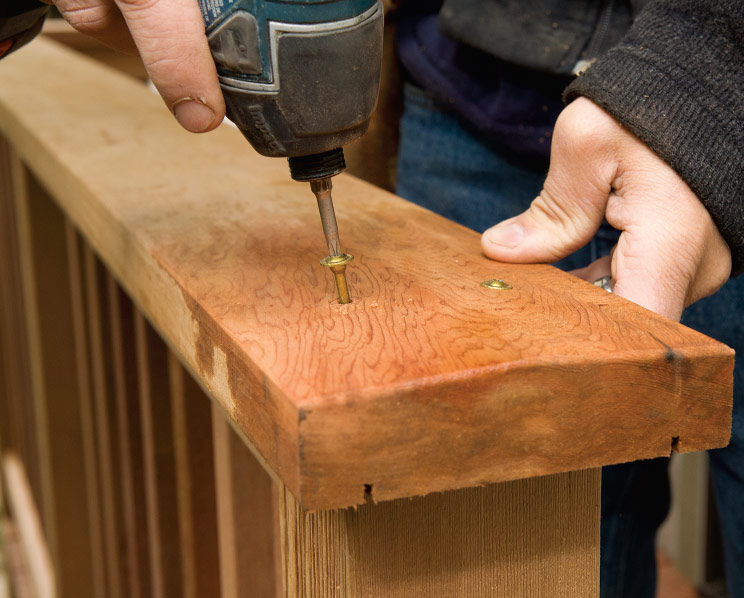
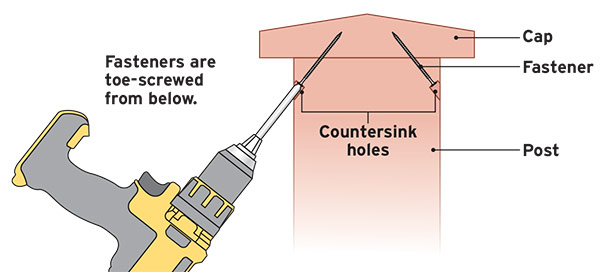
A railing cap installation is a fairly straightforward process. For the cap shown here, we used a typical top-down fastener. The challenge for this installation was at the corners. Because we beveled the top, the corner joint needed to be mitered. To make a mitered joint in the cap, first set the outside overhang, in this case 1 in. (see photos, below). Measure one length of the cap and add the overhang to get the distance to the long point of the miter. For example, if the cap length is 41-1/8 in. and the overhang is 1 in., make the piece 42-1/8 in. from one end to the long point of the miter. Before installing the cap, round over any sharp edges with the trim router. Cut both legs of the cap and then fit the miter first. To secure the miter, drive a 3-1/2-in. screw from the side. After the miter is set, secure the rest of the cap rail with top-down screws into the posts.

1. Measure the outside overhang to begin the miter calculation.


2. Add the overhang to the measured length necessary for the cap to calculate the overall length.


3. Cut the cap at a 45° miter using the overall cap length and measuring from the long point.


4. Round over any sharp edges to prevent injury and help the cap last longer.


5. Fit the miter, paying close attention to the overhang along the cap’s length.


6. Secure the miter with a fastener driven across the joint. If you like, you can also use all-weather glue in the joint.


7. Overhang the post with the cap by several inches where you will add a stair railing.


Secure the railing cap from the top
Secure the railing cap from the top with pan-head fasteners. To avoid splitting the cap, drill a pilot hole through the cap that is the same size as the fastener shank.

If you have a typical bench planer, a simple jig lets you make a custom railing cap out of standard 2x decking stockMake a Custom Railing Cap

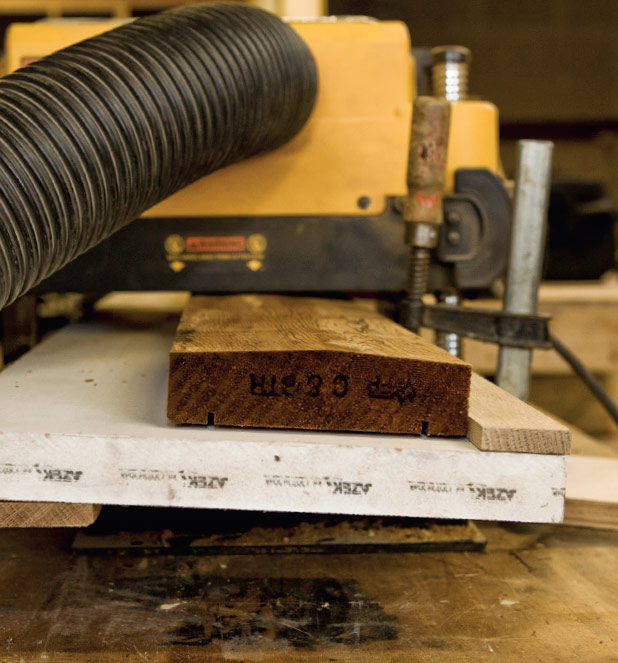
Trying to buy railing cap can be frustrating. Often what you find is expensive or of poor quality, and if you do find something you like, it’s often on back order. Fortunately, if you have a typical bench planer, a simple jig lets you make a custom railing cap out of standard 2x decking stock.

The jig consists of an auxiliary base of white shelving stock, a guide stop to hold the cap stock in place (seen here on the right fastened to the top of the auxiliary base), and a lift block to raise the auxiliary base to sit at an angle. To fashion the cap, simply plane the board to the centerline oriented from both directions.


Screw the railing from below
For Better Protection Screw from the Underside: Top-down fasteners can provide a point of water infiltration that can lead to decay. Undermounting the screws is a more difficult installation but can provide better protection from rot and produces a cleaner look.


Sign up for eletters today and get the latest how-to from Fine Homebuilding, plus special offers.

Sign Up

1. Measure the outside overhang to begin the miter calculation.

2. Add the overhang to the measured length necessary for the cap to calculate the overall length.

3. Cut the cap at a 45° miter using the overall cap length and measuring from the long point.

4. Round over any sharp edges to prevent injury and help the cap last longer.

5. Fit the miter, paying close attention to the overhang along the cap’s length.

6. Secure the miter with a fastener driven across the joint. If you like, you can also use all-weather glue in the joint.

7. Overhang the post with the cap by several inches where you will add a stair railing.

X
X
Previous: Micro-Adjust Deck-Baluster Spacing for an Eye-Deceiving Layout Next: Durable Deck Railing

Guide

Decks

Chapter

Installing Railings

Log in or create an account to post a comment.

Sign up Log in

Become a member and get full access to FineHomebuilding.com

Decks

Decks

Hundreds of articles and videos by top deck-building pros on how to design and build a beautiful, sturdy, and safe deck

View Project Guide

View All Project Guides »

Become a member and get unlimited site access, including the Decks Project Guide.

Start Free Trial

Design & Planning
  • Basic Design Options
  • Generating Plans
  • Calculating Deck Loads
  • Code Compliance
Tools & Materials
  • Deck Building Tools
  • Foundation and Framing Materials
  • Decking Materials
  • Fasteners and Hardware
Footings & Foundations
  • Choosing a Foundation
  • Sizing and Laying Out Footings
  • Excavation
  • Pouring the Foundation
Framing a Deck
  • Framing Overview
  • Installing the Ledger
  • Setting Posts and Beams
  • Installing Joists
Installing Decking
  • Decking Basics
  • Installation Process
  • Adding Fascia and Other Decorative Elements
Installing Railings
  • Installing Deck Railing Posts
  • Building Wood Rails and Balustrades
  • Non-Wood Railing Options
  • Installing Nonwood Balustrades
Deck Stairs
  • Deck Stairs Overview
  • Laying Out, Cutting, and Installing the Stringers
  • Installing Treads, Risers, and Stair Railings
Custom Details
  • Benches, Planters, and Privacy Features
  • Pergolas
  • Lighting
Finishes and Maintenance
  • Deck Finishes
  • Cleaning and Refinishing
  • Inspection and Repair
Complete Deck Builds
  • Grade-Level Decks
  • Raised Decks

Fine Homebuilding

Follow

Newsletter

Get home building tips, offers, and expert advice in your inbox

Sign Up See all newsletters

Membership & Magazine

  • Online Archive
  • Start Free Trial
  • Magazine Subscription
  • Magazine Renewal
  • Gift a Subscription
  • Customer Support
  • Manage Preferences

Taunton Network

  • Green Building Advisor
  • Fine Woodworking
  • Fine Gardening
  • Threads
  • About
  • Contact
  • Advertise
  • Privacy Policy
  • Careers
  • Copyright
  • Terms of Use
  • Accessibility
  • CA Privacy Rights

© 2021 The Taunton Press, Inc. All rights reserved.

    Main Menu

  • How-To
  • Design
  • Tools & Materials
  • Video
  • Blogs
  • Forum
  • Reader Projects
  • Magazine
  • Members
  • FHB House
  • Podcasts

  • FHB Podcast
  • ProTalk
  • Account

  • Log In
  • Join

    Podcasts

  • FHB Podcast
  • ProTalk
  • Popular Topics

  • Kitchens
  • Business
  • Bedrooms
  • Roofs
  • Architecture and Design
  • Green Building
  • Decks
  • Framing
  • Safety
  • Remodeling
  • Bathrooms
  • Windows
  • Tilework
  • Ceilings
  • HVAC

    Magazine

  • Current Issue
  • Past Issues
  • Magazine Index
  • Subscribe
  • Online Archive
  • Author Guidelines

    All Access

  • Member Home
  • Start Free Trial
  • Gift Membership

    Shop the Store

  • Books
  • DVDs
  • Taunton Workshops

    More

  • FHB Ambassadors
  • Reader Projects
  • Podcast
  • Customer Support

    Account

  • Log In
  • Join

Newsletter

Get home building tips, offers, and expert advice in your inbox

Sign Up See all newsletters

Follow

Join All Access

Become a member and get instant access to thousands of videos, how-tos, tool reviews, and design features.

Start Your Free Trial

Subscribe

FHB Magazine

Start your subscription today and save up to 52%

Subscribe

We hope you’ve enjoyed your free articles. To keep reading, become a member today.

Get complete site access to expert advice, how-to videos, Code Check, and more, plus the print magazine.

Start your FREE trial

Already a member? Log in