FHB Logo Facebook LinkedIn Email Pinterest Twitter Instagram Plus Icon Close Icon Navigation Search Icon Navigation Search Icon Arrow Down Icon Video Guide Icon Article Guide Icon Modal Close Icon Guide Search Icon Skip to content
Subscribe
Log In
  • How-To
  • Design
  • Tools & Materials
  • Videos
  • Blogs
  • Forum
  • Magazine
  • Members
  • FHB House
  • Podcast
Log In

Fine Homebuilding Project Guides

Decks

Guide Home
  • Design & Planning
  • Tools & Materials
  • Footings & Foundations
  • Framing a Deck
  • Installing Decking
  • Installing Railings
  • Deck Stairs
  • Custom Details
  • Finishes, Repairs, and Maintenance
  • Complete Deck Builds
Ask the Experts

Sloping a Deck: Is This Necessary?

Mike Guertin explains which areas of a deck you need to pay attention to in order to deal with drainage.

By Mike Guertin Issue 314 - April/May 2023
On the level. Unlike a poured slab, a stone patio, or the ground beneath a deck, a deck itself does not need to be sloped. Prevent water from getting trapped between the house and the deck by leaving a gap between the first deck board and the flashing. Drawing: Peter Wojcieszek

I’m having a deck built and the contractor recommends sloping the deck by several inches. He said this will help water flow away from the house. Is this necessary? I’d prefer the deck to be nice and level.

—Susan Kinney, via email

Editorial advisor Mike Guertin replies: If you were laying a stone patio or pouring a concrete slab against the house, then yes, those would need to be sloped so that rainwater can drain away. Keeping excess water away from your home helps keep basements dry and protects foundations against damage from freeze-thaw cycles.

Some contractors follow this same sloped-draining logic when building decks, but it’s not necessary. Decks are usually built with wood or synthetic boards that have spaces of 1/4 in. to 3/16 in. between them, allowing rainwater to drain through the nearest gap. (I do always recommend that the soil beneath the deck be graded to slope away from the house before the deck is built.)

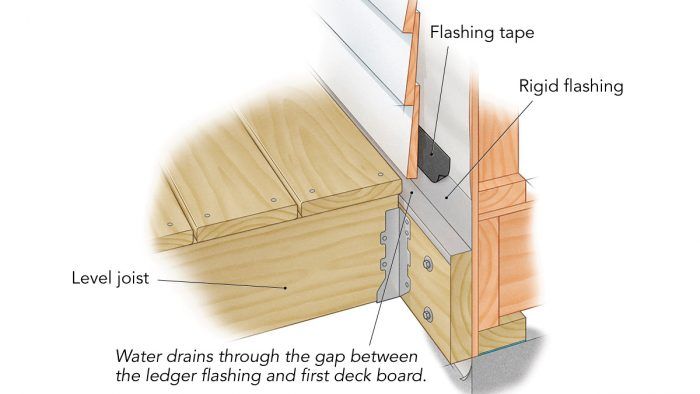
When a deck is built level, the one drainage area you need to pay attention to is where the first deck board runs along the house. If the board is pushed tight up against the flashing, there is a risk that water could be trapped, which could potentially cause wood deck boards to rot in that area. If the deck builder leaves a gap between the board and the flashing, the water will drain harmlessly through.

From Fine Homebuilding #314


RELATED STORIES

  • How to Create a Site Plan
  • Site-Built Deck Drainage
  • 5 Steps for Flashing a Deck Ledger

Sign up for eletters today and get the latest how-to from Fine Homebuilding, plus special offers.

Signing you up...

This site is protected by reCAPTCHA and the Google Privacy Policy and Terms of Service apply.
See all newsletters
See all newsletters
Previous: Deck Elevation and Detail Drawings Next: How it Works: Deck Loads

Guide

Decks

Chapter

Design & Planning

View Comments

  1. ct_yankee | Mar 07, 2023 07:27pm | #1

    In snow country, I would never build a deck level and would always pitch it away from the house wall(s). Doesn't have to be an extreme slope, say 3/16"-1/4" per foot. The phenomena I try to avoid is a crusty snow covered deck followed by rain. The warm of the house walls will tend to melt some of the snow along the wall, resulting in a slight gap which will capture much of the rainwater running off the snow crust. This can really challenge the efficacy of the flashing between the deck attachment and the house wall.
    I'd rather encourage rainwater to drain away from the house under almost all common situations.

Log in or create an account to post a comment.

Sign up Log in

Become a member and get full access to FineHomebuilding.com

Decks

Decks

Hundreds of articles and videos by top deck-building pros on how to design and build a beautiful, sturdy, and safe deck

View Project Guide

View All Project Guides »

Become a member and get unlimited site access, including the Decks Project Guide.

Start Free Trial

Design & Planning
  • Basic Design Options
  • Generating Plans
  • Calculating Deck Loads
  • Code Compliance
Tools & Materials
  • Deck Building Tools
  • Foundation and Framing Materials
  • Decking Materials
  • Fasteners and Hardware
Footings & Foundations
  • Choosing a Foundation
  • Sizing and Laying Out Footings
  • Excavation
  • Pouring the Foundation
Framing a Deck
  • Framing Overview
  • Installing the Ledger
  • Setting Posts and Beams
  • Installing Joists
Installing Decking
  • Decking Basics
  • Installation Process
  • Adding Fascia and Other Decorative Elements
Installing Railings
  • Installing Deck Railing Posts
  • Building Wood Rails and Balustrades
  • Non-Wood Railing Options
  • Installing Nonwood Balustrades
Deck Stairs
  • Deck Stairs Overview
  • Laying Out, Cutting, and Installing the Stringers
  • Installing Treads, Risers, and Stair Railings
Custom Details
  • Benches, Planters, and Privacy Features
  • Pergolas
  • Lighting
Finishes, Repairs, and Maintenance
  • Deck Finishes
  • Cleaning and Refinishing
  • Inspection and Repair
Complete Deck Builds
  • Grade-Level Decks
  • Raised Decks

Fine Homebuilding

Follow

  • twitter
  • facebook
  • instagram
  • pinterest

Newsletter

Get home building tips, offers, and expert advice in your inbox

Signing you up...

This site is protected by reCAPTCHA and the Google Privacy Policy and Terms of Service apply.
See all newsletters
See all newsletters

Membership & Magazine

  • Online Archive
  • Start Free Trial
  • Magazine Subscription
  • Magazine Renewal
  • Gift a Subscription
  • Customer Support
  • Privacy Preferences

Taunton Network

  • Green Building Advisor
  • Fine Woodworking
  • Fine Gardening
  • Threads
  • About
  • Contact
  • Advertise
  • Careers
  • Copyright
  • Terms of Use
  • Site Map
  • Do not sell or share my information
  • Privacy Policy
  • Accessibility
  • California Privacy Rights

© 2023 The Taunton Press, Inc. All rights reserved.

X
X
This is a dialog window which overlays the main content of the page. The modal window is a 'site map' of the most critical areas of the site. Pressing the Escape (ESC) button will close the modal and bring you back to where you were on the page.

Main Menu

  • How-To
  • Design
  • Tools & Materials
  • Video
  • Blogs
  • Forum
  • Reader Projects
  • Magazine
  • Members
  • FHB House

Podcasts

  • FHB Podcast
  • ProTalk

Webinars

  • Upcoming and On-Demand

Podcasts

  • FHB Podcast
  • ProTalk

Webinars

  • Upcoming and On-Demand

Popular Topics

  • Kitchens
  • Business
  • Bedrooms
  • Roofs
  • Architecture and Design
  • Green Building
  • Decks
  • Framing
  • Safety
  • Remodeling
  • Bathrooms
  • Windows
  • Tilework
  • Ceilings
  • HVAC

Magazine

  • Current Issue
  • Past Issues
  • Magazine Index
  • Subscribe
  • Online Archive
  • Author Guidelines

All Access

  • Member Home
  • Start Free Trial
  • Gift Membership

Shop the Store

  • Books
  • DVDs
  • Taunton Workshops

More

  • FHB Ambassadors
  • Reader Projects
  • Podcast
  • FHB House
  • Customer Support

Account

  • Log In
  • Join

Newsletter

Get home building tips, offers, and expert advice in your inbox

Signing you up...

This site is protected by reCAPTCHA and the Google Privacy Policy and Terms of Service apply.
See all newsletters
See all newsletters

Follow

  • twitter
  • facebook
  • instagram
  • pinterest

Join All Access

Become a member and get instant access to thousands of videos, how-tos, tool reviews, and design features.

Start Your Free Trial

Subscribe

FHB Magazine

Start your subscription today and save up to 70%

Subscribe

We hope you’ve enjoyed your free articles. To keep reading, become a member today.

Get complete site access to expert advice, how-to videos, Code Check, and more, plus the print magazine.

Start your FREE trial

Already a member? Log in